Build a Private AI Assistant with Self-Hosted n8n on a VPS - Telegram Bot, Gmail Digest, Memory, Custom Domain and Backups
In this blog post we are going to build a private AI assistant that lives on Telegram, remembers you, reads your inbox on demand, and sends you a triaged email briefing every morning at 7 - all running on your own server with n8n, self-hosted on a VPS for roughly the price of two coffees a month.
This is the companion guide for my YouTube video on the same topic. The video was sponsored by Hostinger, and the VPS I use below is the one from the video, but every step works on any VPS where you can run Docker - the only Hostinger-specific part is the one-click n8n template. I have added the recording slides as a step-by-step viewer, and every screenshot from the n8n canvas, so you can follow along without pausing the video every ten seconds.
Table of Content
- What we are going to build and why self-host
- The slides - step by step
- Part 1 - Get the server and deploy n8n (one-click)
- Part 2 - Your first workflow, the 7 AM Gmail digest
- Part 3 - Custom domain and SSL through Cloudflare
- Part 4 - The assistant, brain plus memory plus Gmail tool
- Part 5 - Backups, snapshots and safe updates
- Troubleshooting - webhooks, OAuth and the gotchas
- Conclusion
1. What we are going to build and why self-host
Build a private AI assistant that lives on Telegram, remembers you, reads your inbox on demand, and sends you a triaged email briefing every morning at 7 — all running on your own server with n8n, self-hosted on a Hostinger VPS.
🎁 Get the exact VPS used here: hostinger.com/RAHULWAGH — coupon RAHULWAGH gives an extra 10% off on top of yearly-plan pricing.
Why self-host instead of n8n Cloud?
| n8n Cloud | Self-hosted (KVM 2 VPS) | |
|---|---|---|
| Price | from €20+/month | €7.79/month (24-mo term) |
| Workflow runs | capped | unlimited |
| Your data | their infrastructure | your server |
| Root access | no | yes |
What you'll build:
- n8n running via Hostinger's one-click template (no Docker knowledge needed)
- A custom domain with SSL, proxied through Cloudflare
- W1 — Assistant Core: Telegram bot + AI agent + per-chat memory
- W2 — Inbox powers: ask-your-inbox Gmail tool + a scheduled 7 AM digest
- Backups, snapshots and safe n8n updates — including a live restore demo
Why self-hosted and not n8n Cloud? Three reasons which matter to me - unlimited workflow runs for a flat price, my email never leaves a server I control, and root access, so I can run Docker and anything else next to n8n. The trade-off is that backups and updates are on you, which is exactly what Part 5 covers.
2. The slides - step by step
These are the slides I used while recording. Click a slide in the rail, or use Prev / Next or the arrow keys, and click a slide to see it full screen. The numbers match the parts below.
3. Part 1 - Get the server and deploy n8n (one-click)
1.1 Get the VPS
- Hostinger → Services → VPS → self-hosted n8n landing page
- Plan: KVM 2 — 2 vCPU / 8 GB RAM / 100 GB NVMe on AMD EPYC. More than enough for everything in this guide, with room to upgrade.
- Pick the 24-month term (lowest monthly price) → add to cart
- Apply coupon RAHULWAGH at checkout — watch the price drop
1.2 Deploy n8n (one-click)
- VPS dashboard → Setup → choose the server location nearest to you
- ⚠️ On the application step select the n8n template — not plain Ubuntu. (If two n8n entries appear, pick the Docker-based one.)
- Optional features: Malware scanner (free — take it). Docker manager is optional.
- Set a strong root password — store it in a password manager, you'll SSH later
- Finish setup → ~5–10 min → status Running + your server IP
After install, Docker Manager shows two containers: n8n-xxxx and traefik.
Traefik is the reverse proxy that auto-provisions HTTPS — SSL handled out of the box.
1.3 First login
- VPS page → Manage App → n8n opens at
https://n8n-xxxx.srvXXXXXXX.hstgr.cloud(already HTTPS ✅) - Create the n8n owner account (local to this server, not an n8n.io account)
- Claim the free license key: n8n emails it → Settings → Usage & plan → Enter activation key
1# verify SSH access while you're here
2ssh root@YOUR_SERVER_IP
If you are not on Hostinger - the template is just n8n plus Traefik in Docker Compose. On any Ubuntu VPS, install Docker, then use the official n8n
docker-compose.ymlwith Traefik from the n8n docs. The rest of this guide is identical. If you have never added an SSH key permanently, this post shows how.
4. Part 2 - Your first workflow, the 7 AM Gmail digest
What we're building: a workflow that wakes up at 7 AM, reads your unread Gmail, has AI sort it by urgency, and sends the digest to your Telegram — every day, without you.
1Schedule (7:00) → Gmail: get unread → Aggregate → AI triage → Telegram
2.1 Prerequisites (10 min, one-time)
A. Telegram bot — the assistant's mouth:
- In Telegram, search @BotFather (blue verified check) → send
/newbot - Display name:
Jarvis→ username: anything ending inbot(e.g.JarvisByRahul_bot) - Copy the HTTP API token it replies with — treat it like a password
- In n8n: Overview → Credentials → Add credential → Telegram API → paste the token → Save → "Connection tested" ✅
- Get your own chat id (the digest's destination): press Start on your bot and send it any message, then open this URL in your browser (with your bot token):
`https://api.telegram.org/bot
/getUpdates` → find `"chat":{"id":123456789,...}` — that number is your chat id. (Alternative: message the bot `userinfobot` — but beware of clones; the getUpdates way needs no third party.)
B. Google OAuth — n8n's permission to read your mail:
- In n8n: Overview → Credentials → Add credential → Gmail OAuth2 API → copy the OAuth Redirect URL shown at the top (keep this dialog open)
- console.cloud.google.com → create/select a project → search Gmail API → Enable
- Google Auth Platform → Clients → Create Client → Application type: Web application → name it
n8n→ under Authorized redirect URIs click + Add URI → paste the redirect URL → Create (leave "JavaScript origins" empty) - Copy the Client ID and Client Secret from the popup → paste both into the open n8n dialog → Sign in with Google
- ⚠️ "Google hasn't verified this app" is expected — it's YOUR app accessing YOUR account: Advanced → Go to <project> (unsafe) → Allow → back in n8n: "Account connected" ✅
2.2 Create the workflow + Schedule Trigger
- Overview → Workflows → Create workflow (orange, top right) — a blank canvas opens
- Click the workflow name ("My workflow") top-left → rename to
W2 - Morning Digest - Click the big "Add first step…" square → a panel opens: "What triggers this workflow?"
- Choose On a schedule
- In the node settings set: Trigger Interval Days · Days Between Triggers 1 · Trigger at Hour 7am · Trigger at Minute 0
- Click anywhere on the dark canvas to close the node. You'll see your first node with a small clock icon.
2.3 Node 2 — Gmail: get the unread mail
- Click the small + on the right edge of the Schedule node → a search panel opens ("What happens next?")
- Type
gmail→ pick Gmail → under Message Actions choose Get many messages - In the node settings:
- Credential: your Gmail account from 2.1 is pre-selected
- Resource: Message · Operation: Get Many
- Return All: OFF · Limit:
30 - Simplify: ON
- Under Filters click Add Filter → Read Status → choose Unread emails only
- Click Execute step (top right of the node) → the right OUTPUT panel fills with your real unread emails. If you see them — Gmail is wired. 🎉
2.4 Node 3 — Aggregate: 30 emails → 1 item
Why: n8n runs the NEXT node once per item. 30 emails would mean 30 separate AI calls. Aggregate merges them into one item first → one AI call.
- + after the Gmail node → search
aggregate→ pick Aggregate - Settings:
- Aggregate: All Item Data (Into a Single List)
- Put Output in Field:
data - Include: change All Fields → Specified Fields
- Fields To Include:
From, Subject, snippet, labels💰 The AI only needs sender/subject/preview — this cuts tokens roughly 80%.
- Execute step → OUTPUT shows 1 item containing a
dataarray of slim emails.
2.5 Node 4 — the AI brain (Basic LLM Chain)
- + after Aggregate → search
basic llm→ pick Basic LLM Chain (Chain, not AI Agent — no tools or decisions needed here, so it's cheaper and faster.) - The node lands on the canvas with an empty Model socket hanging below it. Click the + under "Model" → choose OpenAI Chat Model
- Credential → Create new → paste your OpenAI API key (platform.openai.com → API keys; add billing credits first — separate from ChatGPT Plus) → Save
- Model:
gpt-4o→ close this sub-node - Double-click the Basic LLM Chain node → set Source for Prompt (User Message) → Define below → paste into the Prompt field:
 1You are an email triage assistant. Here are today's unread emails as JSON:
 2
 3{{ JSON.stringify($json.data) }}
 4
 5Write a short Telegram morning digest:
 6- Start with "☀️ Good morning Rahul. X unread emails."
 7- "🔴 Need reply:" (sender + one-line why) — only genuinely personal/actionable
 8- "🟡 Worth reading:" max 3
 9- "⚪ Ignore:" just the count (newsletters, promos, notifications)
10Keep it under 150 words. No markdown headers, just the emoji lines.
2.6 Node 5 — deliver to Telegram
- + after the LLM Chain → search
telegram→ pick Telegram → Send a text message - Settings:
- Credential: the bot from 2.1 (pre-selected)
- Resource: Message · Operation: Send Message
- Chat ID: type your numeric id from step 2.1-A5 (plain number, no expression needed)
- Text: click the field → switch to Expression → enter
{{ $json.text }}— the preview below shows the digest - Add Field → Append n8n Attribution → OFF (otherwise every message ends with an n8n ad)
- Execute step → 📱 your phone buzzes with the digest.
2.7 Test end-to-end, then make it live
- Back on the canvas, click Execute workflow (bottom center) — watch all five nodes light up green left to right
- Click Publish (top right) → name the version (e.g.
v1) → Publish - That's it: tomorrow at 7:00 the digest arrives without you touching anything.
🔍 See it run: the Executions tab (top of the canvas) logs every run — click one to inspect exactly what each node received and produced. Your best friend when debugging.
5. Part 3 - Custom domain and SSL through Cloudflare
Your assistant deserves a real address — and routing it through Cloudflare gives you
free edge SSL, DDoS protection, and webhook delivery that never depends on a lone VPS IP.
This guide uses jarvis.jhooq.org — substitute your own domain everywhere.
3.1 Domain on Cloudflare
- dash.cloudflare.com → Add a domain → Connect a domain → enter your domain → Free plan → Continue through the DNS review
- Cloudflare assigns 2 nameservers → set them at your registrar (Squarespace/GoDaddy/Namecheap: Domains → your domain → Nameservers → custom) → wait for Cloudflare's "Active" email One-time step, 15 min – a couple of hours. Do it before recording/build day; everything after is instant.
- DNS → Add record:
- Type
A· Namejarvis· IPv4 = your VPS IP (e.g.46.202.190.90) - Proxy status: Proxied 🟠 — the orange cloud is the whole point: traffic enters Cloudflare's network and your real IP stays hidden
- Type
- SSL/TLS → Overview → encryption mode Full
(plain Full, not "Full (strict)" — your origin's certificate carries the original
n8n-xxxx.srv…name, and plain Full accepts that)
3.2 Point n8n at the new domain
SSH into the VPS (or use hPanel's Browser terminal) and run — adjust the domain if yours differs:
 1cd /docker/n8n-*        # your app dir — e.g. /docker/n8n-nohc
 2cp docker-compose.yml docker-compose.yml.bak
 3
 4# 1) Traefik: also answer on jarvis.jhooq.org (the original URL keeps working)
 5sed -i 's#rule=Host(`${COMPOSE_PROJECT_NAME}.${TRAEFIK_HOST}`)#rule=Host(`${COMPOSE_PROJECT_NAME}.${TRAEFIK_HOST}`) || Host(`jarvis.jhooq.org`)#' docker-compose.yml
 6
 7# 2) n8n: register all webhooks (Telegram!) on the armored address
 8sed -i 's#WEBHOOK_URL=https://${COMPOSE_PROJECT_NAME}.${TRAEFIK_HOST}/#WEBHOOK_URL=https://jarvis.jhooq.org/#' docker-compose.yml
 9
10docker compose up -d    # recreate — workflows & credentials survive (n8n_data volume)
What the two edits do:
| Edit | Effect |
|---|---|
|| Host(\jarvis.jhooq.org`)` | Traefik (reverse proxy) accepts requests for the new hostname |
WEBHOOK_URL=https://jarvis.jhooq.org/ | n8n registers future webhooks (Telegram trigger!) on the proxied domain |
3.3 Verify
- Open
https://jarvis.jhooq.org→ n8n loads with a green padlock (Cloudflare's edge certificate) - The old
https://n8n-xxxx.srvXXXXXXX.hstgr.cloudURL still works — nothing broke
💡 Why this order matters: we set the proxied domain up before building the Telegram-triggered assistant (Part 4). Telegram will learn the Cloudflare address on its very first webhook registration — no stale-DNS gotchas, maximum delivery reliability. If you ever migrate an already-registered bot to a proxied domain, see Troubleshooting → "DNS-cache gotcha".
Note - the two
sededits above change the Traefik router rule and theWEBHOOK_URLinsidedocker-compose.yml. If you prefer to edit the file by hand, that is perfectly fine - I have a post on editing files inside and around Docker containers. And if your SSL mode is wrong you will see the classic certificate error, which I have covered in 2 ways to fix the self-signed certificate in certificate chain error.
6. Part 4 - The assistant, brain plus memory plus Gmail tool
4.1 Create the Telegram bot
- In Telegram, search @BotFather →
/newbot - Display name:
Jarvis· username: anything ending inbot(e.g.JarvisByRahul_bot) - Copy the HTTP API token — treat it like a password (leak?
/revokeregenerates)
You'll also need an OpenAI API key: platform.openai.com → Billing (add credits — separate from ChatGPT Plus) → API keys → create → copy immediately.
4.2 Telegram Trigger
- n8n → Create workflow → name it
W1 - Assistant Core - Add first step → On app event → search Telegram → On message
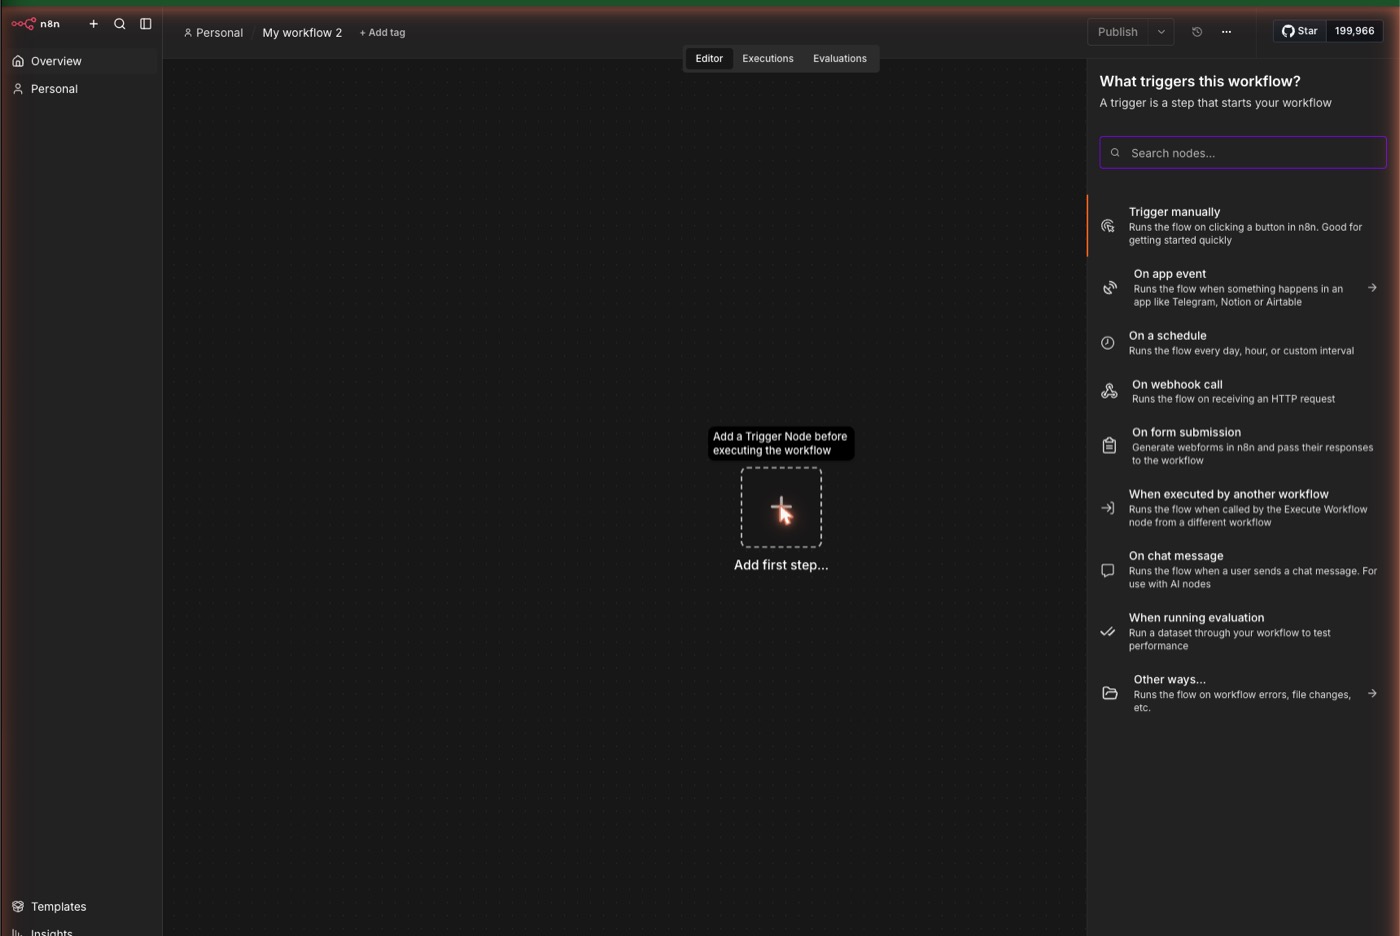
- Credential → Create new → paste the bot token → Save ✅
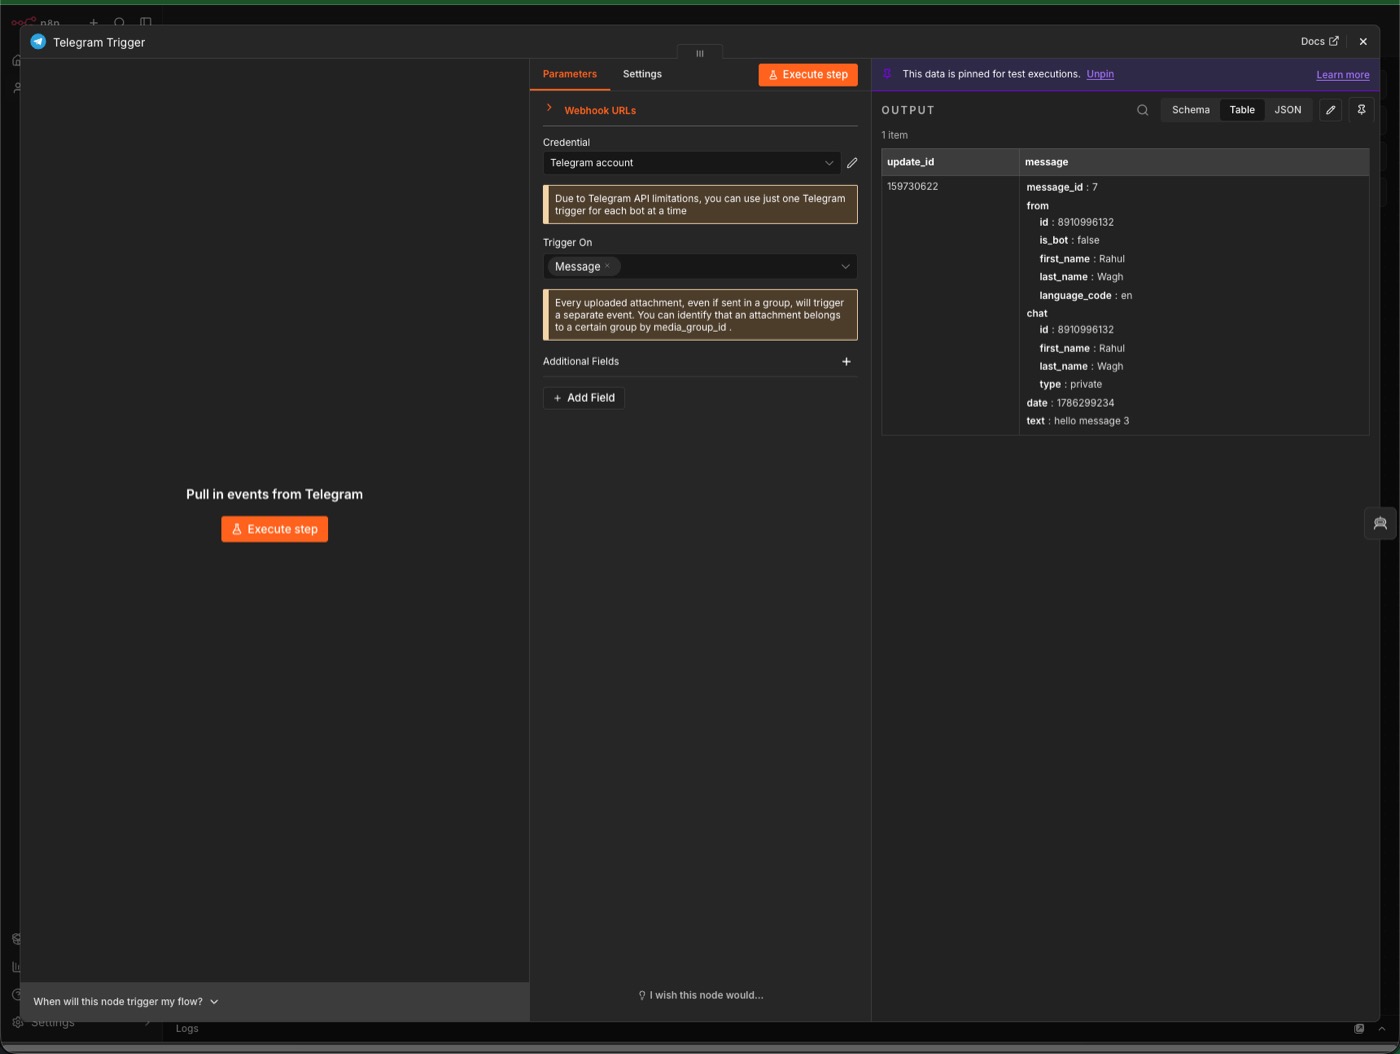
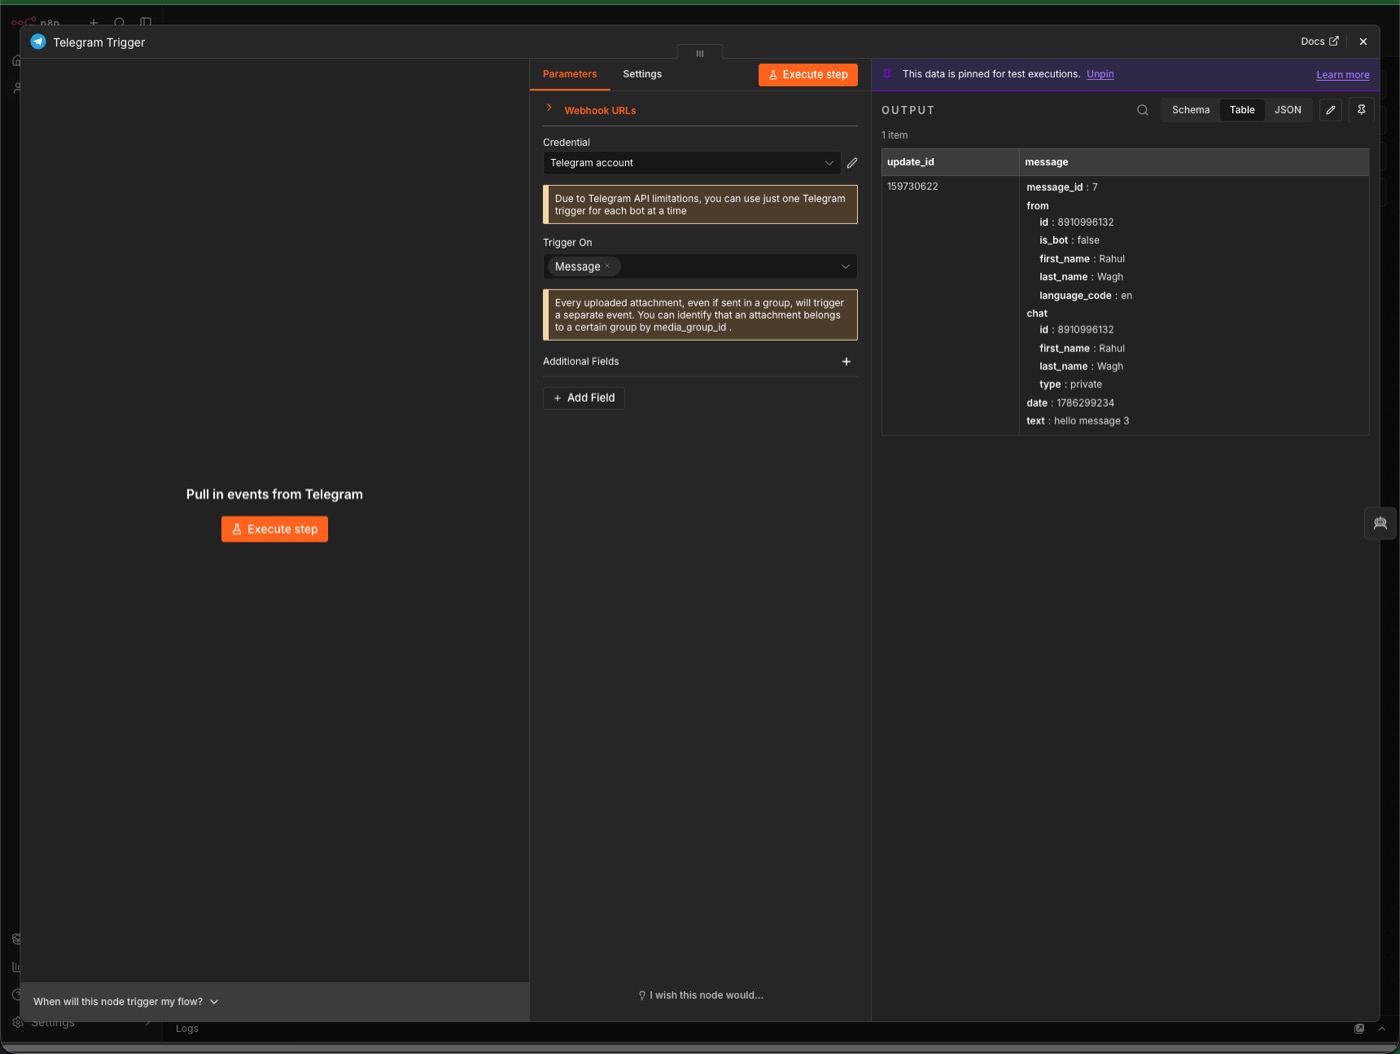
- Test this trigger → message your bot within ~2 minutes (the test window expires!) → data appears → pin the output 📌
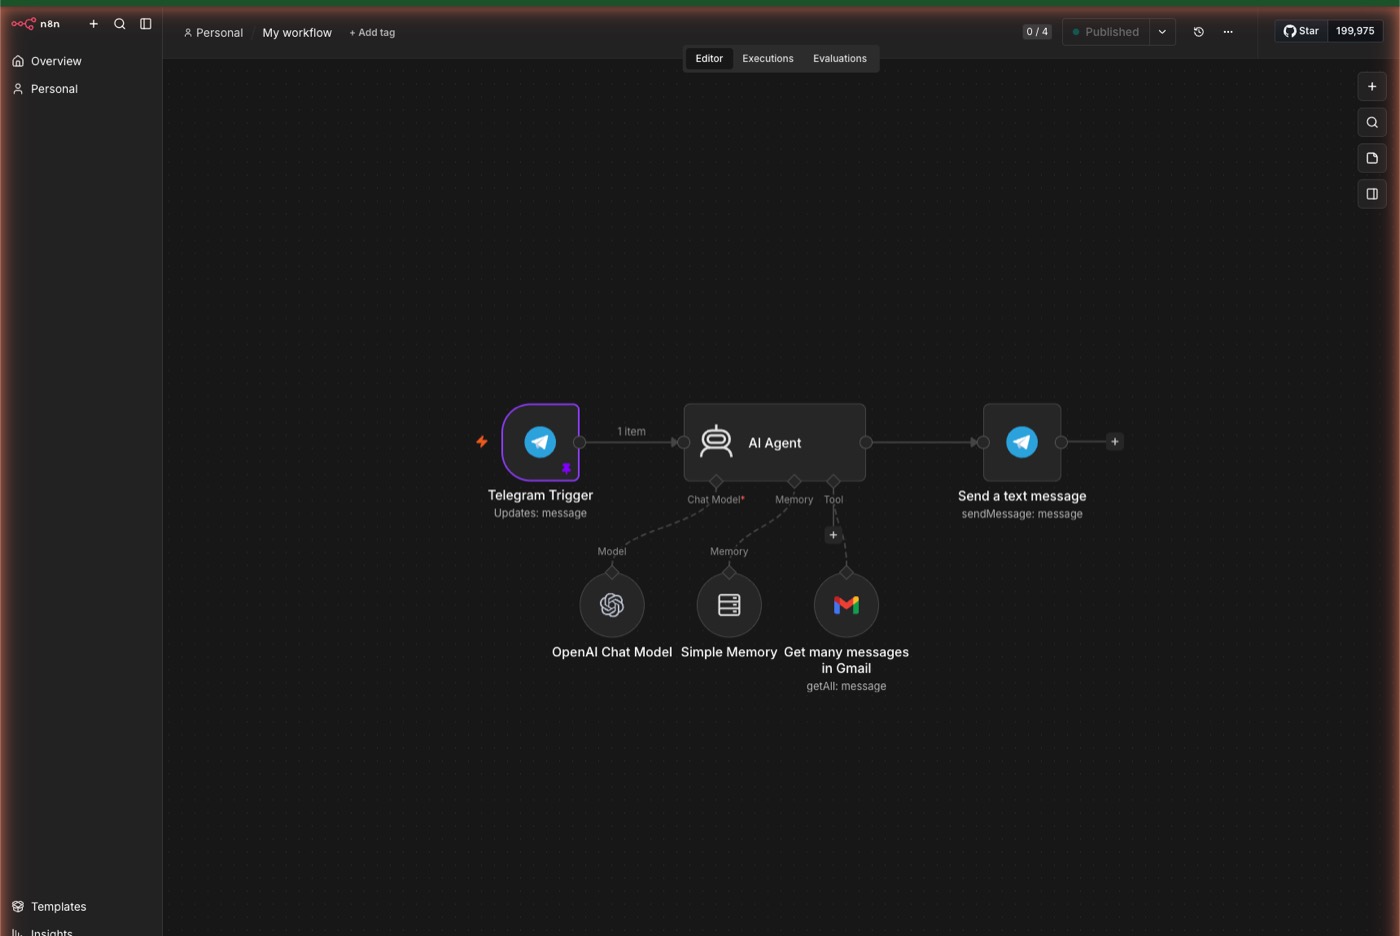
4.3 AI Agent — brain and memory
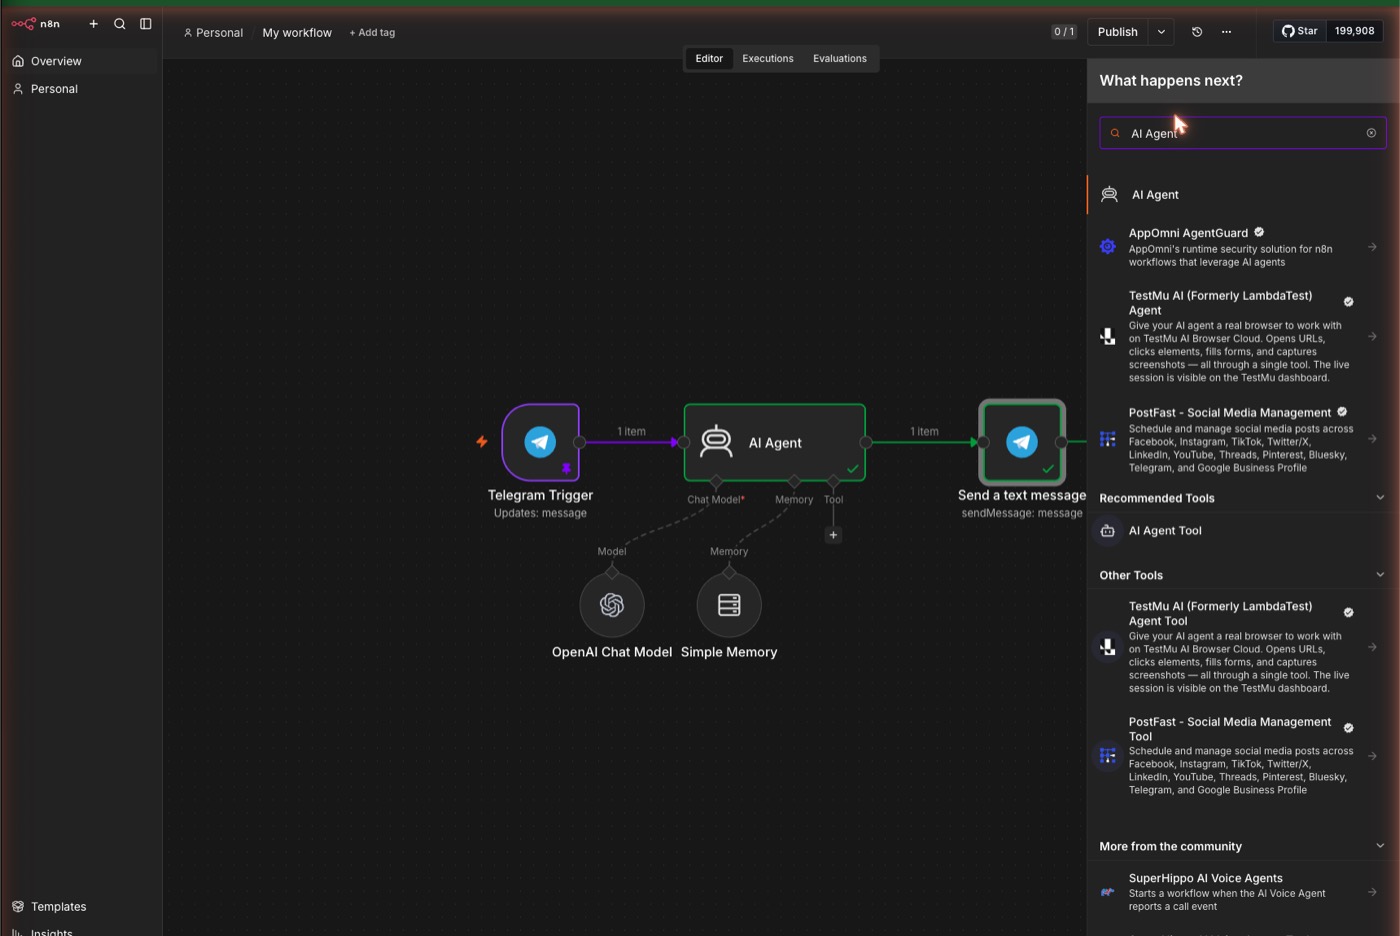
- + after the trigger → AI Agent
- ⚠️ Source for Prompt → "Define below" → drag the
textfield in → preview must show your message, notundefined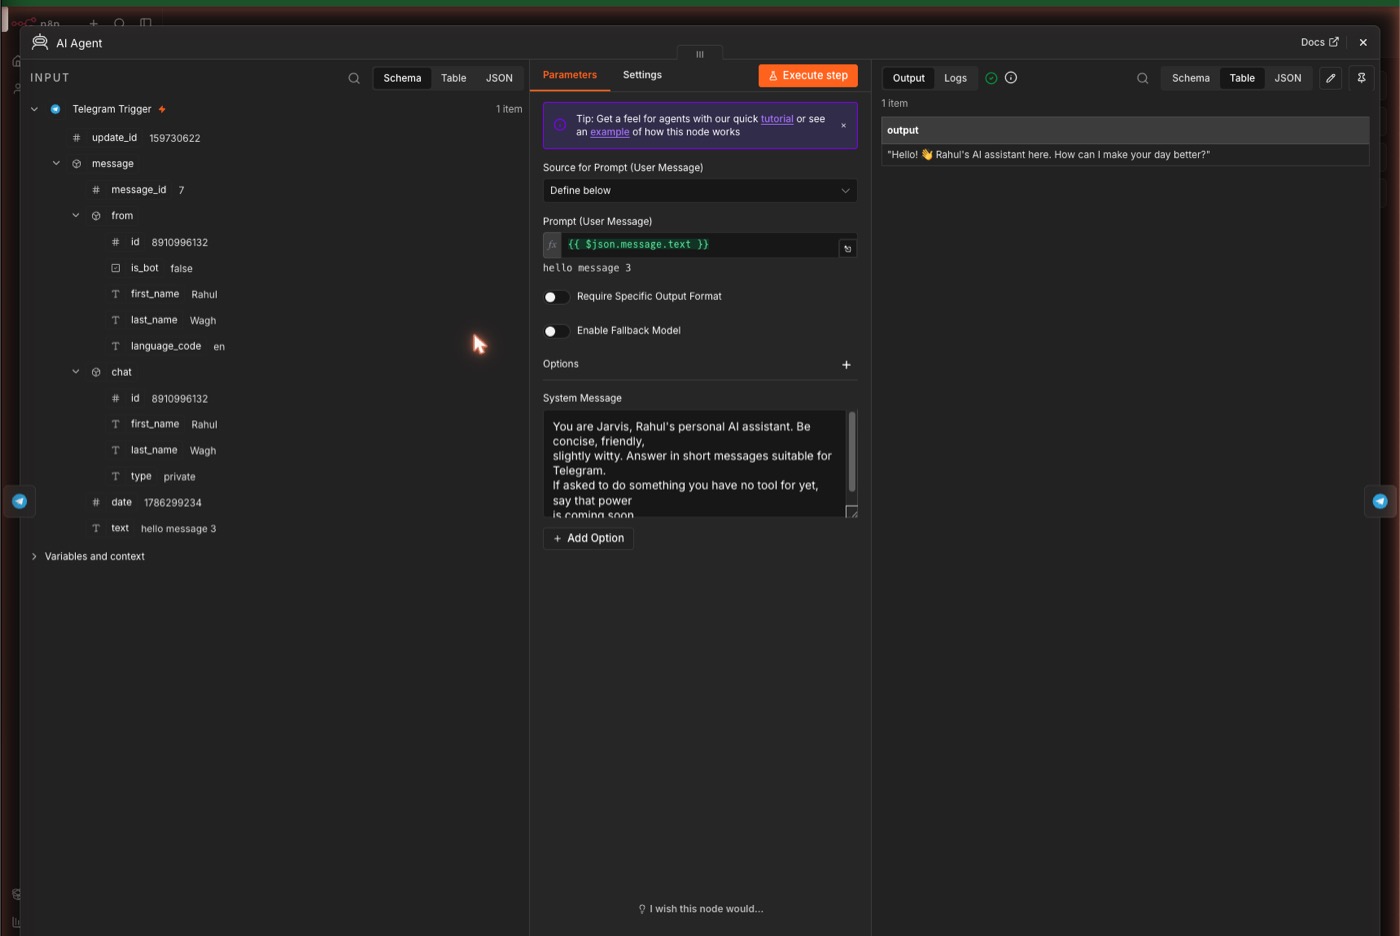
- + under Chat Model → OpenAI Chat Model → your API key →
gpt-4o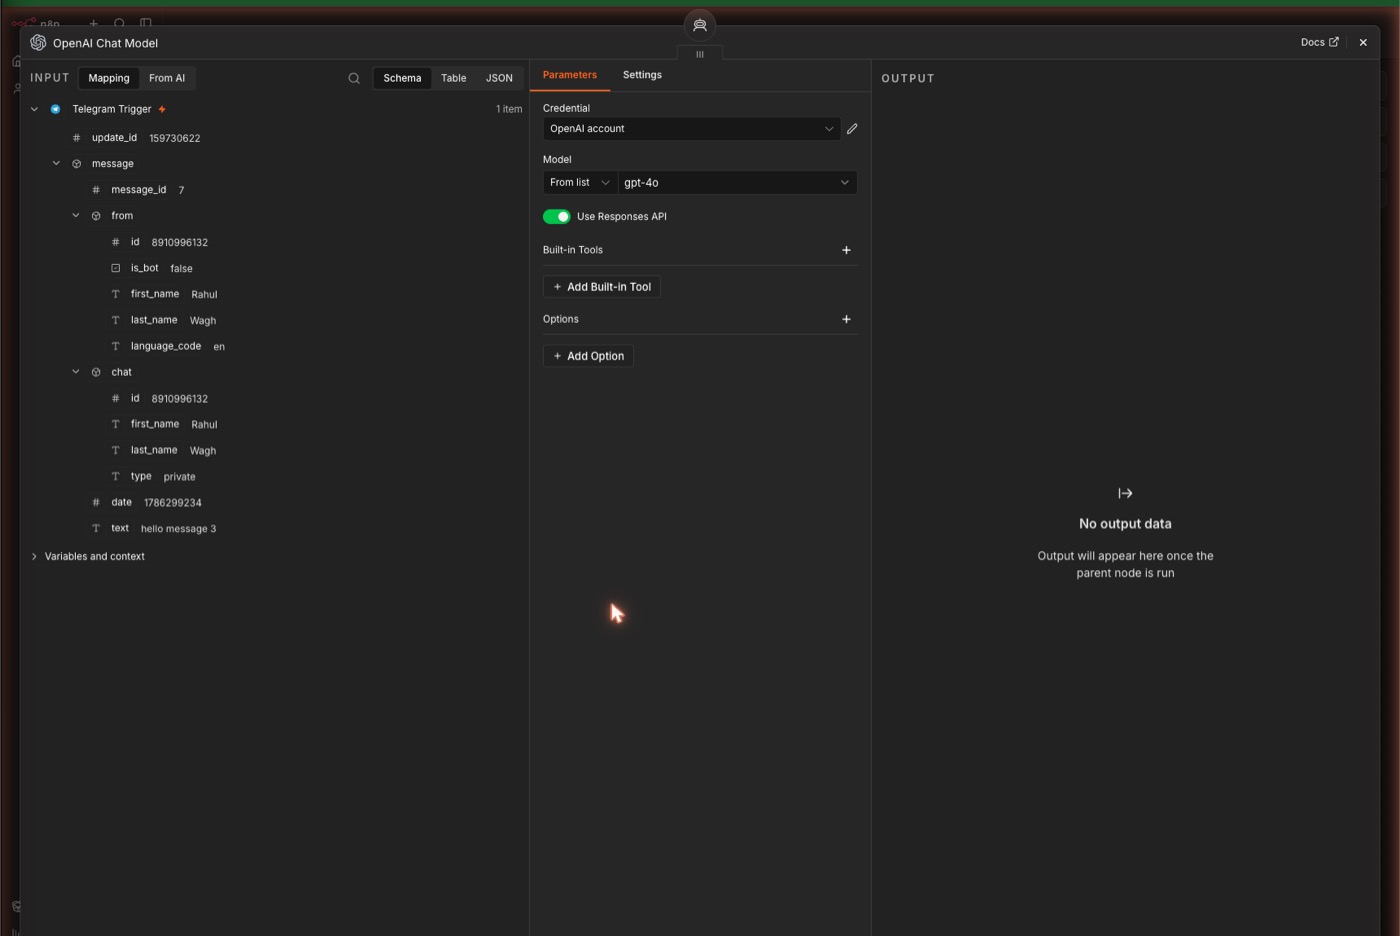
- + under Memory → Simple Memory → Session ID = drag
chat > id→ window5(memory is per-chat — that's what makes it remember you)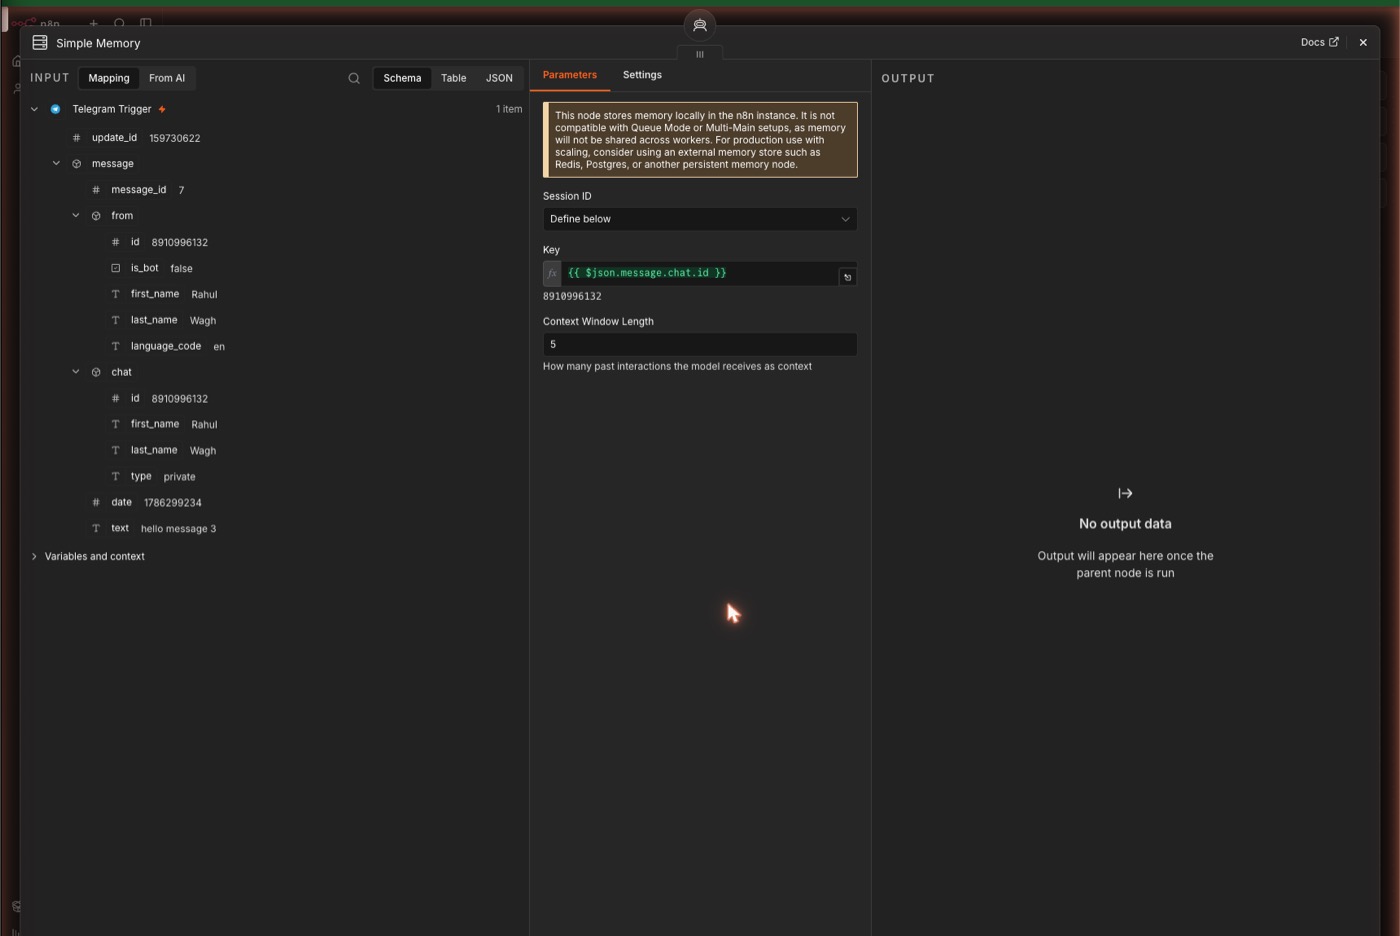
- System Message (Options → System Message):
1You are Jarvis, Rahul's personal AI assistant. Be concise, friendly,
2slightly witty. Answer in short messages suitable for Telegram.
3If asked to do something you have no tool for yet, say that power
4is coming soon.
4.4 Reply + publish
- + after the Agent → Telegram → Send a text message
- Chat ID = drag
chat > idfrom the Telegram Trigger · Text = drag the Agent'soutput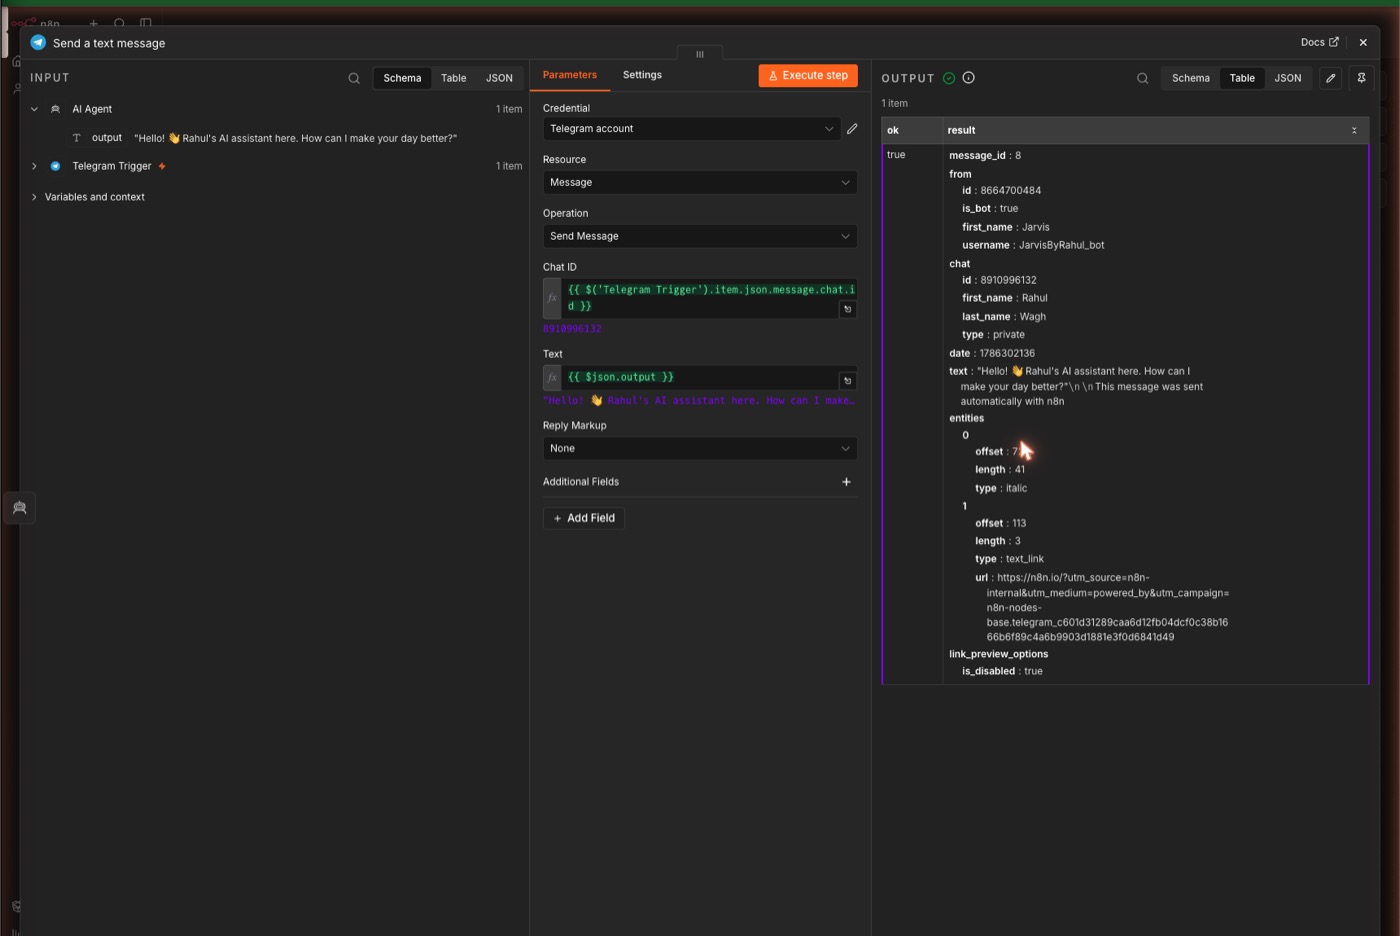
- Turn off Append n8n Attribution (Add Field) — or every reply ends with an n8n ad
- Publish — the webhook becomes permanent, no more 2-minute test windows
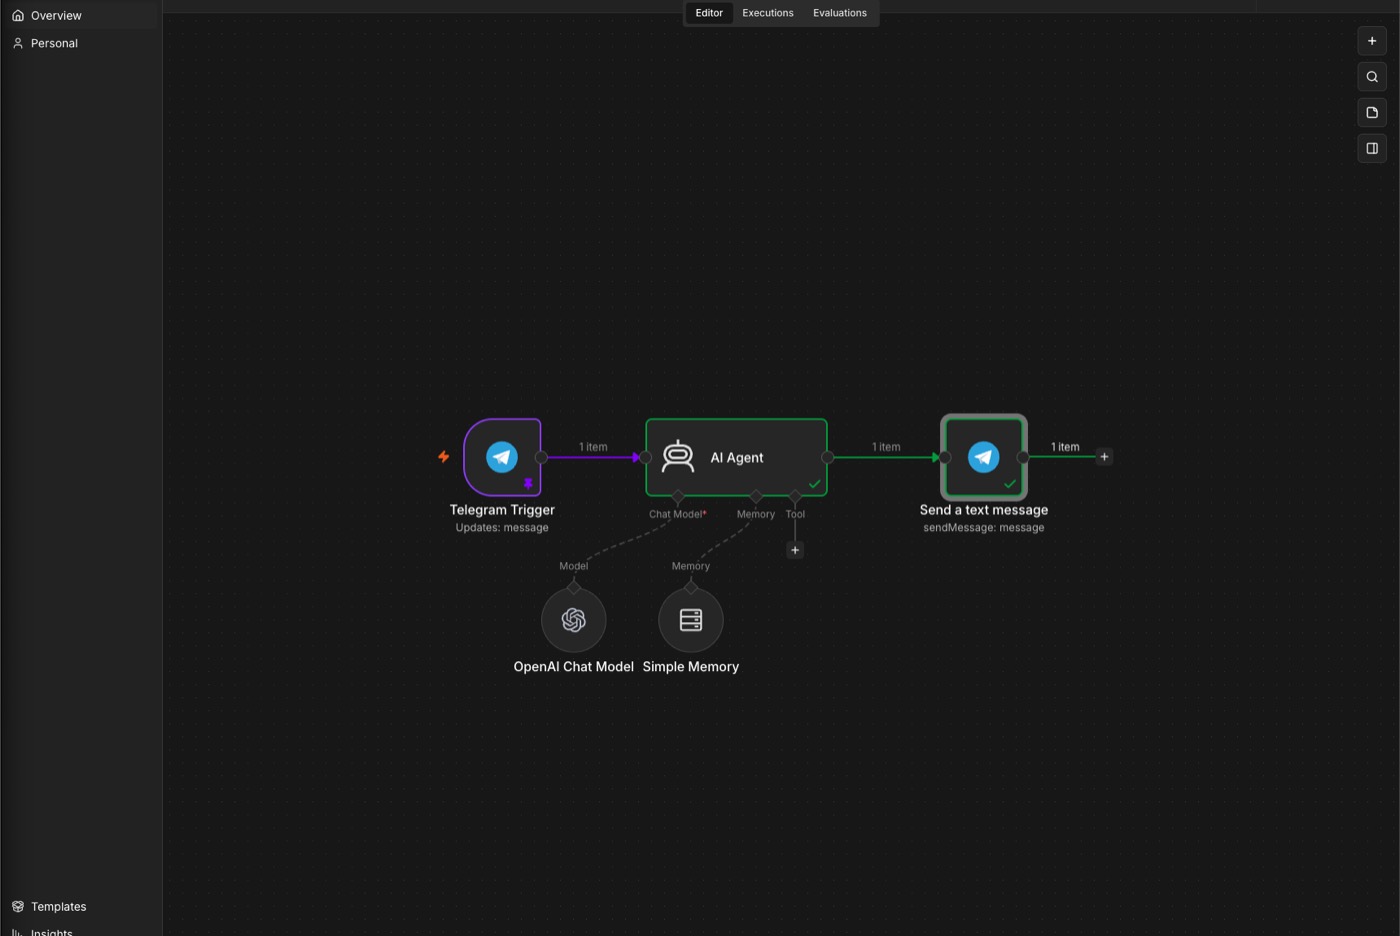
The memory test: "my name is Rahul" → then "what's my name?" → it remembers ✅
4.5 Give the assistant your inbox (Gmail tool)
Now that the agent exists, wire your Gmail into it — so you can ask about email, not just get the morning digest:
- Open
W1 - Assistant Core→ on the AI Agent node, click the + under "Tool" - Search
gmail→ pick Gmail Tool - Settings: Resource Message · Operation Get Many · Limit
20· Simplify ON · Filter → Read Status Unread only (credential from Part 2 is pre-selected)
- Open the AI Agent node → extend the System Message:
1You can read Rahul's Gmail with the Gmail tool. When asked about
2email, fetch messages first, then summarize: group by urgency
3(needs reply / important / ignore). Never invent emails.
- Publish (edits aren't live until published!) → from your phone: "summarize my unread emails" → the 47→2 moment 🔥
7. Part 5 - Backups, snapshots and safe updates
You now trust this server with your email. Make it un-loseable.
5.1 Snapshots & weekly backups
- hPanel → VPS → Snapshots & Backups
- Create snapshot = manual save point before any risky change (one slot — a new snapshot overwrites the old)
- Backups = automatic weekly, with one-click restore
5.2 The time-travel demo
- Snapshot the server
- Change something visible — add
Always answer like a pirate.to the assistant's system message → publish → the bot suddenly answers "Arrr, ahoy!" 🏴☠️ - Restore the snapshot (~2–5 min downtime) → change is gone, bot is normal again
⚠️ Restore reverts the entire server to snapshot time — workflows, executions, everything after it.
5.3 Updating n8n safely
1# 1. snapshot first (hPanel)
2# 2. then:
3cd /docker/n8n-* && docker compose pull && docker compose up -d
Version bumps, workflows intact. Turn on 2FA in n8n (Settings → Personal) while you're at it.
The docker compose pull && docker compose up -d pattern is the standard way to update any Docker Compose app in place - I have explained what happens under the hood in my post on docker compose and multiple commands.
8. Troubleshooting - webhooks, OAuth and the gotchas
Telegram trigger: "Listening…" but nothing arrives
The #1 gotcha. Check what Telegram thinks (paste in a browser with your token):
1https://api.telegram.org/bot<TOKEN>/getWebhookInfo
"url": ""→ the 2-minute test window expired before your message arrived. Click Test this trigger again, send within ~30s. Once the workflow is published, the webhook is permanent and this never recurs."pending_update_count" > 0→ messages queued, delivered on re-registration."last_error_message": "Connection timed out"→ Telegram can't reach your server (below).
Webhook timeouts: when the host's network drops Telegram's traffic
Symptom: bot replies sometimes, then goes silent; local curl to the webhook is instant, but
tcpdump -n 'tcp port 443 and (net 149.154.160.0/20 or net 91.108.4.0/22)'
shows zero inbound packets during Telegram retries → filtering upstream of your VPS.
Permanent fix — put webhooks behind Cloudflare (see Part 2): with the record Proxied,
Telegram connects to Cloudflare's network, which is never blocked. Verify with getWebhookInfo:
ip_address should be a Cloudflare IP (188.114.x.x / 172.67.x.x).
DNS-cache gotcha: Telegram pins resolved IPs for hours. If it already learned your direct IP, re-register the webhook on a brand-new subdomain (fresh name = fresh lookup = Cloudflare immediately). Doing the domain setup before first bot registration avoids this entirely.
Google OAuth
- "Google hasn't verified this app" → normal for your own app: Advanced → Continue.
- New Google Cloud UI: the consent screen now lives under Google Auth Platform (Branding / Audience / Clients).
- One OAuth client serves Gmail, Calendar, Sheets… — reuse Client ID + Secret in each n8n credential.
AI Agent answers undefined
The Agent's prompt defaults to n8n's built-in chat (chatInput). With a Telegram trigger you must set
Source for Prompt → "Define below" and map {{ $json.message.text }} — the preview under the field
must show your actual message.
OpenAI "Rate limit reached"
Usually billing, not rate: API credits are separate from ChatGPT Plus. Check platform.openai.com → Billing. For big payloads (30 emails), trim fields with Aggregate → Specified Fields first.
9. Conclusion
By the end of this guide you have a private AI assistant that is yours - it runs on your server, it reads your mail only when you ask or at 7 AM, and it remembers your conversation per chat. To summarise -
- Self-host n8n on a small VPS - one-click template or plain Docker Compose with Traefik.
- Put it behind a custom domain on Cloudflare first, before you register the Telegram bot, so the webhook never learns your raw IP.
- W1 - Assistant Core - Telegram trigger, AI Agent with Simple Memory, Gmail tool, Telegram reply.
- W2 - Morning Digest - Schedule, Gmail get many, Aggregate, Basic LLM Chain, Telegram.
- Snapshot before every risky change, and update with
docker compose pull && docker compose up -d.
If you build something on top of this - a calendar tool, a Slack version, a different model - tell me in the comments, I read all of them.