How to Create a FREE Google Cloud Account with $300 Credit - Step by Step Sign-Up, What the 90-Day Trial Really Covers, the Always Free Tier Limits, Budget Alerts and How to Avoid Any Charges (Google Cloud Part-1)
Every cloud journey starts with the same boring but important step - getting an account without getting a bill. In this Part-1 of my Google Cloud series we are going to create a Google Cloud account from scratch, claim the $300 welcome credit, and - this is the part most tutorials skip - understand exactly what the Free Trial covers, what the Always Free tier covers, and where the two differ, so that you can run the labs from the rest of this series without ever paying a cent.
I am writing this against the current Google Cloud free program documentation, because the terms have changed a few times over the years (the trial used to be 12 months, then 90 days, and the Free Tier product list keeps moving). Where a number comes from the docs I link to the page, so that you can verify it yourself.
Table of Content
- Free Trial vs Free Tier - two different things
- What you need before you start
- Step 1 - Start the Free Trial sign-up
- Step 2 - Account information and terms
- Step 3 - Payment verification and the $0 to $1 hold
- Step 4 - Your first project and billing account
- What the Free Trial blocks
- How to check your remaining credit and days
- Set a budget alert on day one
- The Always Free tier - monthly limits that never expire
- What happens on day 90 - auto-close, grace period, deletion
- Your first lab - a free e2-micro VM
- Seven rules so that you never see a charge
- Conclusion
1. Free Trial vs Free Tier - two different things
This is the first thing I want you to get right, because the two programs are constantly mixed up -
| Free Trial | Always Free tier | |
|---|---|---|
| What is it | a $300 welcome credit you spend on any Google Cloud product | a monthly allowance of specific products that is free forever |
| How long | 90 days from sign-up, or until the $300 is used, whichever comes first | no end date (Google can change it with 30 days notice) |
| Who gets it | new customers who have never paid for Google Cloud, Google Maps Platform or Firebase and have never signed up for the trial before | everybody with a billing account - during the trial and after you upgrade |
| Where | any region | mostly specific US regions (for example the free VM only in us-west1, us-central1, us-east1) |
| Can it charge your card | no - the trial never bills you; only a manual upgrade starts billing | only usage above the free limits, and only on an upgraded (paid) account |
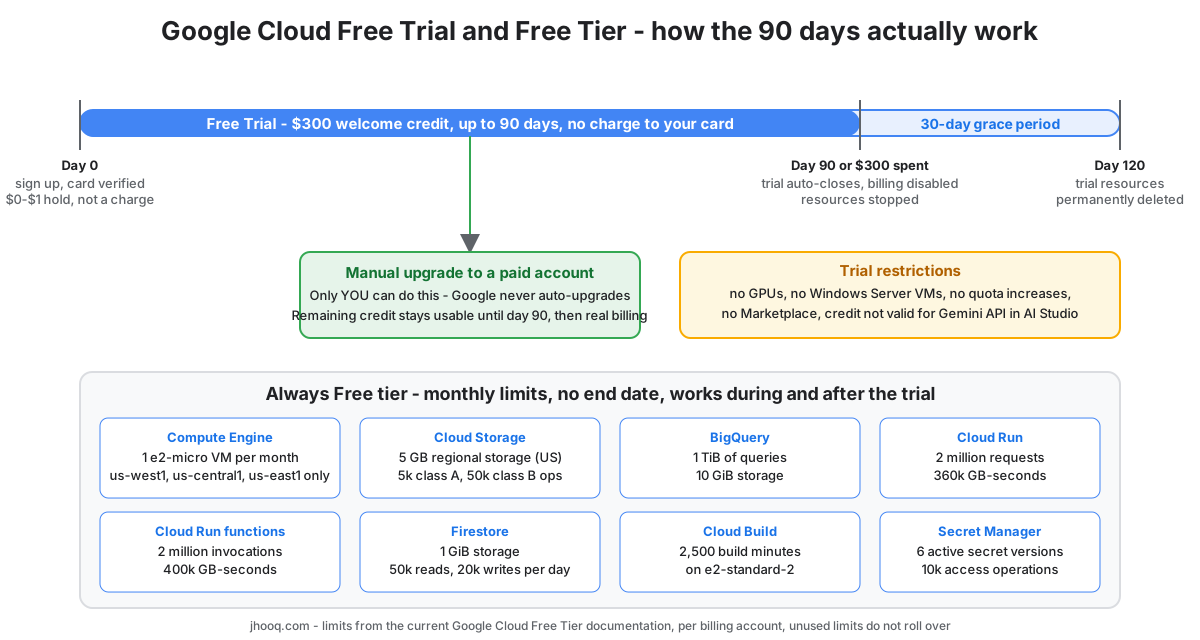
So during the 90 days you effectively get both - the Free Tier usage is not even counted against the $300. After day 90 only the Free Tier remains, and only if you have upgraded to a paid account (more on that in section 11).
2. What you need before you start
- A Google account - a personal Gmail works. If you run Google Workspace for your company you can use that account too, but for learning I prefer a personal one so that the billing account is unambiguously yours.
- A credit or debit card that is valid for the whole 90 days. Google uses it only for identity verification - nothing is charged during the trial. Prepaid and virtual cards are frequently rejected, so use a real one.
- In some countries Google asks for bank account verification as well. The Free Tier docs call this out - it depends on your country.
- Your address - it must match the country of the card.
- Ten minutes.
One more thing - the eligibility check is per Google account and per person. If you had a Free Trial years ago on the same Gmail, you will not get a second one. Google does not publish a list of countries, so if the sign-up page tells you the trial is not available where you are, that is the only reliable answer.
3. Step 1 - Start the Free Trial sign-up
- Go to cloud.google.com/free and click Get started for free. It takes you to console.cloud.google.com/freetrial.
- Sign in with the Google account you want to own the cloud account.
- You land on a two-step wizard - Account information and Payment information verification.
If instead of the wizard you land straight in the console, your account already has a Google Cloud presence (maybe from Firebase or Maps). Look for the blue Activate or Start free trial button at the top of the console - it opens the same wizard.
4. Step 2 - Account information and terms
On the first step you fill in -
- Country - this decides the currency, the tax treatment and which payment methods are accepted. It cannot be changed later for this billing account.
- What best describes your organisation or needs - pick anything, it only steers the console's onboarding tips.
- Terms of Service - tick the Google Cloud Platform Free Trial Terms. The Free Trial Terms are the document that lists the restrictions I cover in section 7, so have a quick look.
- Optionally the email-updates box - leave it unticked, you will get the important billing mails anyway.
Click Continue.
5. Step 3 - Payment verification and the $0 to $1 hold
The second step is the one that scares people, so let's be very precise about what happens -
- Account type - Individual or Business. For learning choose Individual. Business asks for a tax ID in many countries and makes you the legal entity's representative; you do not need that for labs.
- Name and address - must match the card's billing address.
- Payment method - the card. Google puts a temporary authorisation hold between $0.00 and $1.00 (or the local equivalent) on it to confirm it is real. This is a hold, not a charge - it shows as pending and is released by your bank in a few days, sometimes up to a month. You will see it in your banking app; it is normal.
- Click Start free.
The Free Tier documentation is explicit on the key promise - you are not billed during the Free Trial. Billing starts only when you manually upgrade to a paid billing account. There is no auto-upgrade on day 90.
6. Step 4 - Your first project and billing account
Once the wizard finishes, Google creates two things for you -
- A project called My First Project (ID like
my-first-project-123456). Every resource in Google Cloud lives inside a project - this is Google's equivalent of an AWS account boundary inside your account. You can rename it or create a new one; for this series I create a project per topic. - A billing account called My Billing Account, with the $300 credit attached. A billing account can pay for many projects, and a project is linked to exactly one billing account.
Check both - in the console open the project picker (top left), and go to Billing from the hamburger menu. If Billing shows This project has no billing account, link it to My Billing Account - otherwise you cannot create VMs.
I also recommend doing two housekeeping things right now - set your time zone and language under the settings cog, and go to IAM & Admin → Settings to note your project number, you will need it when you start using gcloud.
7. What the Free Trial blocks
The trial is generous but deliberately fenced. From the current free program docs, during the trial you cannot -
- attach GPUs to VM instances,
- create Windows Server VMs (licence cost),
- request quota increases,
- use Google Cloud Marketplace,
- create Google Cloud VMware Engine resources,
- use the $300 for the Gemini API in AI Studio or for partner generative-AI models offered as managed APIs (first-party Vertex AI usage is fine),
- mine cryptocurrency - the Free Trial Terms forbid it and Google does enforce it.
The trial also cannot be paused or extended. The 90 days are calendar days from sign-up, whether you log in or not. If you are in the middle of a course and you want to avoid losing the credit, sign up when you are actually ready to start.
Quotas are the practical limit you will hit first. A fresh trial project has a small CPU quota per region (historically around 8 vCPUs in a region, but Google adjusts it per account and does not publish a fixed number), so do not plan a big Kubernetes lab on day one. Check IAM & Admin → Quotas before a large deployment.
8. How to check your remaining credit and days
- Hamburger menu → Billing.
- If you have several billing accounts, pick My Billing Account.
- On the Overview page there is a Free credit (or Free Trial credit) pane - it shows the remaining credit and the remaining days.
- For the detail, open Reports on the left - the chart shows daily cost, and the Credits filter shows how much of each day was covered by the trial credit.
A quick mental model - the credits report shows what you would have paid. If the chart says $2.40 per day, you are burning the credit at $72 per month, which is well inside the $300 for 90 days. If you see $10 per day, something is running that should not be (usually a GPU-less but large VM, a GKE cluster, or a Cloud SQL instance left on overnight).
9. Set a budget alert on day one
A budget does not stop spending - Google is explicit about that - but it emails you when you cross thresholds, and that is enough to catch a forgotten VM. From the Cloud Billing budgets docs -
- Billing → Budgets & alerts → Create budget.
- Scope - all projects on the billing account, all services. Give it a name like
free-trial-guard. - Amount - Specified amount, $300, and tick Include credits in cost - this is important, otherwise the budget tracks the net (zero) cost and never fires during the trial.
- Thresholds - 50%, 75%, 90% and 100% of actual spend. Tick Email alerts to billing admins and users.
- (Optional) connect a Pub/Sub topic to the budget - that is how you would trigger a Cloud Function to disable billing automatically when a cap is hit. The docs have an example; I show it in a later part of this series.
Also set a second, small budget - say $10 per month, without credits included - that one stays useful after the trial, when real money is involved.
10. The Always Free tier - monthly limits that never expire
The Always Free usage is per billing account, resets monthly and does not roll over. The list changes, so treat the official page as the source of truth; at the time of writing the ones you will actually use in this series are -
| Product | Free every month | Fine print |
|---|---|---|
| Compute Engine | 1 non-preemptible e2-micro VM | only in us-west1, us-central1 or us-east1; 30 GB-months standard persistent disk; 1 GB egress from North America; no GPUs or TPUs |
| Cloud Storage | 5 GB-months regional storage | US regions only; 5,000 class A and 50,000 class B operations; 100 GB egress from North America |
| BigQuery | 1 TiB of queries, 10 GiB storage | the sandbox works even without a billing account |
| Cloud Run | 2 million requests, 360,000 GB-seconds memory, 180,000 vCPU-seconds | request-based billing; 1 GB egress from North America |
| Cloud Run functions | 2 million invocations, 400,000 GB-seconds, 200,000 GHz-seconds | 5 GB egress |
| Firestore | 1 GiB storage; 50,000 reads, 20,000 writes, 20,000 deletes per day | 10 GiB egress |
| Pub/Sub | 10 GiB of messages | |
| Secret Manager | 6 active secret versions, 10,000 access operations | 3 rotation notifications |
| Cloud Build | 2,500 build-minutes | on e2-standard-2 |
There are also time-boxed product trials on top - Spanner (90 days, 10 GB), AlloyDB, Looker and Cloud SQL (30 days each) - and separate free offers for Google Maps Platform, Google AI Studio and Firebase.
Two gotchas with the free VM - the limit is one e2-micro's worth of hours, so two e2-micros in the same month means one of them is billed for its hours. And the external IP of the VM is covered only while attached to a running free VM; a reserved static IP that is not in use costs money.
11. What happens on day 90 - auto-close, grace period, deletion
This is the part that makes the Free Trial safe -
- The trial ends when 90 days pass or the $300 is spent, whichever comes first.
- If you have not upgraded, the trial auto-closes - billing is disabled, every resource is stopped and you lose access to them. Nothing is charged.
- You then get a 30-day grace period. If you upgrade during these 30 days you can recover the stopped resources. If you do not, the trial resources are permanently deleted.
- If you did upgrade before day 90, any unused credit stays available until the original 90 days run out, and after that you pay for whatever exceeds the Always Free tier.
So the only way to get a real bill is to click Upgrade yourself (or Activate on the blue banner the console keeps showing). The banner is designed to be clicked - do not, until you have read section 13.
12. Your first lab - a free e2-micro VM
Let's prove the account works and that the Free Tier is real -
- Hamburger menu → Compute Engine → VM instances. The first visit asks you to enable the Compute Engine API - click Enable and wait a minute.
- Create instance.
- Name
lab-vm-1, Regionus-central1(one of the three Free Tier regions), any zone. - Machine configuration - series E2, machine type e2-micro (2 shared vCPUs, 1 GB). The right-hand cost estimate drops to a line saying the instance is covered by the Free Tier for the first 744 hours per month.
- Boot disk - Debian or Ubuntu, standard persistent disk, 10 GB (keep the total under 30 GB across the month to stay free; the default balanced disk is not in the free allowance, so change it).
- Firewall - tick Allow HTTP traffic only if you plan to serve something. Leave SSH to the console's browser SSH button, which uses IAP and needs no public port.
- Create, then click SSH next to the instance. Run
uname -aandcurl -s ifconfig.meto see the external IP.
When you are done: stop the VM if you will reuse it (a stopped VM still pays for its disk, but the 30 GB standard disk is inside the free allowance), or delete it. Deleting the whole project (IAM & Admin → Settings → Shut down) is the nuclear option that guarantees nothing lingers.
The Compute Engine quickstart walks through the same steps with screenshots if you want a second reference.
13. Seven rules so that you never see a charge
- Do not upgrade until you need something the trial blocks. The console will nag you with an Activate full account banner; ignore it.
- Budget with credits included at $300 (section 9) and a second small budget without credits for after the trial.
- Stop or delete every lab resource when you finish. VMs, GKE clusters, Cloud SQL instances and load balancers are billed by the hour whether you use them or not.
- Stay in the Free Tier regions for the e2-micro and the 5 GB bucket -
us-west1,us-central1,us-east1. - Release static IPs you reserve and do not attach - they cost money the moment they are idle.
- One project per lab, and shut the project down at the end. It is the cleanest way to be sure nothing survives.
- Check the Billing report once a week during the trial. If the daily cost jumps, find out why the same day.
More videos on this topic - the next two parts of my Google Cloud series - a complete beginner tour of the Cloud Console, and how to create a Google Cloud project -
14. Conclusion
You now have a Google Cloud account with the $300 welcome credit, you know that the credit lasts 90 days or $300, that the card is only a verification hold, that nothing is charged unless you upgrade, and that the Always Free tier gives you an e2-micro, 5 GB of storage, a terabyte of BigQuery and 2 million Cloud Run requests every month even after the trial. You also have a budget alert in place and your first VM running.
In the next parts of this series we move into the networking that the rest of my cloud content depends on - start with Google Cloud VPC Peering, then Shared VPC, Private Service Connect and the organisation setup with Cloud Identity. If you are comparing clouds, the AWS equivalent of this post is Part-1 of my AWS series on IAM users, and for Azure start with the Azure virtual network post.
Posts in this series
- How to Create a FREE Google Cloud Account with $300 Credit - Step by Step Sign-Up, What the 90-Day Trial Really Covers, the Always Free Tier Limits, Budget Alerts and How to Avoid Any Charges (Google Cloud Part-1)
- Google Cloud Private Service Connect (PSC) Explained - Publish a Service with a Service Attachment and Consume It Through a PSC Endpoint
- Google Cloud Shared VPC Explained - Host Project, Service Project, networkUser and Cloud NAT (gcloud and Terraform)
- Google Cloud Organization Setup with Cloud Identity Free - Create an Org and Move Your Projects Under It
- Google Cloud Cross-Project VPC Peering - Peer Two VPCs in Different Projects (gcloud and Terraform)
- Google Cloud VPC Peering - Hub and Spoke Setup Step by Step with gcloud and Terraform