Docker Copy File from Host to Container - docker cp, Bind Mounts, Docker Compose and Dockerfile COPY (Complete Guide)

When working with Docker containers, one of the most common tasks is to copy a file from the local host into a container - a config file you want to try, a certificate, a script, a database dump. And almost as often, the other way round - a log file or a generated report out of the container onto your laptop.
In this post we will go through four different ways of copying files from a local host into a Docker container, when to use which one, and the errors you are going to run into. I have used all four in real projects, and the right answer depends on one question - do you want the file in this one container right now, or do you want it in the image so that every container has it?
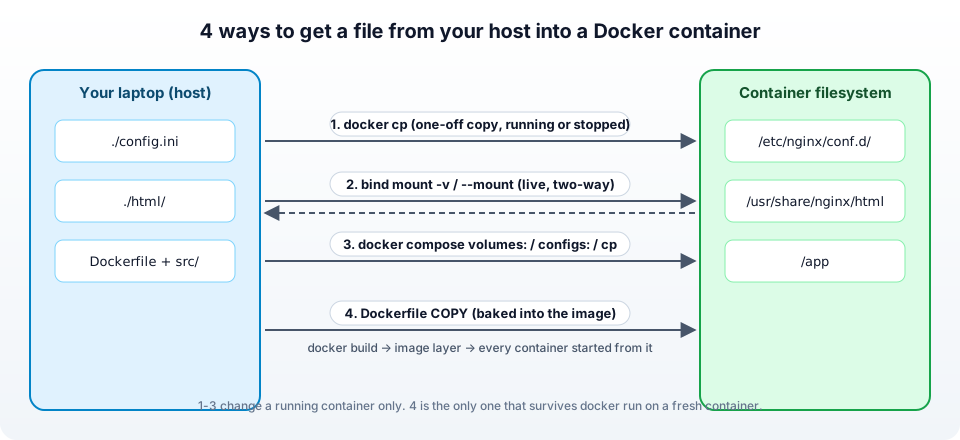
Table Of Content
- Which method should you use? (quick comparison)
- Copy file using the Docker CLI command "docker cp"
- Copy file using a Docker bind mount
- Copy files and directories with Docker Compose (volumes, configs and docker compose cp)
- Copy file using the Dockerfile "COPY" instruction
- Common errors when copying files to a Docker container
- Conclusion
1. Which method should you use? (quick comparison)
| Method | File ends up in | Container must be | Survives container recreate? | Best for |
|---|---|---|---|---|
docker cp | one container | running or stopped | No | One-off copy, debugging, grabbing logs out |
Bind mount -v / --mount | one container, live | started with the mount | Yes, as long as you mount again | Local development, config you edit often |
Docker Compose volumes: / configs: | every container of that service | started by compose | Yes | Multi-container projects |
Dockerfile COPY | the image | - | Yes, it is in the image | Application code, anything that must ship with the image |
The rule of thumb I follow -
- "I just need this file in there now" -
docker cp. - "I keep editing this file on my laptop and want the container to see it" - a bind mount.
- "This file is part of my application" -
COPYin the Dockerfile. Anything youdocker cpinto a running container is lost the moment that container is removed, which is exactly the mistake I made the first time.
2. Copy file using the Docker CLI command "docker cp"
Using the "docker cp" command is the quickest, least complicated, and most effective method for copying files into a Docker container that is already operating. It works like cp between two filesystems, except one side is a container -
1# host -> container
2docker cp /path/to/local/file.txt mycontainer:/path/to/container/file.txt
3
4# container -> host
5docker cp mycontainer:/path/in/container/file.txt /path/on/host/file.txt
You can use either the container name or the container ID on the container side. Here are the screenshots which will help you to understand the above example -
1. First check your container is running (or at least exists) before you start the copy.
1# Check the docker container status and copy the container ID or name
2
3docker ps -a

Note -
docker cpalso works on a stopped container. That makes it really handy when a container crashes on start and you want to pull its config or logs out, or push a corrected config in before starting it again.
2. Check the location inside the docker container - In the previous step you got the container id, now use the following docker exec -it command to verify the location inside the docker container where you want to copy the file.
1# Replace the container id with your container ID
2docker exec -it 8c06902e8efc sh

I would like to copy my test-file.txt to the /usr directory inside the running docker container. Let's check the path where we want to copy the file.

3. Run the docker cp command to copy the file - Now we know the container-id as well as the destination directory where we want to copy the file.
Let's run the following command -
1docker cp test-file.txt 8c06902e8efc:/usr
Here is the screenshot of how I copied the file to the docker container and verified the file by logging into the docker container -

Notice the small detail - when the destination is an existing directory (/usr), the file is copied into it and keeps its name. When the destination does not exist, Docker treats it as the new file name. Same rules as the Linux cp command.
2.1 docker cp from container to host
The same command in the other direction, which is what I use the most on a broken container -
1# grab the nginx config out of a running container
2docker cp mynginx:/etc/nginx/nginx.conf ./nginx.conf
3
4# grab a whole log directory
5docker cp mynginx:/var/log/nginx ./nginx-logs
2.2 docker cp a directory, and the gotchas (wildcards, symlinks, ownership)
Copying a directory - Just point at the directory. The trailing slash matters, exactly like rsync -
1# copies the directory "config" INTO /app  ->  /app/config/...
2docker cp ./config mycontainer:/app
3
4# copies the CONTENTS of "config" into /app  ->  /app/file1, /app/file2 ...
5docker cp ./config/. mycontainer:/app
No wildcards - docker cp ./*.txt mycontainer:/app does not work. docker cp takes exactly one source. Either copy the directory, or loop in the shell -
1for f in ./*.txt; do docker cp "$f" mycontainer:/app/; done
Symlinks - By default a symlink is copied as a symlink. If you want the file it points to, use -L -
1docker cp -L ./current-config.yaml mycontainer:/app/config.yaml
Ownership - Files copied with docker cp are owned by root (UID 0) inside the container, regardless of who owns them on the host. If your container runs as a non-root user (which it should), the application may not be able to read or write the file. Either fix it after the copy -
1docker exec -u 0 mycontainer chown appuser:appuser /app/config.yaml
or use -a (archive mode) to keep the UID and GID from the host, when they match the container's user.
You cannot copy between two containers directly - docker cp containerA:/x containerB:/y is not supported. Go through the host: copy out, then copy in.
The official reference for every flag is in the docker cp documentation.
3. Copy file using a Docker bind mount
Utilizing a bind mount is yet another option for getting files from the local host into a container. Strictly speaking nothing is copied - a directory (or a single file) on the host is mounted into the container's filesystem. Any change you make on the host shows up in the container immediately, and vice versa. This is what you want for local development.
When utilizing a bind mount, you supply the path on the host and the path inside the container when you start the container, with either -v or the more explicit --mount -
1# -v  host-path:container-path[:options]
2docker run -d --name web -v "$(pwd)/html:/usr/share/nginx/html:ro" nginx
3
4# --mount is the same thing with named fields (easier to read, and it errors out
5# instead of silently creating an empty directory when the host path is wrong)
6docker run -d --name web \
7  --mount type=bind,source="$(pwd)/html",target=/usr/share/nginx/html,readonly \
8  nginx
A few things which bite people here -
- The host path must be absolute.
-v html:/usr/share/nginx/htmlwithout./or$(pwd)creates a named volume calledhtmlinstead of mounting your directory. Use$(pwd)/htmlin bash or${PWD}/htmlin PowerShell. - Mounting a single file works, e.g.
-v "$(pwd)/nginx.conf:/etc/nginx/nginx.conf:ro", but if the file does not exist on the host, Docker creates a directory with that name and your container fails to start with a confusing error. - Paths with spaces must be quoted, otherwise you get the
invalid reference formaterror - I have a whole post on how to fix docker invalid reference format. - On Docker Desktop (macOS and Windows) bind mounts are slower than on Linux, because the files cross a VM boundary. For a
node_modulesfolder with fifty thousand files that is noticeable.
What about named volumes? A named volume (docker volume create test-volume) is managed by Docker and lives outside your project directory. It is the right choice for data the container produces (databases), not for files you want to push in from the host. But you can seed a volume with files, by mounting both the volume and your host directory into a throwaway container -
1. Create the volume -
1docker volume create test-volume
2. Verify the volume - After creating the volume let's verify it by running the following commands.
1# List the available docker volumes
2
3docker volume ls

1# Inspect the docker volume
2
3docker volume inspect test-volume

3. Copy files into the volume - Mount the volume into a container and use docker cp, or do it in one shot with a helper container -
1# Option A: start a container with the volume mounted, then docker cp into it
2docker run -itd --name httpd --mount source=test-volume,target=/my-test-vol alpine
3docker cp ./test-file.txt httpd:/my-test-vol/
4
5# Option B: one-liner - mount the volume AND the host directory, copy inside
6docker run --rm -v test-volume:/data -v "$(pwd)":/src alpine cp -r /src/. /data/
Let's break down the first command, because people ask about every flag -
- "docker run": create and run a new container.
- "-itd": "-i" keeps STDIN open, "-t" allocates a pseudo-tty, "-d" runs the container detached (in the background).
- "--name httpd": gives the container a name, so we can refer to it as
httpdinstead of an ID. - "--mount source=test-volume,target=/my-test-vol": mounts the named volume
test-volumeat/my-test-volinside the container. - "alpine": the image to use.
I have covered volumes versus bind mounts in more depth in how to manage persistent storage in Docker, and the official explanation is in the Docker storage documentation.
4. Copy files and directories with Docker Compose (volumes, configs and docker compose cp)
Docker Compose is the tool for running multi-container applications from a single compose.yaml file. There are three ways to get a file into a Compose service, and people usually only know the first one.
4.1 Bind mount in the volumes: section
To mount a single file into a container, define the service and add the file under volumes: -
1# compose.yaml - mount a single file inside the docker container
2
3services:
4  web:
5    image: nginx
6    volumes:
7      - ./config.ini:/etc/nginx/conf.d/config.ini:ro
To mount multiple files and directories, add one line per mount -
1# compose.yaml - mount two directories and one file inside the docker container
2
3services:
4  web:
5    image: nginx
6    volumes:
7      - ./config.ini:/etc/nginx/conf.d/config.ini:ro
8      - ./html:/usr/share/nginx/html
9      - ./logs:/var/log/nginx
In the above example the service "web" uses the "nginx" image, and the "volumes" directive defines three mounts - the file config.ini on the host to /etc/nginx/conf.d/config.ini in the container, the html directory to /usr/share/nginx/html, and the logs directory to /var/log/nginx. Relative paths are relative to the compose file, which is the one place where a relative path is fine.
Note - You do not need the
version: '3'line any more. The Compose specification ignores it, and newer versions of Docker print a warning when it is present.
4.2 The configs: element - for files that should not be a mount
Since the Compose specification, there is a cleaner way to inject a single configuration file - the top-level configs: element. The file is copied into the container at start-up, read-only, and it does not depend on the host path staying around -
 1# compose.yaml - inject config.ini with configs
 2
 3services:
 4  web:
 5    image: nginx
 6    configs:
 7      - source: nginx_config
 8        target: /etc/nginx/conf.d/config.ini
 9
10configs:
11  nginx_config:
12    file: ./config.ini
You can even write the content inline with content: instead of file:, which is great for a tiny file in a demo.
4.3 docker compose cp - copy into a running service
This is the one most people do not know exists, and it is the answer to "docker compose copy file to container". Compose v2 has its own cp sub-command which works with the service name instead of a container ID -
1# host -> the container of the "web" service
2docker compose cp ./config.ini web:/etc/nginx/conf.d/config.ini
3
4# container -> host
5docker compose cp web:/var/log/nginx/access.log ./access.log
6
7# when the service is scaled, pick the instance
8docker compose cp --index 2 ./config.ini web:/etc/nginx/conf.d/config.ini
It has the same semantics and the same limits as docker cp (one-off, lost on recreate, no wildcards). I have more Compose tips in my post on running multiple commands in docker compose.
5. Copy file using the Dockerfile "COPY" instruction
When building a Docker image, you will find yourself in a situation where you need to put certain files into the image. The "COPY" instruction in a Dockerfile is the method for that, and it is the only method on this list where the file becomes part of the image - every container started from the image has it.
1. The COPY instruction's syntax
1# Dockerfile copy command
2
3COPY [--chown=<user>:<group>] [--chmod=<perms>] <src>... <dest>
: the host file or directory, relative to the build context (the directory you pass todocker build, usually.). You cannotCOPYanything outside the build context, which is the cause of the errorCOPY failed: no source files were specified- I have a dedicated post on fixing docker COPY failed no source files were specified.: the path inside the image. A relativedestis relative to the currentWORKDIR.
Here is a Dockerfile to copy a single file into the image -
1# Copy only a single file - app.py
2
3FROM python:3.12-alpine
4
5WORKDIR /app
6
7COPY app.py /app
Here is a Dockerfile to copy multiple files -
1# Copy multiple files present under the src directory - src/*.py
2
3FROM python:3.12-alpine
4
5WORKDIR /app
6
7COPY src/*.py /app
Yes, wildcards work in COPY (Go filepath.Match patterns), unlike in docker cp.
Here is a Dockerfile to copy a directory -
1# Copy the directory src into the image
2
3FROM python:3.12-alpine
4
5WORKDIR /app
6
7COPY src /app
Three COPY features you should be using -
 1# 1. set the owner at copy time instead of a separate RUN chown (which doubles the layer size)
 2COPY --chown=app:app src /app
 3
 4# 2. set the permissions at copy time (BuildKit)
 5COPY --chmod=755 entrypoint.sh /usr/local/bin/entrypoint.sh
 6
 7# 3. copy from an earlier stage in a multi-stage build - this is how you keep images small
 8FROM golang:1.23 AS build
 9WORKDIR /src
10COPY . .
11RUN go build -o /out/app .
12
13FROM alpine:3.20
14COPY --from=build /out/app /usr/local/bin/app
And one .dockerignore file next to your Dockerfile, so that COPY . . does not drag .git, node_modules or your .env into the image -
1.git
2node_modules
3*.log
4.env
COPY vs ADD - ADD can also fetch URLs and auto-extract tar files, which sounds nice but makes builds unpredictable. Use COPY unless you specifically need the tar extraction. I have compared the two in detail in docker COPY vs ADD. The full reference is in the Dockerfile COPY documentation.
6. Common errors when copying files to a Docker container
1. Error response from daemon: No such container: mycontainer - The container name or ID is wrong, or the container was removed. docker ps -a lists all of them, including stopped ones.
2. lstat /path/to/file: no such file or directory - The source path is wrong. For docker cp it is relative to your current shell directory; for COPY it is relative to the build context.
3. Error: No such container:path: mycontainer:/app/config - You copied in the container-to-host direction and the path inside the container does not exist. docker exec mycontainer ls -la /app to check.
4. docker: invalid reference format - Almost always a path with a space or a ${pwd} / $(pwd) mix-up in a -v flag. Quote the mount - full list of causes here.
5. Permission denied inside the container after a copy - The file is owned by root (see 2.2). chown it, or use COPY --chown in the Dockerfile.
6. The file I copied is gone after docker compose up - Expected. up recreates the container when the image or config changed, and anything you docker cp'd into the old container is thrown away. Use a mount, configs: or COPY for anything that needs to persist.
7. cannot copy to a tmpfs or read-only path - The destination is a read-only mount (:ro) or a tmpfs. Copy somewhere else, or drop the read-only flag while you debug.
8. Editing instead of copying - If all you want is to change one line in a config inside a running container, you do not need to copy at all - see how to edit a file inside a docker container.
7. Conclusion
To summarise the four ways to copy a file from the host into a Docker container -
docker cp- one-off copy, in either direction, running or stopped container, no wildcards, files owned by root.- Bind mount - live two-way sync for development, always use absolute host paths.
- Docker Compose -
volumes:for mounts,configs:for a read-only config file,docker compose cpfor a one-off copy by service name. - Dockerfile
COPY- the only way to make the file part of the image; use--chown,--chmod,--fromand a.dockerignore.
If you keep reaching for docker cp to fix a running container, that is usually the sign that the file belongs in the Dockerfile. For the full set of commands I use day to day, see the rest of my Docker series, and for the Kubernetes equivalent of this whole post, kubectl cp works the same way as docker cp.