Real-Time DevOps Project - Deploy a Python Flask REST API with MySQL RDS on AWS Using Terraform and Jenkins, Step by Step (Jenkins on EC2 in eu-west-1, App and Database in eu-central-1, ALB, ACM, Route 53, Custom Domain with HTTPS)
This is the project video people keep asking me to write up - a real, end-to-end DevOps pipeline with nothing mocked: a Jenkins server that Terraform builds in one AWS region, a Jenkins pipeline that runs Terraform to build a second region, and at the end a Python Flask REST API talking to MySQL on RDS, behind an Application Load Balancer, with an ACM certificate and a custom domain on Route 53, live at https://jhooq.org. Two Terraform repositories, one application repository, about 100 minutes of recording, and every piece of it is in GitHub.
I recorded it in December 2023. The architecture has aged well; a few of the components have not - Jenkins no longer runs on Java 11, RDS MySQL 5.7 is now paid Extended Support, and db.t2.micro cannot be created any more - so this post is the video plus the 2026 corrections, with the exact lines to change. I also re-ran terraform init and terraform validate on both repositories today with Terraform 1.16, and the output is in here.
TL;DR
- Two regions, two Terraform repos, one pipeline. terraform-jenkins builds Jenkins in eu-west-1 (VPC 11.0.0.0/16, EC2 t2.medium, ALB 443 to 8080, ACM, Route 53 alias
jenkins.jhooq.org). The pipeline in devops-project-1 builds eu-central-1 (VPC 10.0.0.0/16, EC2 t2.micro running Flask on 5000, ALB 443 to 5000, RDS MySQL, ACM, aliasjhooq.org). - The Jenkinsfile is five stages - Clone, Terraform Init, Plan, Apply, Destroy - with three boolean parameters so that one job does everything, and AWS access comes from a Jenkins credential injected with
withCredentials, never from the repo. - Build #4 on 6 December 2023 (revision
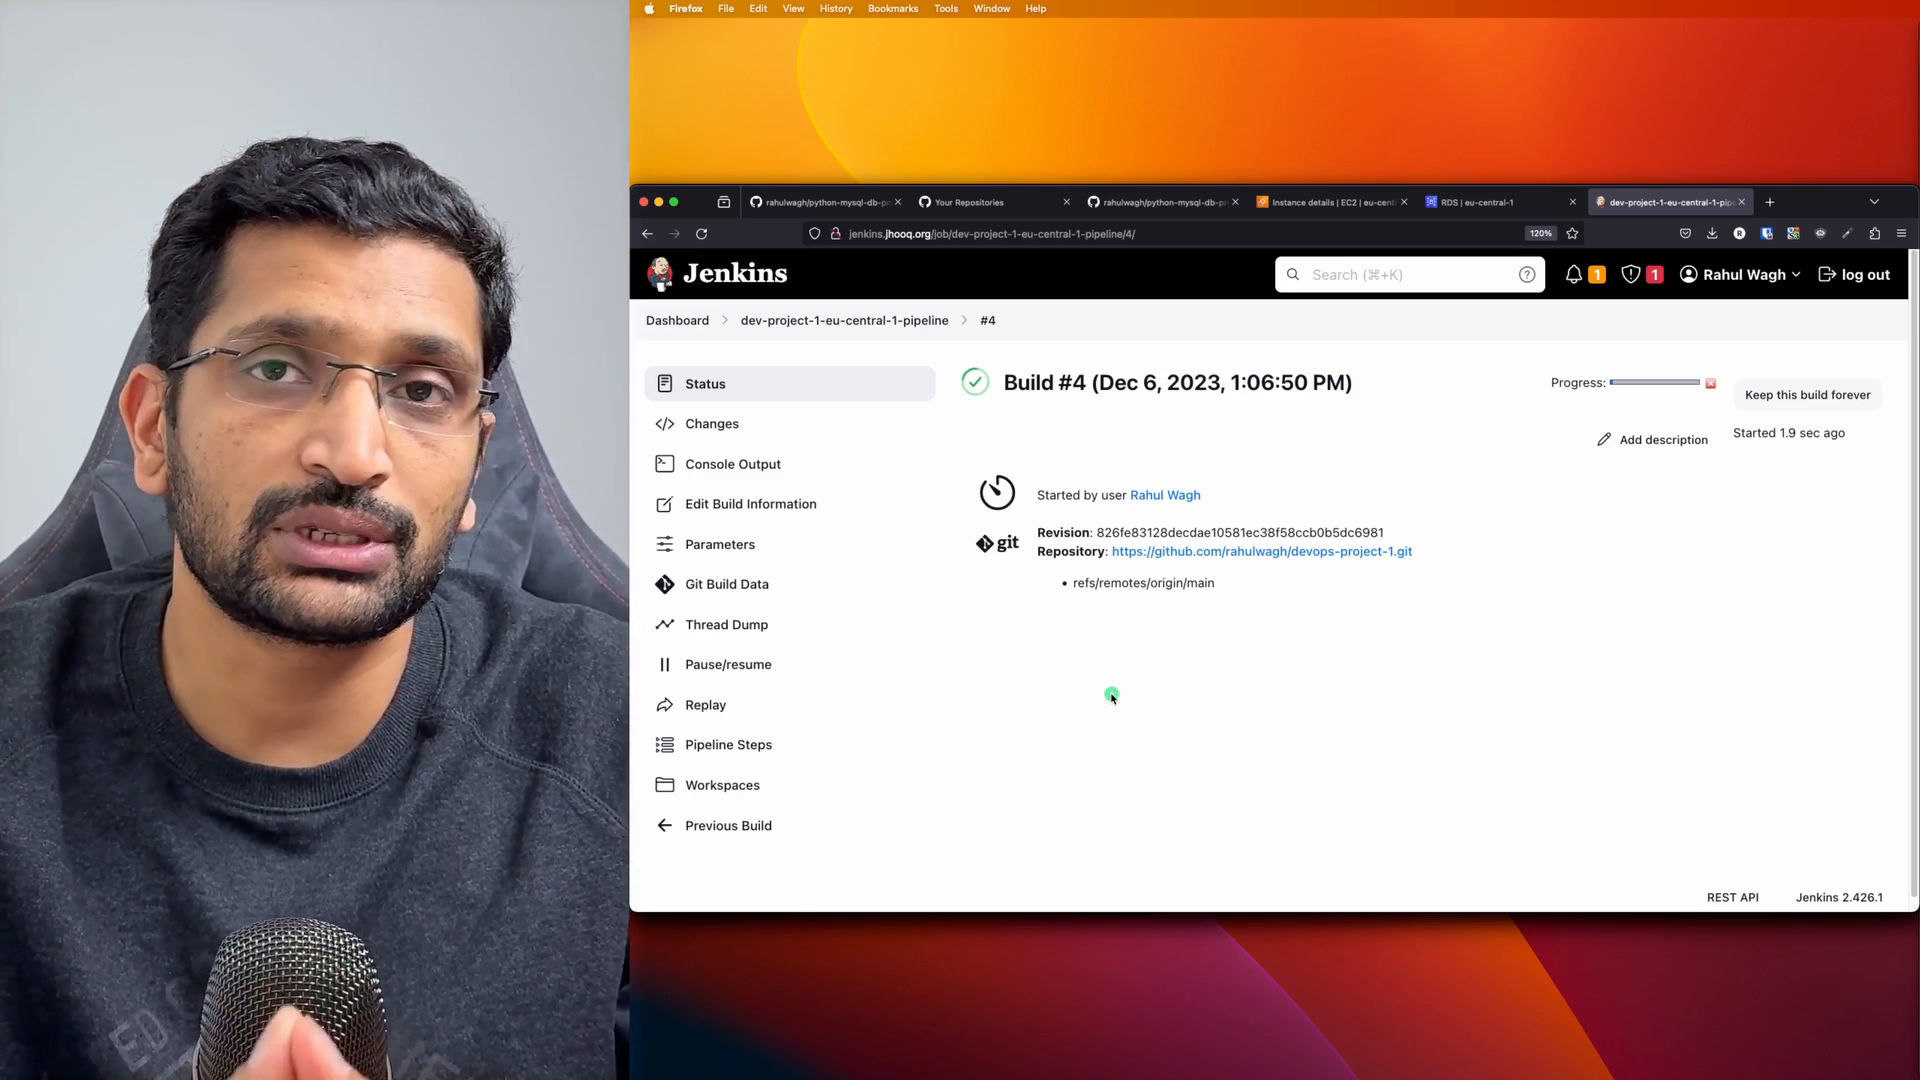
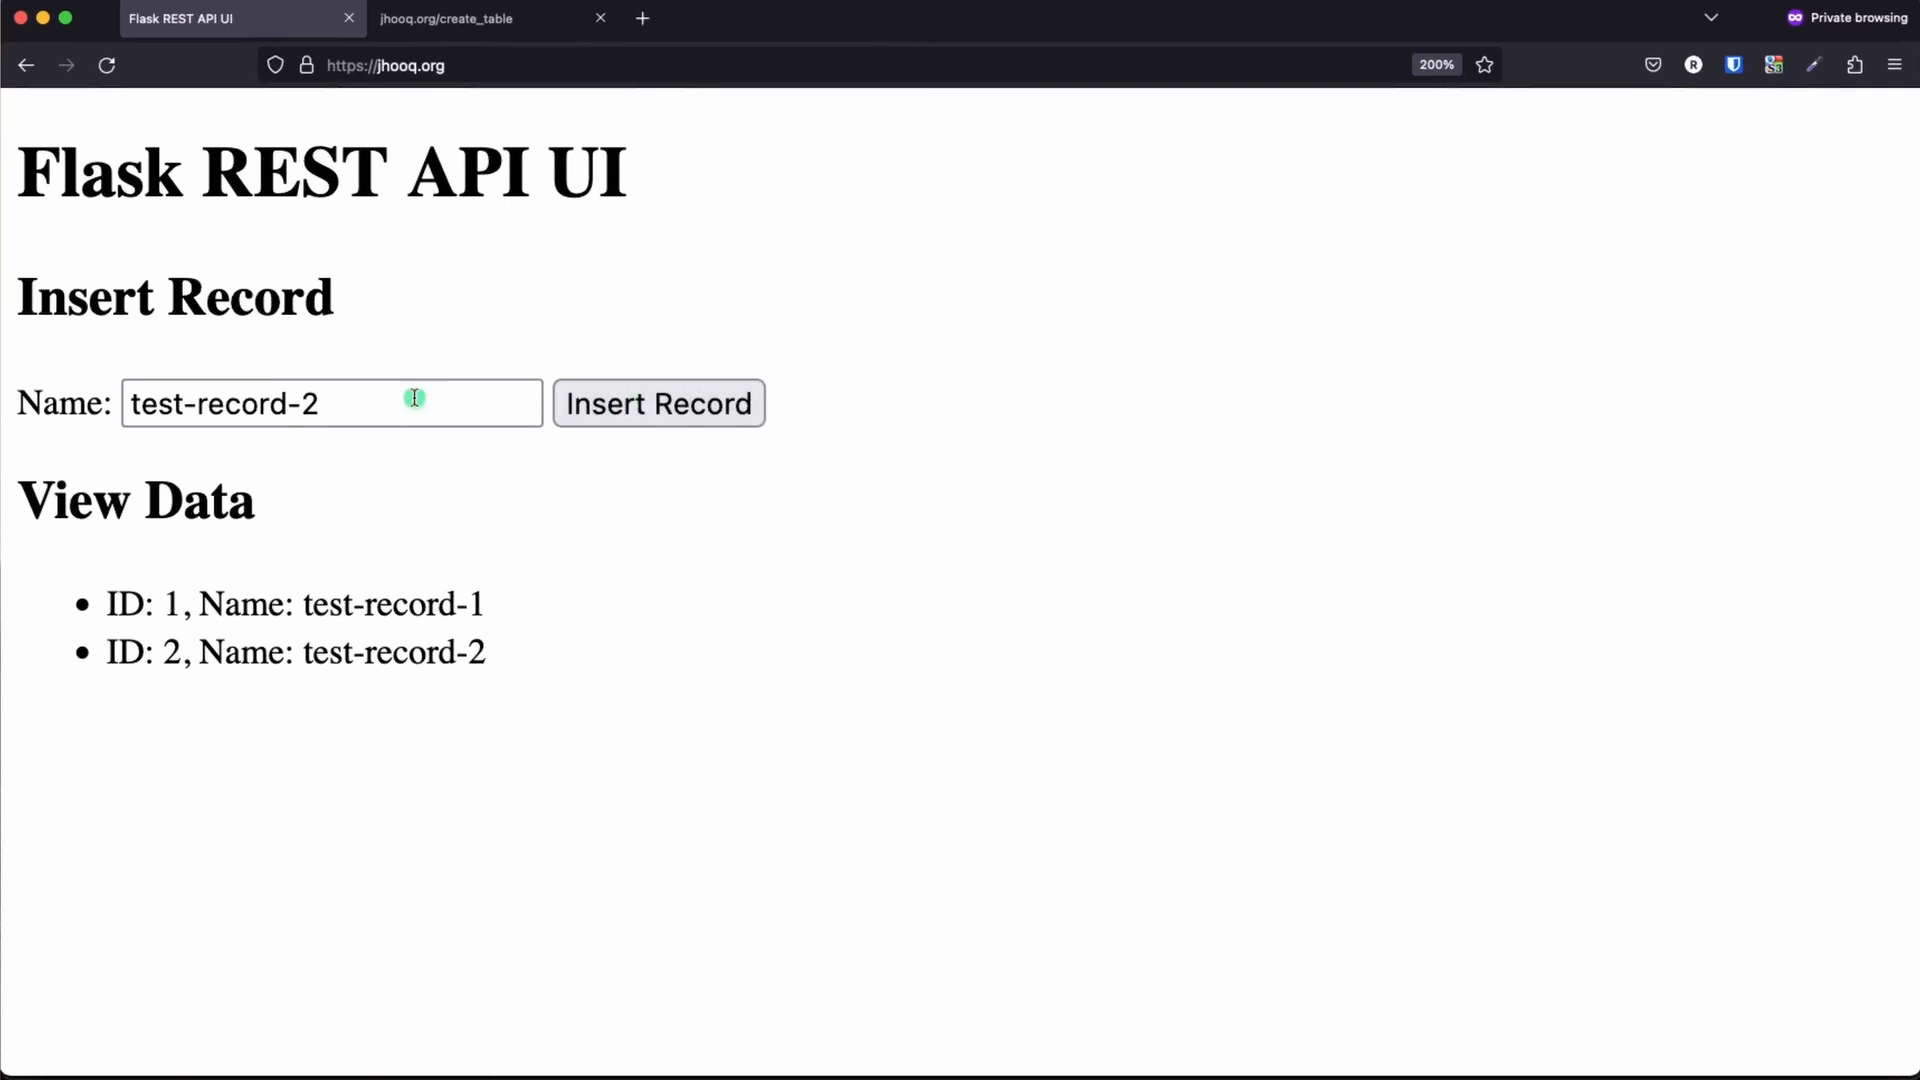
826fe83, the repo's HEAD today) applied the stack; the Flask UI athttps://jhooq.orgthen insertedtest-record-1andtest-record-2into RDS through the ALB. - Both repositories still pass
terraform validatetoday (Terraform 1.16.2, AWS provider 5.26.0 from the lock file) - but three things changed since 2023 and will break a blind re-run: install Java 21 (Jenkins dropped Java 11 in June 2024 and Java 17 in March 2026), use MySQL 8.4 on db.t4g.micro (5.7 is Extended Support since March 2024, db.t2 is not creatable since June 2024), and take amd64 Terraform, not thelinux_386build in the installer script. - Things I would fix before calling this production: the DB password hard-coded in
main.tfandapp.py, RDS in public subnets, SSH open to0.0.0.0/0, and the EC2 user data that starts Flask withpython3 app.py(the dev server) instead of gunicorn.
Table of Content
- What we are building
- The three repositories
- Phase 1 - Jenkins in eu-west-1 with Terraform
- Step 1 - Networking - VPC, subnets, Internet Gateway, route tables
- Step 2 - Security groups
- Step 3 - The Jenkins EC2 instance and its user data installer
- Step 4 - ALB, target group and the login health check
- Step 5 - Hosted zone, ACM certificate and jenkins.jhooq.org
- Step 6 - Unlock Jenkins and store the AWS credential
- Phase 2 - The Flask REST API and its MySQL routes
- Step 7 - The application infrastructure - EC2, ALB on 5000, RDS, ACM, Route 53
- Step 8 - The Jenkinsfile explained
- Step 9 - Run the pipeline - Build 4 and the live app
- What broke when I ran this and what has changed since 2023
- What I would fix before production
- What it costs
- Run it yourself
- Conclusion
1. What we are building

The project has three layers, the way I introduced them in the video -
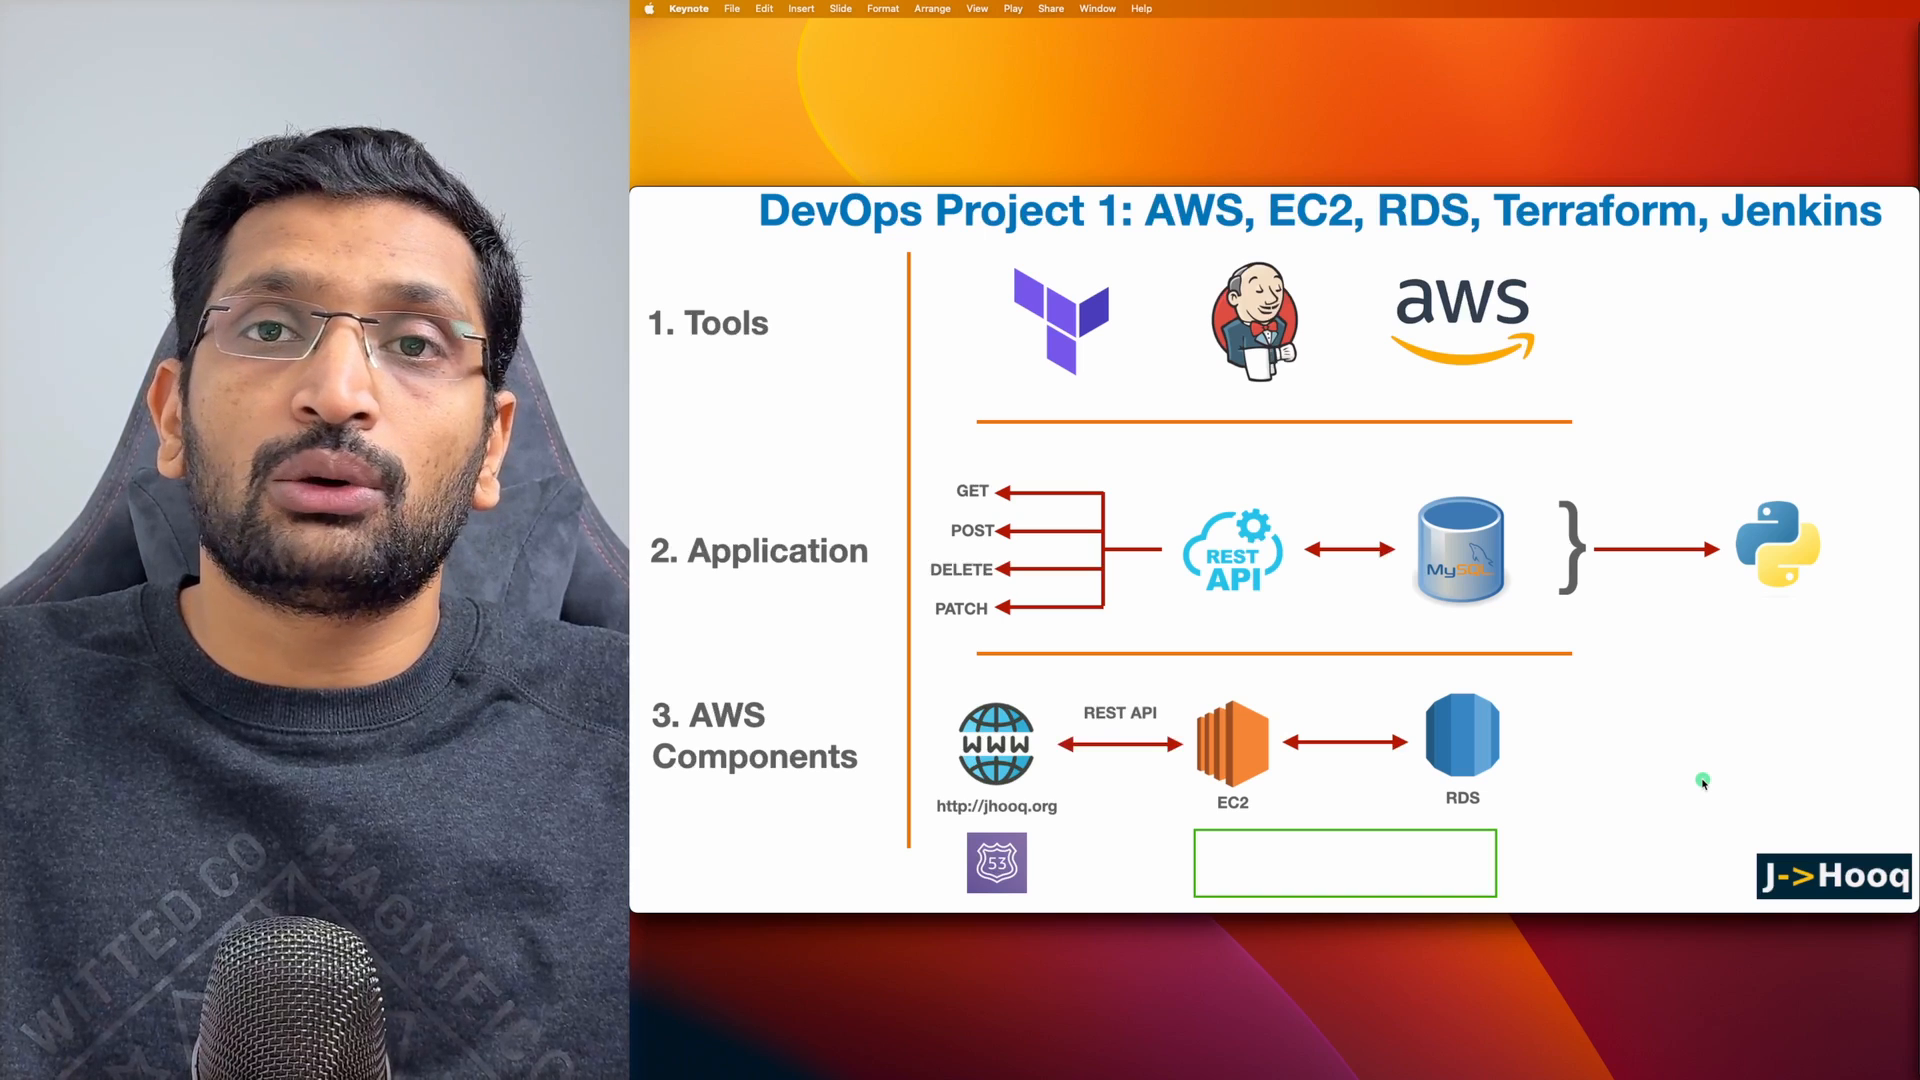
| Layer | What | Where |
|---|---|---|
| Tools | Terraform 1.6 (1.16 today), Jenkins 2.426 LTS, the AWS CLI credentials behind a Jenkins credential | your laptop builds Jenkins; Jenkins builds everything else |
| Application | a Flask REST API with GET /health, GET /create_table, POST /insert_record, GET /data and a tiny HTML UI, storing rows in MySQL | EC2 in eu-central-1, database on RDS |
| AWS components | VPC, subnets, Internet Gateway, route tables, security groups, EC2, ALB, target groups, ACM, Route 53, RDS, S3 for Terraform state | eu-west-1 for Jenkins, eu-central-1 for the app |
Why two regions - purely to prove that the pipeline is not "Jenkins deploying into its own VPC". The Jenkins server in Ireland deploys an application in Frankfurt it has no network path to; it only needs the AWS API. That is how real CI servers work.
2. The three repositories
| Repository | Role | Entry point |
|---|---|---|
| rahulwagh/terraform-jenkins | Phase 1 - Terraform that builds the Jenkins server in eu-west-1; you run this from your laptop once | main.tf wiring the networking, security-groups, jenkins, load-balancer, load-balancer-target-group, hosted-zone, certificate-manager modules |
| rahulwagh/devops-project-1 | Phase 2 - the Jenkinsfile and infra/, the Terraform the pipeline runs to build eu-central-1 | Jenkinsfile, infra/main.tf with networking, security-groups, ec2, rds, load-balancer, load-balancer-target-group, hosted-zone, certificate-manager |
| rahulwagh/python-mysql-db-proj-1 | the Flask application the EC2 user data clones and starts | app.py, requirements.txt (Flask, pymysql), templates/index.html |
Both Terraform repos follow the same shape - a root main.tf that only calls local modules, a variables.tf and terraform.tfvars, a provider.tf and an S3 remote backend. Each module folder is a single main.tf that declares its own variable blocks at the top and output blocks right after - not the three-file convention, but you can read a module top to bottom in one screen, which is what I wanted for the video.
3. Phase 1 - Jenkins in eu-west-1 with Terraform
Phase 1 is terraform-jenkins. The values that drive it are in terraform.tfvars -
 1bucket_name = "dev-proj-1-jenkins-remote-state-bucket-123456"
 2
 3vpc_cidr             = "11.0.0.0/16"
 4vpc_name             = "dev-proj-jenkins-eu-west-vpc-1"
 5cidr_public_subnet   = ["11.0.1.0/24", "11.0.2.0/24"]
 6cidr_private_subnet  = ["11.0.3.0/24", "11.0.4.0/24"]
 7eu_availability_zone = ["eu-west-1a", "eu-west-1b"]
 8
 9public_key = "ssh-rsa AAAA... rahulwagh@Rahuls-MacBook-Pro.local"   # your own key
10ec2_ami_id = "ami-0694d931cee176e7d"                                # Ubuntu, eu-west-1, Dec 2023
and the provider and backend -
 1provider "aws" {
 2  region                   = "eu-west-1"
 3  shared_credentials_files = ["/Users/rahulwagh/.aws/credentials"]
 4}
 5
 6terraform {
 7  backend "s3" {
 8    bucket = "dev-proj-1-jenkins-remote-state-bucket-123456"
 9    key    = "devops-project-1/jenkins/terraform.tfstate"
10    region = "eu-west-1"
11  }
12}
Two things to change before you run it - the S3 bucket must already exist and be yours (bucket names are global, so ...-123456 will be taken), and the AMI id is Region- and date-specific; look up the current Ubuntu AMI in eu-west-1 or, better, use a data source (I show that in section 15). The shared_credentials_files path is my Mac; set it to yours or delete the line and let the provider pick up ~/.aws/credentials or environment variables (Terraform S3 backend docs).
The root main.tf reads like a build order -
 1module "networking"     { source = "./networking"  ... vpc_cidr, subnets, AZs ... }
 2module "security_group" { source = "./security-groups" vpc_id = module.networking.dev_proj_1_vpc_id ... }
 3module "jenkins" {
 4  source                    = "./jenkins"
 5  ami_id                    = var.ec2_ami_id
 6  instance_type             = "t2.medium"
 7  subnet_id                 = tolist(module.networking.dev_proj_1_public_subnets)[0]
 8  sg_for_jenkins            = [module.security_group.sg_ec2_sg_ssh_http_id, module.security_group.sg_ec2_jenkins_port_8080]
 9  enable_public_ip_address  = true
10  user_data_install_jenkins = templatefile("./jenkins-runner-script/jenkins-installer.sh", {})
11}
12module "lb_target_group"           { ... lb_target_group_port = 8080, health check /login ... }
13module "alb"                       { ... lb_listner_port = 80, lb_https_listner_port = 443, dev_proj_1_acm_arn = module.aws_ceritification_manager.dev_proj_1_acm_arn, lb_target_group_attachment_port = 8080 }
14module "hosted_zone"               { source = "./hosted-zone" domain_name = "jenkins.jhooq.org" aws_lb_dns_name = module.alb.aws_lb_dns_name ... }
15module "aws_ceritification_manager" { source = "./certificate-manager" domain_name = "jenkins.jhooq.org" hosted_zone_id = module.hosted_zone.hosted_zone_id }
4. Step 1 - Networking - VPC, subnets, Internet Gateway, route tables
The networking module is the same in both repositories, only the CIDRs differ. It creates the VPC, two public and two private subnets across two AZs with count, an Internet Gateway, a public route table with the 0.0.0.0/0 route, a private route table with no default route (the NAT Gateway line is commented out to save money), and the associations -
 1resource "aws_vpc" "dev_proj_1_vpc_eu_central_1" {
 2  cidr_block = var.vpc_cidr
 3  tags = { Name = var.vpc_name }
 4}
 5
 6resource "aws_subnet" "dev_proj_1_public_subnets" {
 7  count             = length(var.cidr_public_subnet)
 8  vpc_id            = aws_vpc.dev_proj_1_vpc_eu_central_1.id
 9  cidr_block        = element(var.cidr_public_subnet, count.index)
10  availability_zone = element(var.eu_availability_zone, count.index)
11  tags = { Name = "dev-proj-public-subnet-${count.index + 1}" }
12}
13
14resource "aws_internet_gateway" "dev_proj_1_public_internet_gateway" {
15  vpc_id = aws_vpc.dev_proj_1_vpc_eu_central_1.id
16  tags   = { Name = "dev-proj-1-igw" }
17}
18
19# Public Route Table
20resource "aws_route_table" "dev_proj_1_public_route_table" {
21  vpc_id = aws_vpc.dev_proj_1_vpc_eu_central_1.id
22  route {
23    cidr_block = "0.0.0.0/0"
24    gateway_id = aws_internet_gateway.dev_proj_1_public_internet_gateway.id
25  }
26  tags = { Name = "dev-proj-1-public-rt" }
27}
28
29resource "aws_route_table_association" "dev_proj_1_public_rt_subnet_association" {
30  count          = length(aws_subnet.dev_proj_1_public_subnets)
31  subnet_id      = aws_subnet.dev_proj_1_public_subnets[count.index].id
32  route_table_id = aws_route_table.dev_proj_1_public_route_table.id
33}
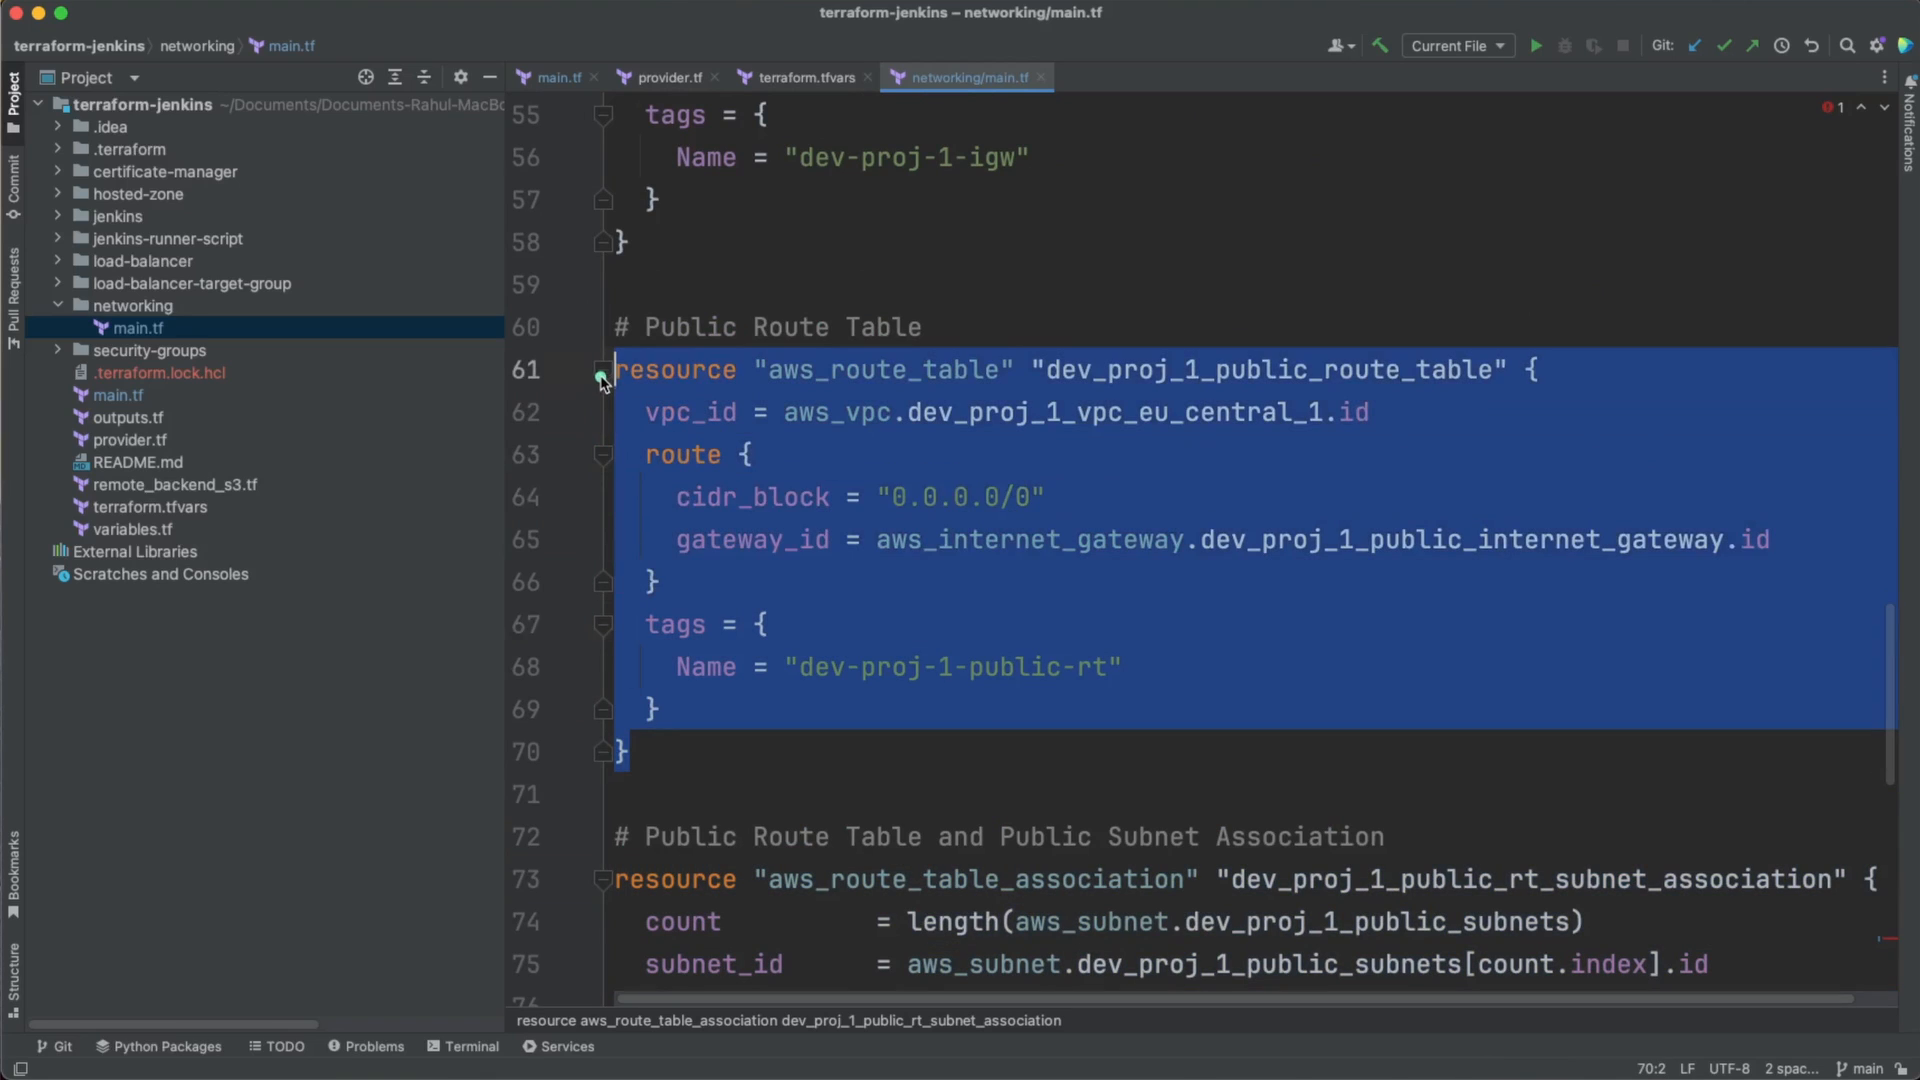
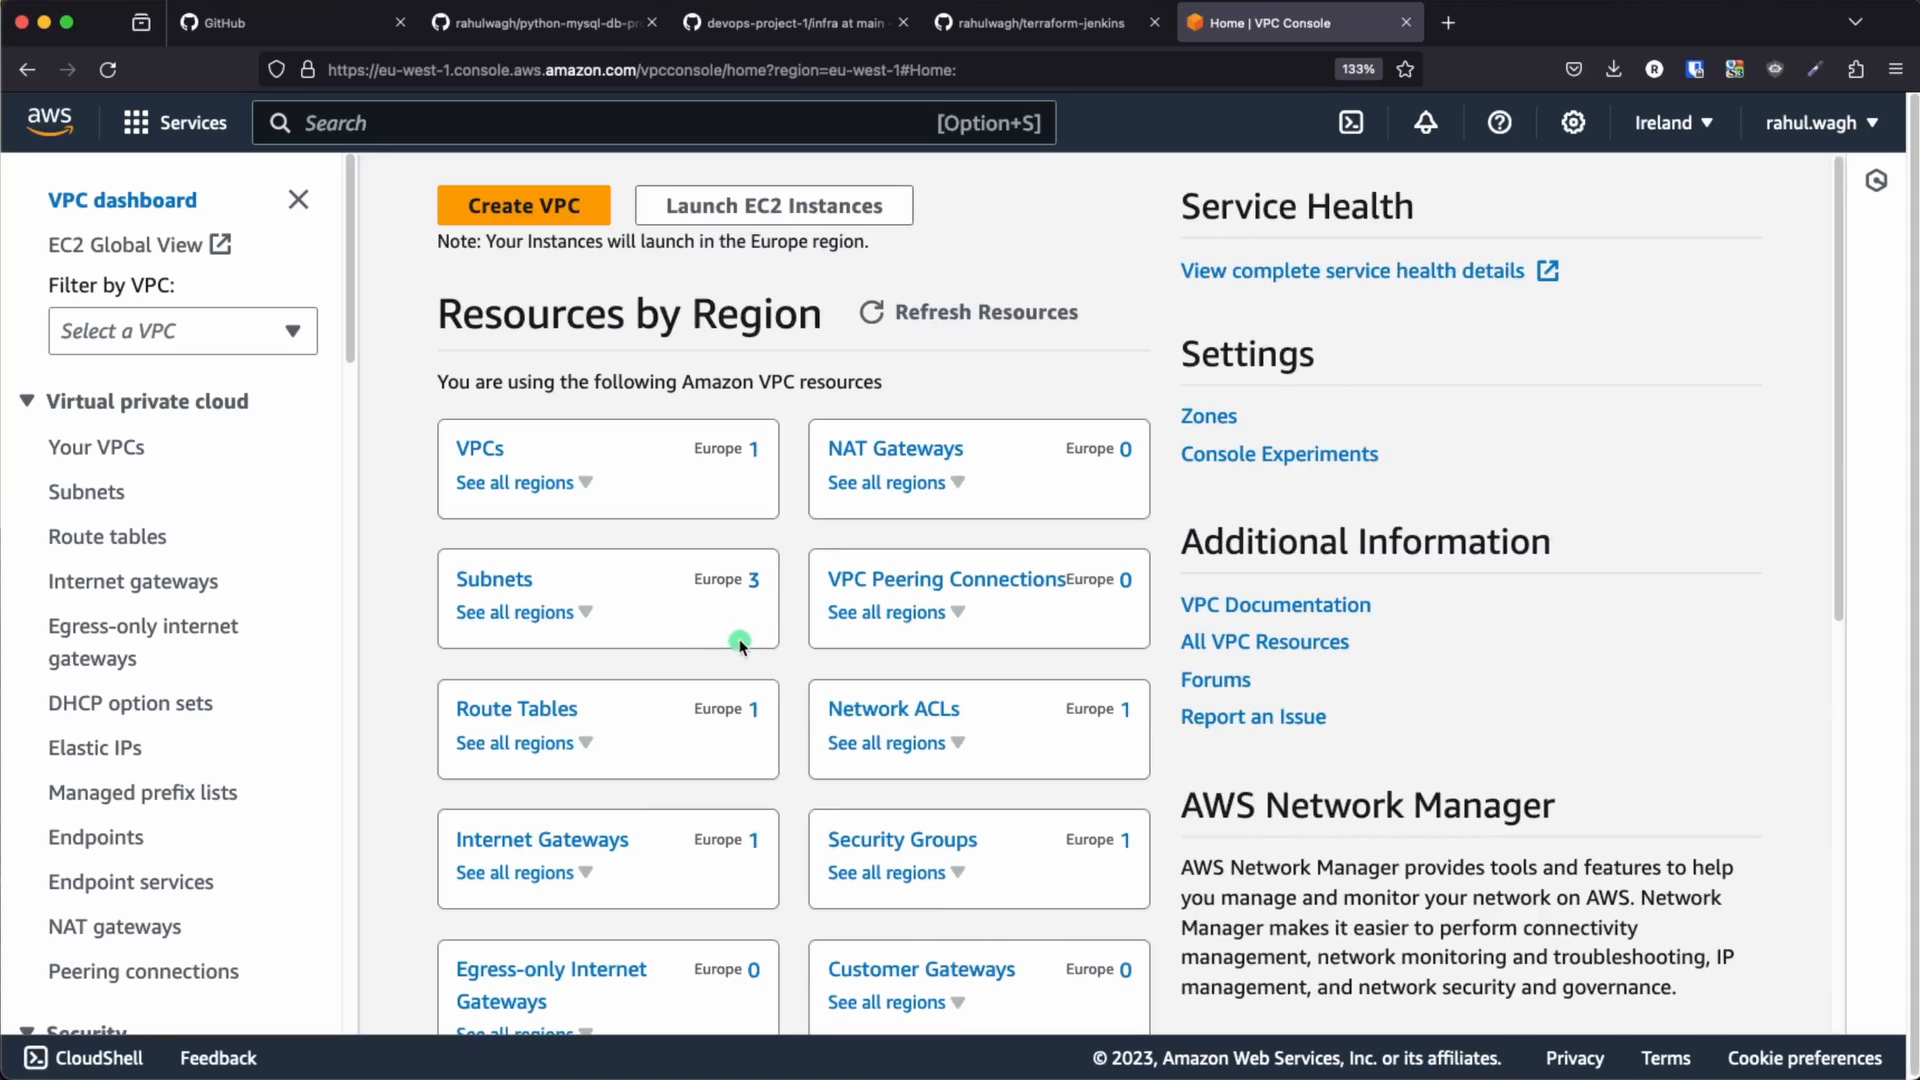
Yes, the resource is called dev_proj_1_vpc_eu_central_1 even in the eu-west-1 repo - I copied the module between the two projects and never renamed it. Harmless, but you will see it in terraform plan. The reasoning behind every one of these resources is in Part-5 of my AWS series; after a plan, the VPC dashboard in eu-west-1 showed exactly 1 VPC, 3 subnets, 1 route table, 1 Internet Gateway and 1 security group -
5. Step 2 - Security groups
Two groups for Jenkins - the general one for SSH and web, and a dedicated one for port 8080, where Jenkins listens -
 1resource "aws_security_group" "ec2_sg_ssh_http" {
 2  name        = var.ec2_sg_name
 3  description = "Enable the Port 22(SSH) & Port 80(http)"
 4  vpc_id      = var.vpc_id
 5
 6  ingress { description = "Allow remote SSH from anywhere"   cidr_blocks = ["0.0.0.0/0"] from_port = 22  to_port = 22  protocol = "tcp" }
 7  ingress { description = "Allow HTTP request from anywhere" cidr_blocks = ["0.0.0.0/0"] from_port = 80  to_port = 80  protocol = "tcp" }
 8  ingress { description = "Allow HTTP request from anywhere" cidr_blocks = ["0.0.0.0/0"] from_port = 443 to_port = 443 protocol = "tcp" }
 9  egress  { description = "Allow outgoing request" from_port = 0 to_port = 0 protocol = "-1" cidr_blocks = ["0.0.0.0/0"] }
10}
11
12resource "aws_security_group" "ec2_jenkins_port_8080" {
13  name        = var.ec2_jenkins_sg_name
14  description = "Enable the Port 8080 for jenkins"
15  vpc_id      = var.vpc_id
16  ingress { description = "Allow 8080 port to access jenkins" cidr_blocks = ["0.0.0.0/0"] from_port = 8080 to_port = 8080 protocol = "tcp" }
17}
Both groups go on the Jenkins instance; the first one also goes on the ALB. Note that the 8080 group has no egress block, so Terraform creates it with no outbound rule at all - that is fine only because the other group on the same interface allows all outbound (rules are aggregated across groups, see security groups, section 2). In the app repo there is a third group, rds-sg, that allows 3306 only from the public subnet CIDRs, and a port 5000 group for the Flask API.
6. Step 3 - The Jenkins EC2 instance and its user data installer
The jenkins module is a t2.medium Ubuntu instance in the first public subnet, with a public IP, IMDSv2 enforced, a key pair created from your public key, and the installer script passed as user data -
 1resource "aws_instance" "jenkins_ec2_instance_ip" {
 2  ami                         = var.ami_id
 3  instance_type               = var.instance_type              # t2.medium - Jenkins wants 4 GB
 4  key_name                    = "aws_ec2_terraform"
 5  subnet_id                   = var.subnet_id
 6  vpc_security_group_ids      = var.sg_for_jenkins
 7  associate_public_ip_address = var.enable_public_ip_address
 8  user_data                   = var.user_data_install_jenkins
 9
10  metadata_options {
11    http_endpoint = "enabled"
12    http_tokens   = "required"   # IMDSv2 only
13  }
14  tags = { Name = var.tag_name }
15}
16
17resource "aws_key_pair" "jenkins_ec2_instance_public_key" {
18  key_name   = "aws_ec2_terraform"
19  public_key = var.public_key
20}
And the installer, jenkins-runner-script/jenkins-installer.sh, exactly as it is in the repo -
 1#!/bin/bash
 2sudo apt-get update
 3yes | sudo apt install openjdk-11-jdk-headless
 4echo "Waiting for 30 seconds before installing the jenkins package..."
 5sleep 30
 6sudo wget -O /usr/share/keyrings/jenkins-keyring.asc \
 7  https://pkg.jenkins.io/debian-stable/jenkins.io-2023.key
 8echo deb [signed-by=/usr/share/keyrings/jenkins-keyring.asc] \
 9  https://pkg.jenkins.io/debian-stable binary/ | sudo tee \
10  /etc/apt/sources.list.d/jenkins.list > /dev/null
11sudo apt-get update
12yes | sudo apt-get install jenkins
13sleep 30
14echo "Waiting for 30 seconds before installing the Terraform..."
15wget https://releases.hashicorp.com/terraform/1.6.5/terraform_1.6.5_linux_386.zip
16yes | sudo apt-get install unzip
17unzip 'terraform*.zip'
18sudo mv terraform /usr/local/bin/
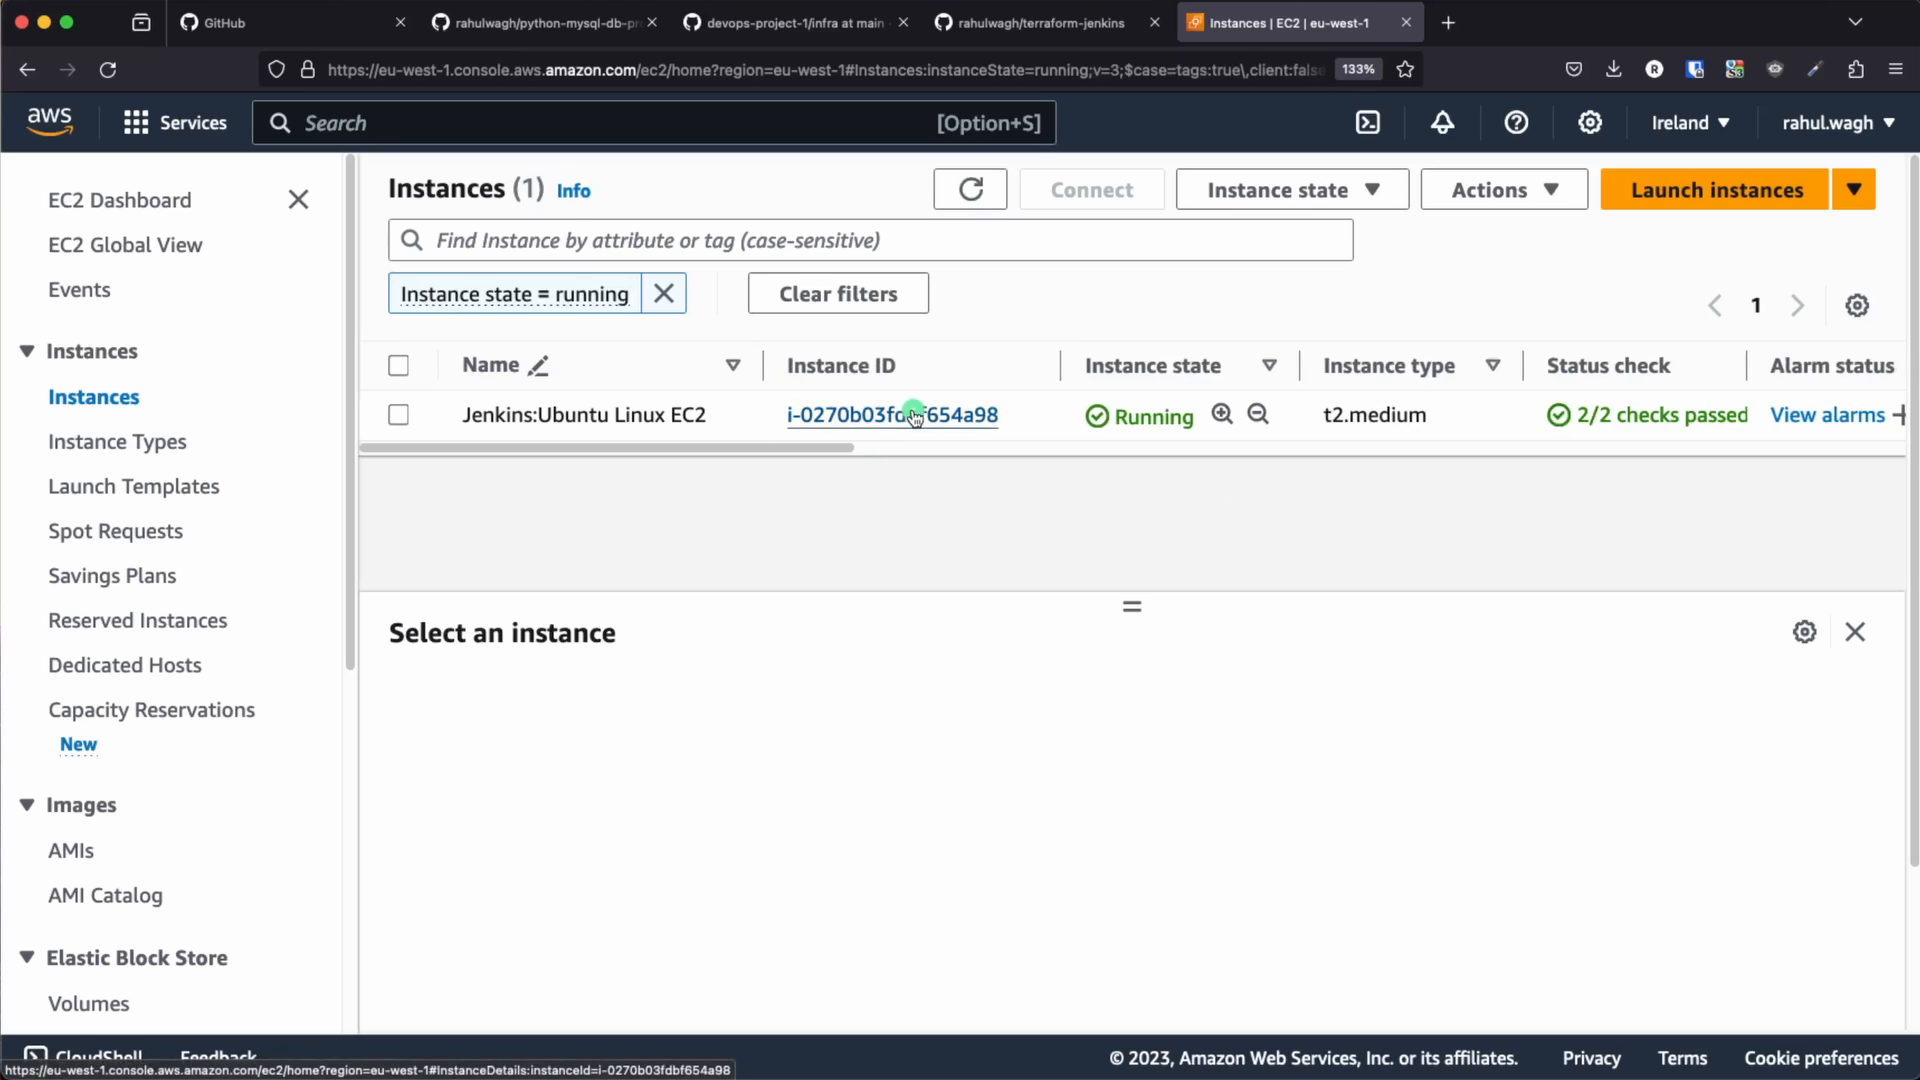
Three jobs - Java, the Jenkins LTS apt repository, and a Terraform binary on the PATH so that the pipeline's sh 'terraform init' works. This script is the part of the project that has aged - the Java version, the signing key and the Terraform build all need updating in 2026; the exact replacements are in section 14. After terraform apply the instance showed up in the console as Jenkins:Ubuntu Linux EC2, running, 2/2 checks passed -
7. Step 4 - ALB, target group and the login health check
Jenkins should not be reached on http://<public-ip>:8080. The load-balancer-target-group module registers the instance on port 8080 and health-checks /login, the one Jenkins page that answers 200 without authentication -
 1resource "aws_lb_target_group" "dev_proj_1_lb_target_group" {
 2  name     = var.lb_target_group_name       # jenkins-lb-target-group
 3  port     = var.lb_target_group_port       # 8080
 4  protocol = var.lb_target_group_protocol   # HTTP
 5  vpc_id   = var.vpc_id
 6  health_check {
 7    path                = "/login"
 8    port                = 8080
 9    healthy_threshold   = 6
10    unhealthy_threshold = 2
11    timeout             = 2
12    interval            = 5
13    matcher             = "200"
14  }
15}
16
17resource "aws_lb_target_group_attachment" "dev_proj_1_lb_target_group_attachment" {
18  target_group_arn = aws_lb_target_group.dev_proj_1_lb_target_group.arn
19  target_id        = var.ec2_instance_id
20  port             = 8080
21}
The load-balancer module creates the internet-facing ALB in both public subnets with an HTTP listener on 80 and an HTTPS listener on 443 using the ACM certificate, both forwarding to the target group -
 1resource "aws_lb" "dev_proj_1_lb" {
 2  name               = var.lb_name
 3  internal           = var.is_external         # false - the variable name is backwards, the value is right
 4  load_balancer_type = var.lb_type             # application
 5  security_groups    = [var.sg_enable_ssh_https]
 6  subnets            = var.subnet_ids          # both public subnets - an ALB needs two AZs
 7}
 8
 9resource "aws_lb_listener" "dev_proj_1_lb_https_listner" {
10  load_balancer_arn = aws_lb.dev_proj_1_lb.arn
11  port              = 443
12  protocol          = "HTTPS"
13  ssl_policy        = "ELBSecurityPolicy-FS-1-2-Res-2019-08"
14  certificate_arn   = var.dev_proj_1_acm_arn
15  default_action {
16    type             = "forward"
17    target_group_arn = var.lb_target_group_arn
18  }
19}
healthy_threshold = 6 with a 5-second interval means a target is marked healthy after 30 seconds of good checks - fine for Jenkins, which takes a minute to boot anyway. The one thing I would change today is the HTTP listener - make it a redirect to 443 instead of a second forward. The target group and listener behaviour is covered in depth in my NLB vs ALB post and the ALB target group health check docs.
8. Step 5 - Hosted zone, ACM certificate and jenkins.jhooq.org
The domain jhooq.org was bought at Google Domains and its name servers pointed at a Route 53 public hosted zone - that zone is the only thing in this project created by hand, which is why the module uses a data source and not a resource -
 1data "aws_route53_zone" "dev_proj_1_jhooq_org" {
 2  name         = "jhooq.org"
 3  private_zone = false
 4}
 5
 6resource "aws_route53_record" "lb_record" {
 7  zone_id = data.aws_route53_zone.dev_proj_1_jhooq_org.zone_id
 8  name    = var.domain_name            # jenkins.jhooq.org
 9  type    = "A"
10  alias {
11    name                   = var.aws_lb_dns_name
12    zone_id                = var.aws_lb_zone_id
13    evaluate_target_health = true
14  }
15}
An alias A record to the ALB - free, and it follows the ALB's IPs as they change (alias vs non-alias records). The certificate-manager module requests the certificate with DNS validation and writes the validation CNAME into the same zone, so Terraform can finish without you touching the console -
 1resource "aws_acm_certificate" "dev_proj_1_acm_arn" {
 2  domain_name       = var.domain_name
 3  validation_method = "DNS"
 4  lifecycle { create_before_destroy = false }
 5}
 6
 7resource "aws_route53_record" "validation" {
 8  for_each = {
 9    for dvo in aws_acm_certificate.dev_proj_1_acm_arn.domain_validation_options : dvo.domain_name => {
10      name = dvo.resource_record_name, record = dvo.resource_record_value, type = dvo.resource_record_type
11    }
12  }
13  zone_id = var.hosted_zone_id
14  name    = each.value.name
15  type    = each.value.type
16  records = [each.value.record]
17  ttl     = 60
18}
Notice there is no aws_acm_certificate_validation resource - the HTTPS listener references the certificate ARN directly, which works because by the time the ALB listener is created the CNAME has usually been seen by ACM. On a slow validation the listener creation fails with a certificate not yet issued error and a second terraform apply fixes it; adding the validation resource makes it deterministic (section 15). How ACM DNS validation and renewal work is in Part-16 of the AWS series and the ACM docs.
9. Step 6 - Unlock Jenkins and store the AWS credential
With the apply finished, https://jenkins.jhooq.org showed the Unlock Jenkins page. The initial password lives on the instance -
1ssh -i ~/.ssh/aws_ec2_terraform ubuntu@<jenkins-public-ip>
2sudo cat /var/lib/jenkins/secrets/initialAdminPassword
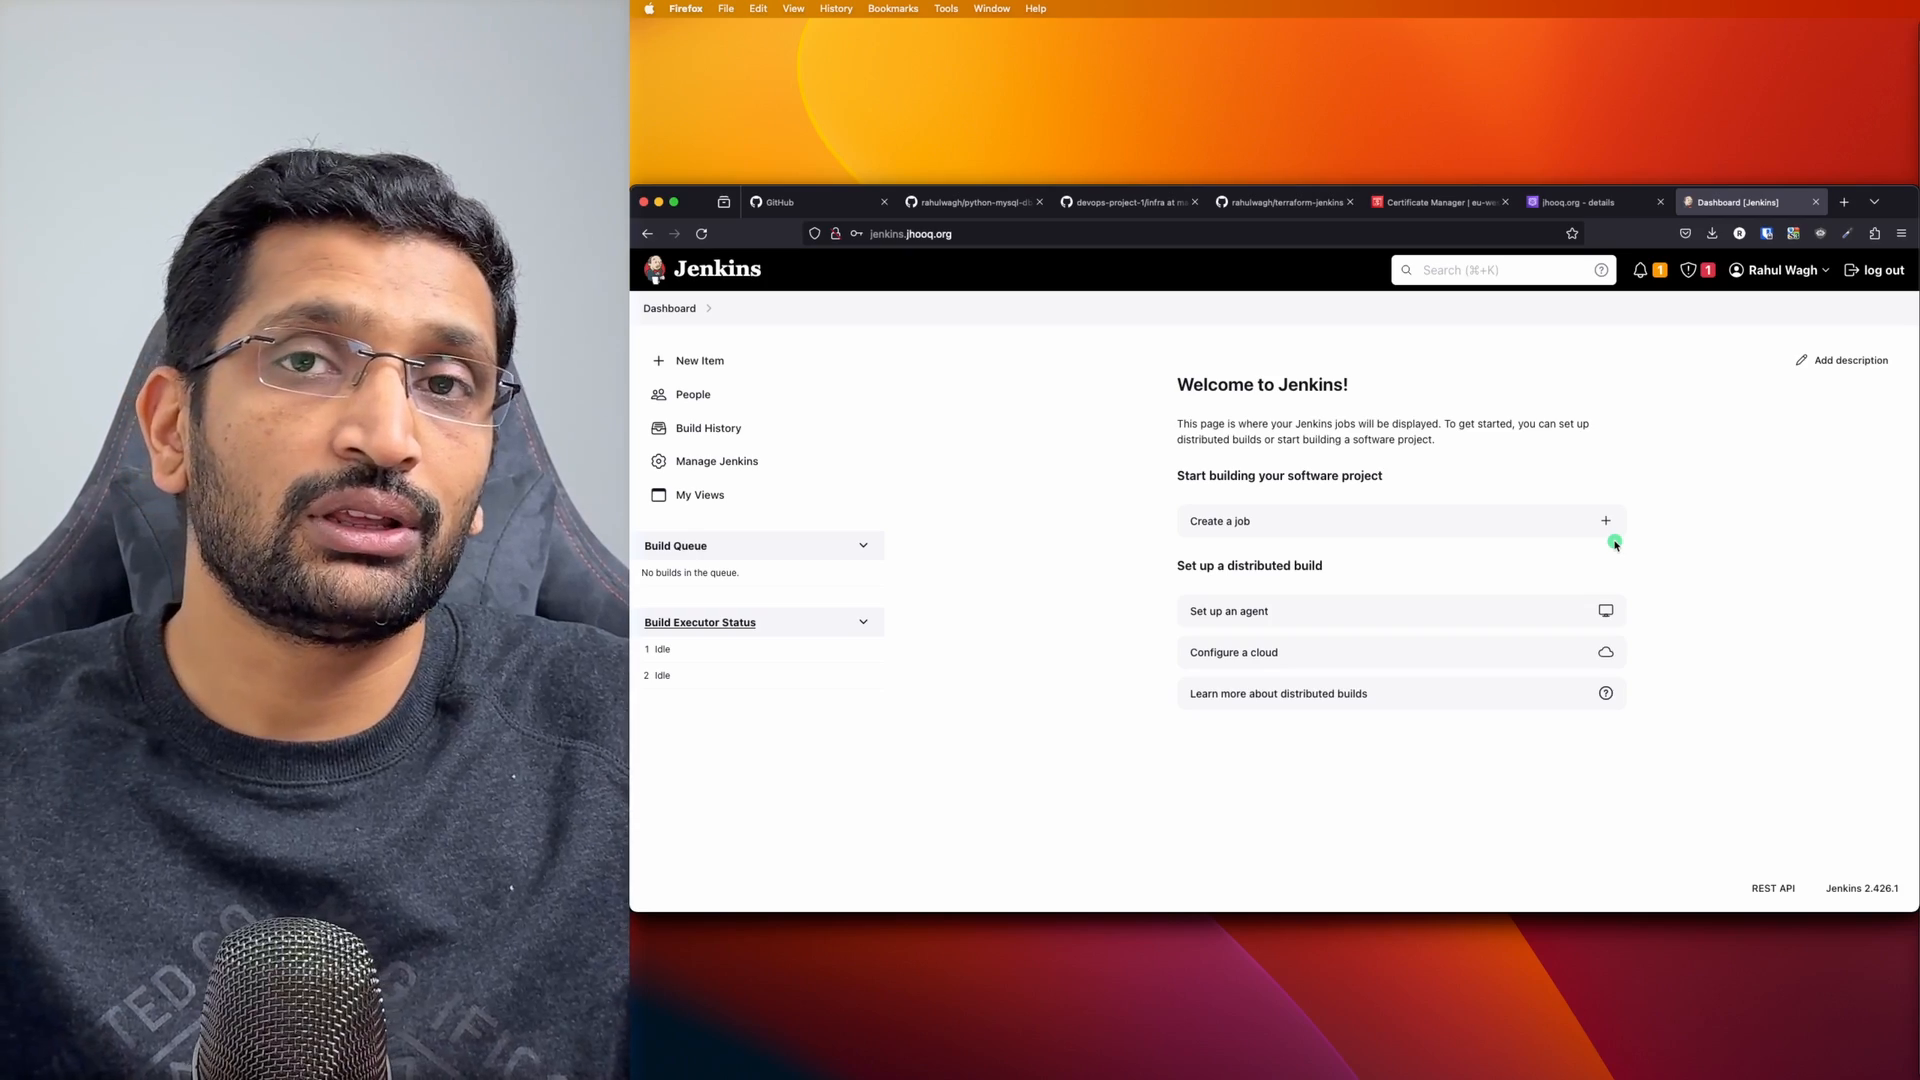
Paste it, Install suggested plugins, create the admin user, and you land on the dashboard - Jenkins 2.426.1 in the recording -
Then the one piece of configuration the pipeline depends on - an AWS credential. Manage Jenkins → Plugins → install the AWS Credentials plugin (it pulls in Credentials Binding). Manage Jenkins → Credentials → System → Global credentials → Add credentials - Kind AWS Credentials, Scope Global, ID aws-crendentails-rwagh (yes, with the typo - the Jenkinsfile uses this exact id), the Access Key ID and Secret Access Key of an IAM user from Part-1 of the AWS series, Create -
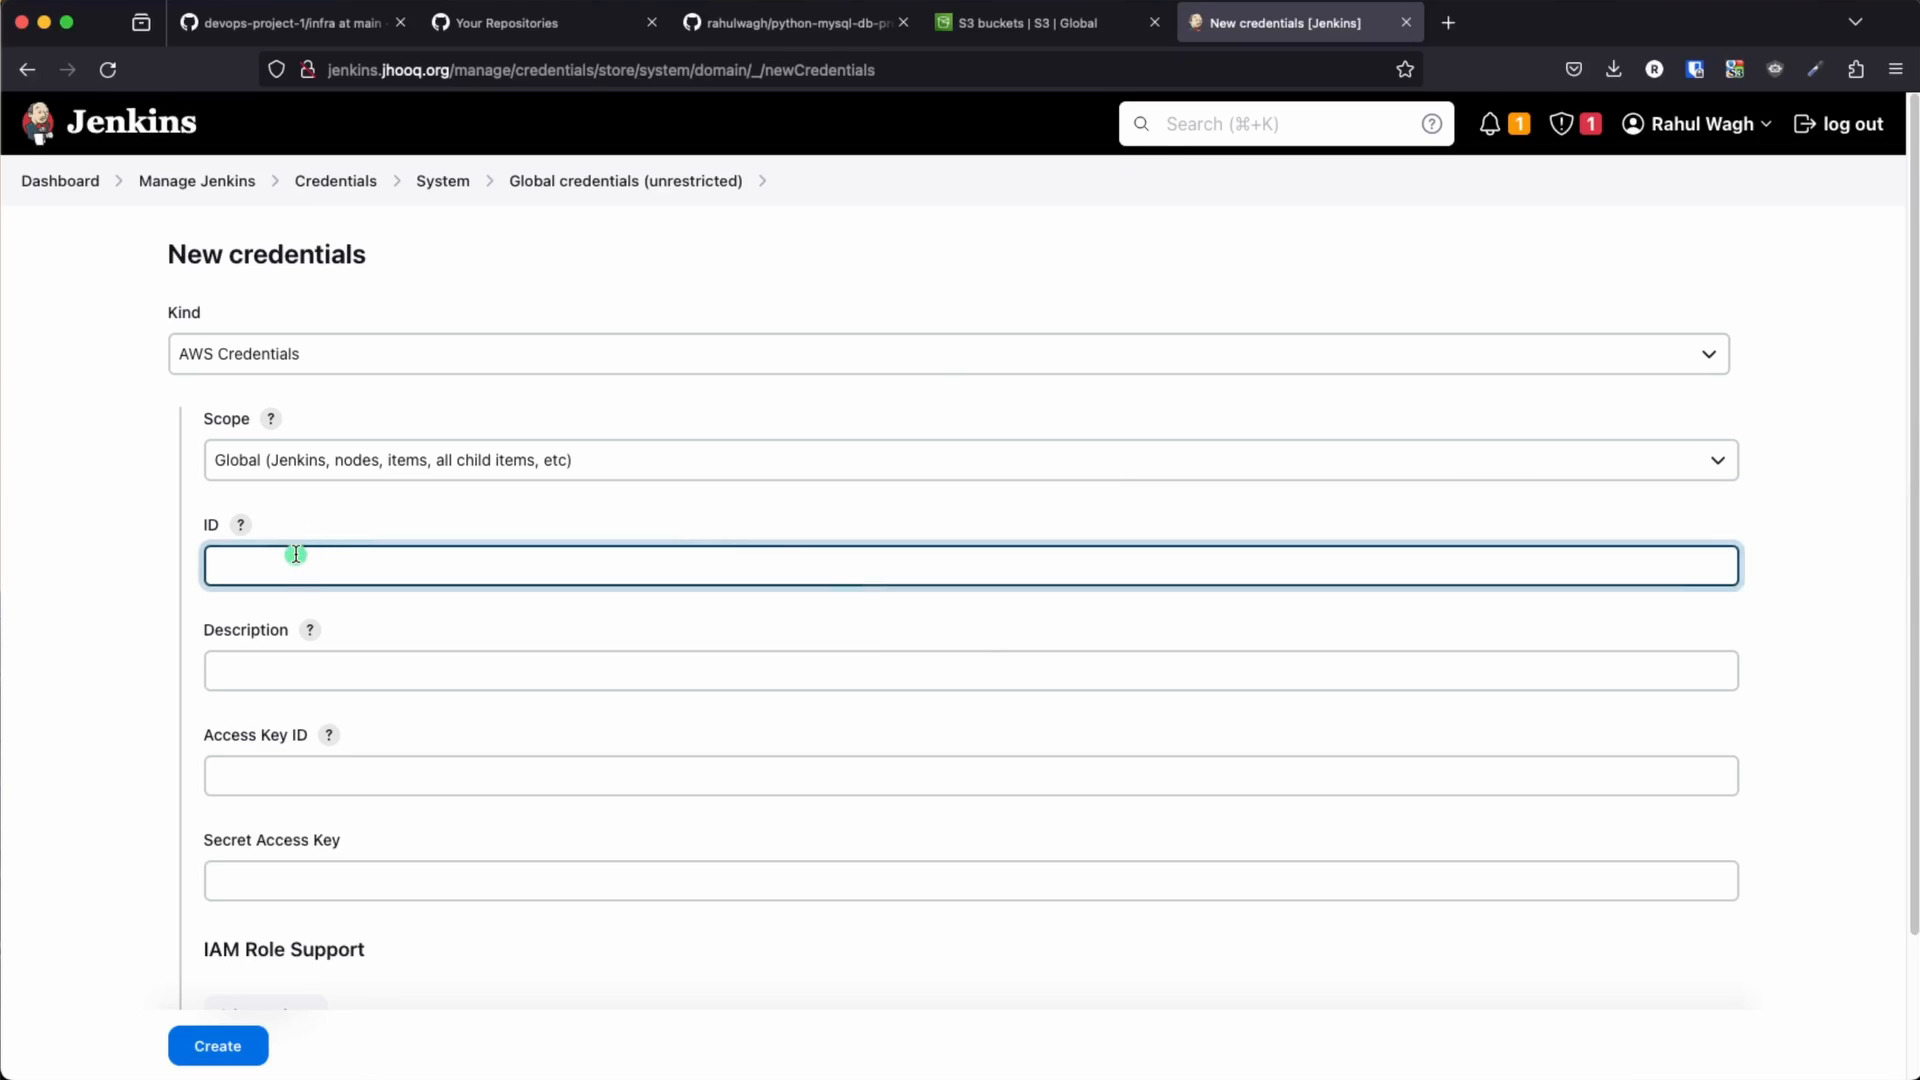
The AWS Credentials plugin stores the pair encrypted in Jenkins and the withCredentials step exposes it to the shell as AWS_ACCESS_KEY_ID and AWS_SECRET_ACCESS_KEY only for the duration of the block, which is what Terraform's provider reads first - that is why the hard-coded shared_credentials_files path in provider.tf does not matter on the Jenkins box. A better pattern today is an IAM instance profile on the Jenkins EC2 instance with the deploy permissions, so that no long-lived key exists at all; the plugin's IAM Role Support field is where you would put a role to assume.
10. Phase 2 - The Flask REST API and its MySQL routes
The application is deliberately tiny - 60 lines of Flask with PyMySQL, four routes and a page -
 1from flask import Flask, jsonify, render_template, request
 2import pymysql
 3
 4app = Flask(__name__)
 5
 6def get_db_connection():
 7    connection = pymysql.connect(host='mydb.cylck8yh5jkc.eu-central-1.rds.amazonaws.com',  # Replace with your RDS endpoint
 8                                 user='dbuser', password='dbpassword', db='devprojdb',
 9                                 charset='utf8mb4', cursorclass=pymysql.cursors.DictCursor)
10    return connection
11
12@app.route('/health')
13def health():
14    return "Up & Running"                     # the ALB health check hits this
15
16@app.route('/create_table')
17def create_table():
18    connection = get_db_connection(); cursor = connection.cursor()
19    cursor.execute("""CREATE TABLE IF NOT EXISTS example_table (
20                        id INT AUTO_INCREMENT PRIMARY KEY, name VARCHAR(255) NOT NULL)""")
21    connection.commit(); connection.close()
22    return "Table created successfully"
23
24@app.route('/insert_record', methods=['POST'])
25def insert_record():
26    name = request.json['name']
27    connection = get_db_connection(); cursor = connection.cursor()
28    cursor.execute("INSERT INTO example_table (name) VALUES (%s)", (name,))
29    connection.commit(); connection.close()
30    return "Record inserted successfully"
31
32@app.route('/data')
33def data():
34    connection = get_db_connection(); cursor = connection.cursor()
35    cursor.execute('SELECT * FROM example_table')
36    result = cursor.fetchall(); connection.close()
37    return jsonify(result)
38
39@app.route('/')
40def index():
41    return render_template('index.html')
42
43if __name__ == '__main__':
44    app.run(debug=True, host='0.0.0.0')      # Flask dev server on 0.0.0.0:5000
| Route | Method | Does |
|---|---|---|
/health | GET | returns Up & Running - the target group health check, no database involved, so the target stays healthy even if RDS is down |
/create_table | GET | creates example_table if it does not exist - you open it once in the browser after the first deploy |
/insert_record | POST | inserts {"name": "..."} with a parameterised query |
/data | GET | returns all rows as JSON |
/ | GET | the HTML page that calls insert and data from the browser |
The RDS endpoint and the password are hard-coded - fine for a 100-minute video, not fine for anything else; the fix is in section 15. Everything Flask-specific is standard Flask quickstart material and PyMySQL.
11. Step 7 - The application infrastructure - EC2, ALB on 5000, RDS, ACM, Route 53
devops-project-1/infra is the eu-central-1 twin of the Jenkins repo - same networking module with 10.0.0.0/16, same ALB and certificate modules pointed at jhooq.org, plus the pieces the app needs -
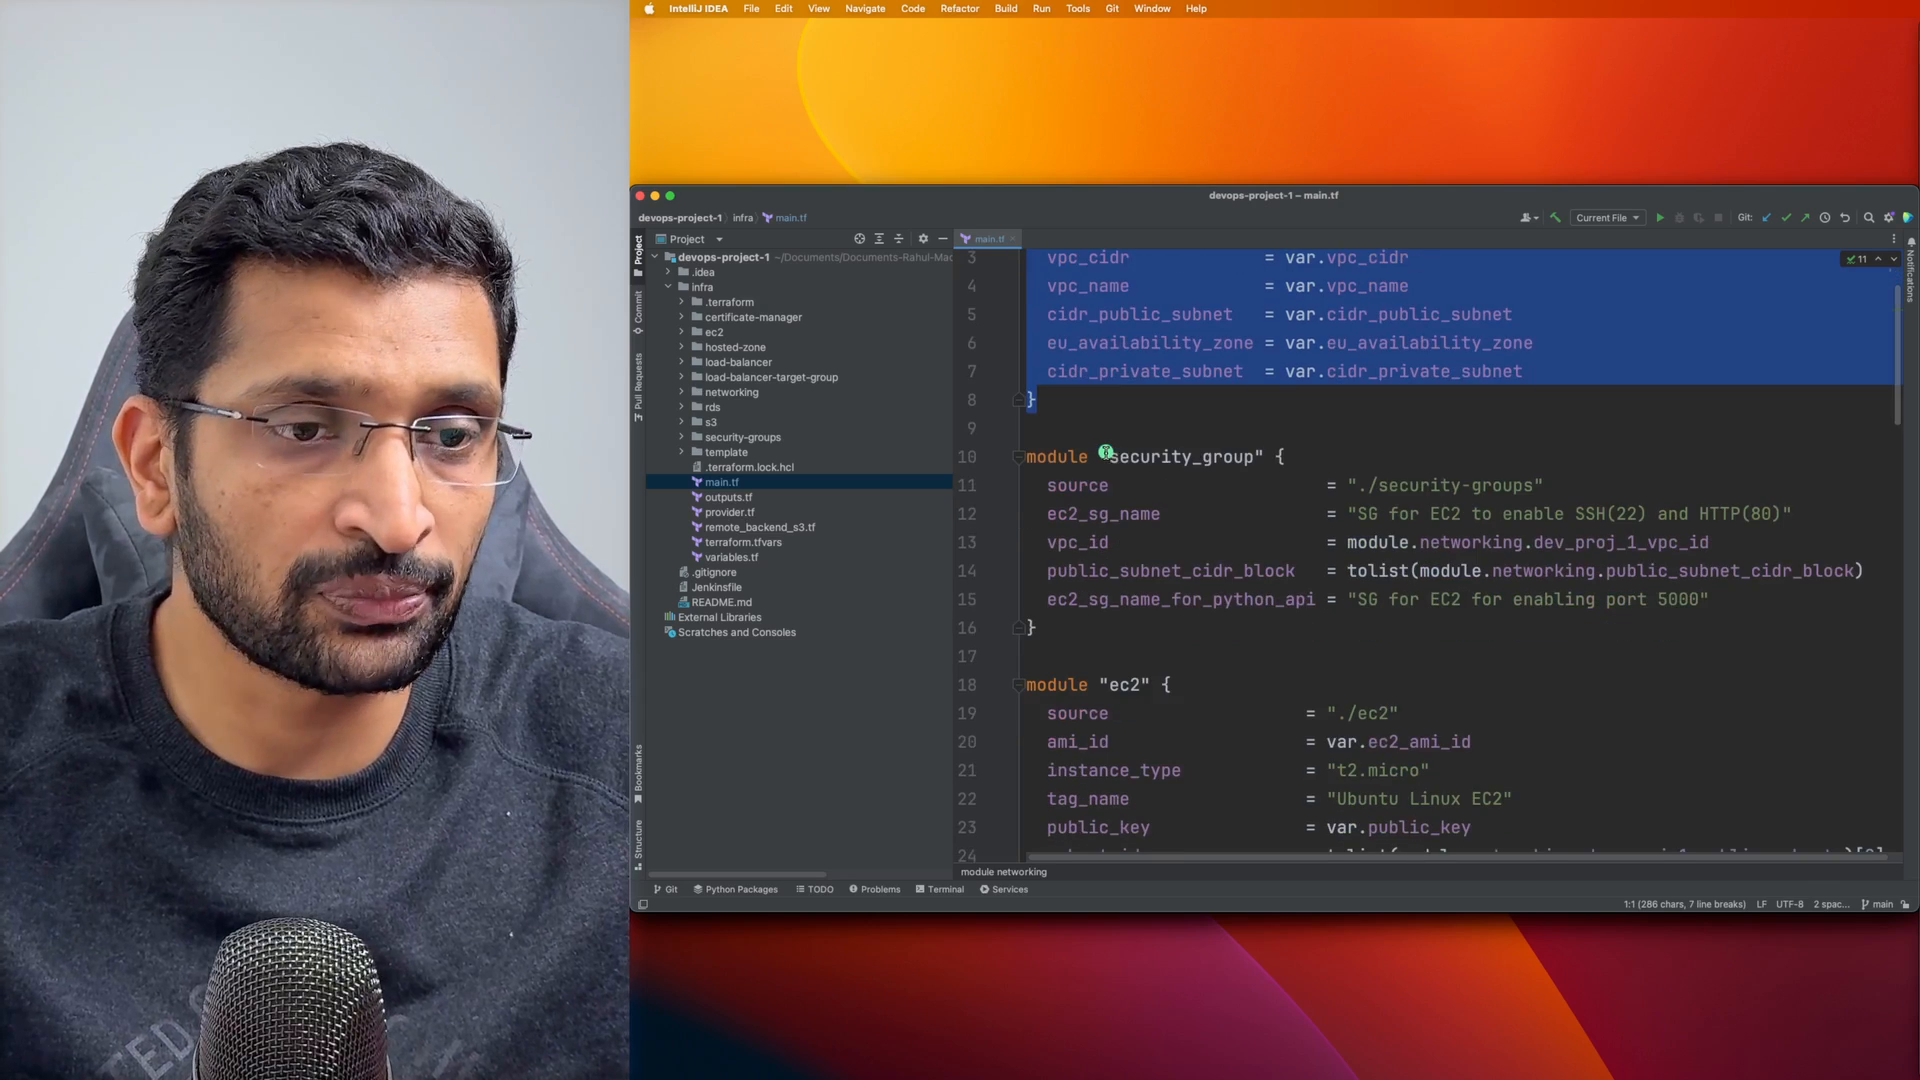
The EC2 instance - a t2.micro in the first public subnet, with the SSH/HTTP group and the port-5000 group, and this user data from infra/template/ec2_install_apache.sh (the name is historical, it installs Python, not Apache) -
 1#! /bin/bash
 2cd /home/ubuntu
 3yes | sudo apt update
 4yes | sudo apt install python3 python3-pip
 5git clone https://github.com/rahulwagh/python-mysql-db-proj-1.git
 6sleep 20
 7cd python-mysql-db-proj-1
 8pip3 install -r requirements.txt
 9echo 'Waiting for 30 seconds before running the app.py'
10setsid python3 -u app.py &
11sleep 30
setsid python3 -u app.py & is what keeps Flask running after cloud-init exits - crude, and it is the first thing to replace with a systemd unit and gunicorn when you take this further (EC2 user data docs).
The target group - port 5000, health check /health on 5000, matcher 200, the same thresholds as Jenkins. The ALB - an HTTP listener on 5000 (so you can test http://<alb-dns>:5000 before DNS and the certificate exist) and the HTTPS listener on 443, both forwarding to the 5000 target group.
The RDS instance - the module that is most out of date, exactly as it is in the repo -
 1resource "aws_db_subnet_group" "dev_proje_1_db_subnet_group" {
 2  name       = var.db_subnet_group_name
 3  subnet_ids = var.subnet_groups          # the PUBLIC subnets - see section 15
 4}
 5
 6resource "aws_db_instance" "default" {
 7  allocated_storage       = 10
 8  storage_type            = "gp2"
 9  engine                  = "mysql"
10  engine_version          = "5.7"         # Extended Support since March 2024 - use 8.4
11  instance_class          = "db.t2.micro" # cannot be created since June 2024 - use db.t4g.micro
12  identifier              = var.mysql_db_identifier   # mydb
13  username                = var.mysql_username        # dbuser
14  password                = var.mysql_password        # dbpassword - hard-coded, see section 15
15  vpc_security_group_ids  = [var.rds_mysql_sg_id]
16  db_subnet_group_name    = aws_db_subnet_group.dev_proje_1_db_subnet_group.name
17  db_name                 = var.mysql_dbname           # devprojdb
18  skip_final_snapshot     = true
19  apply_immediately       = true
20  backup_retention_period = 0
21  deletion_protection     = false
22}
skip_final_snapshot, zero backup retention and no deletion protection are the lab settings that let terraform destroy work in one go. The security group rds-sg allows 3306 only from the two public subnet CIDRs, which is where the EC2 instance lives - so the database is reachable from the app and from nothing on the internet, even though it sits in a public subnet (it has no public IP). The RDS in a VPC and aws_db_instance pages cover every argument.
Hosted zone and certificate - identical modules to Phase 1 with domain_name = "jhooq.org", giving an alias A record at the apex and a DNS-validated certificate on the 443 listener.
12. Step 8 - The Jenkinsfile explained
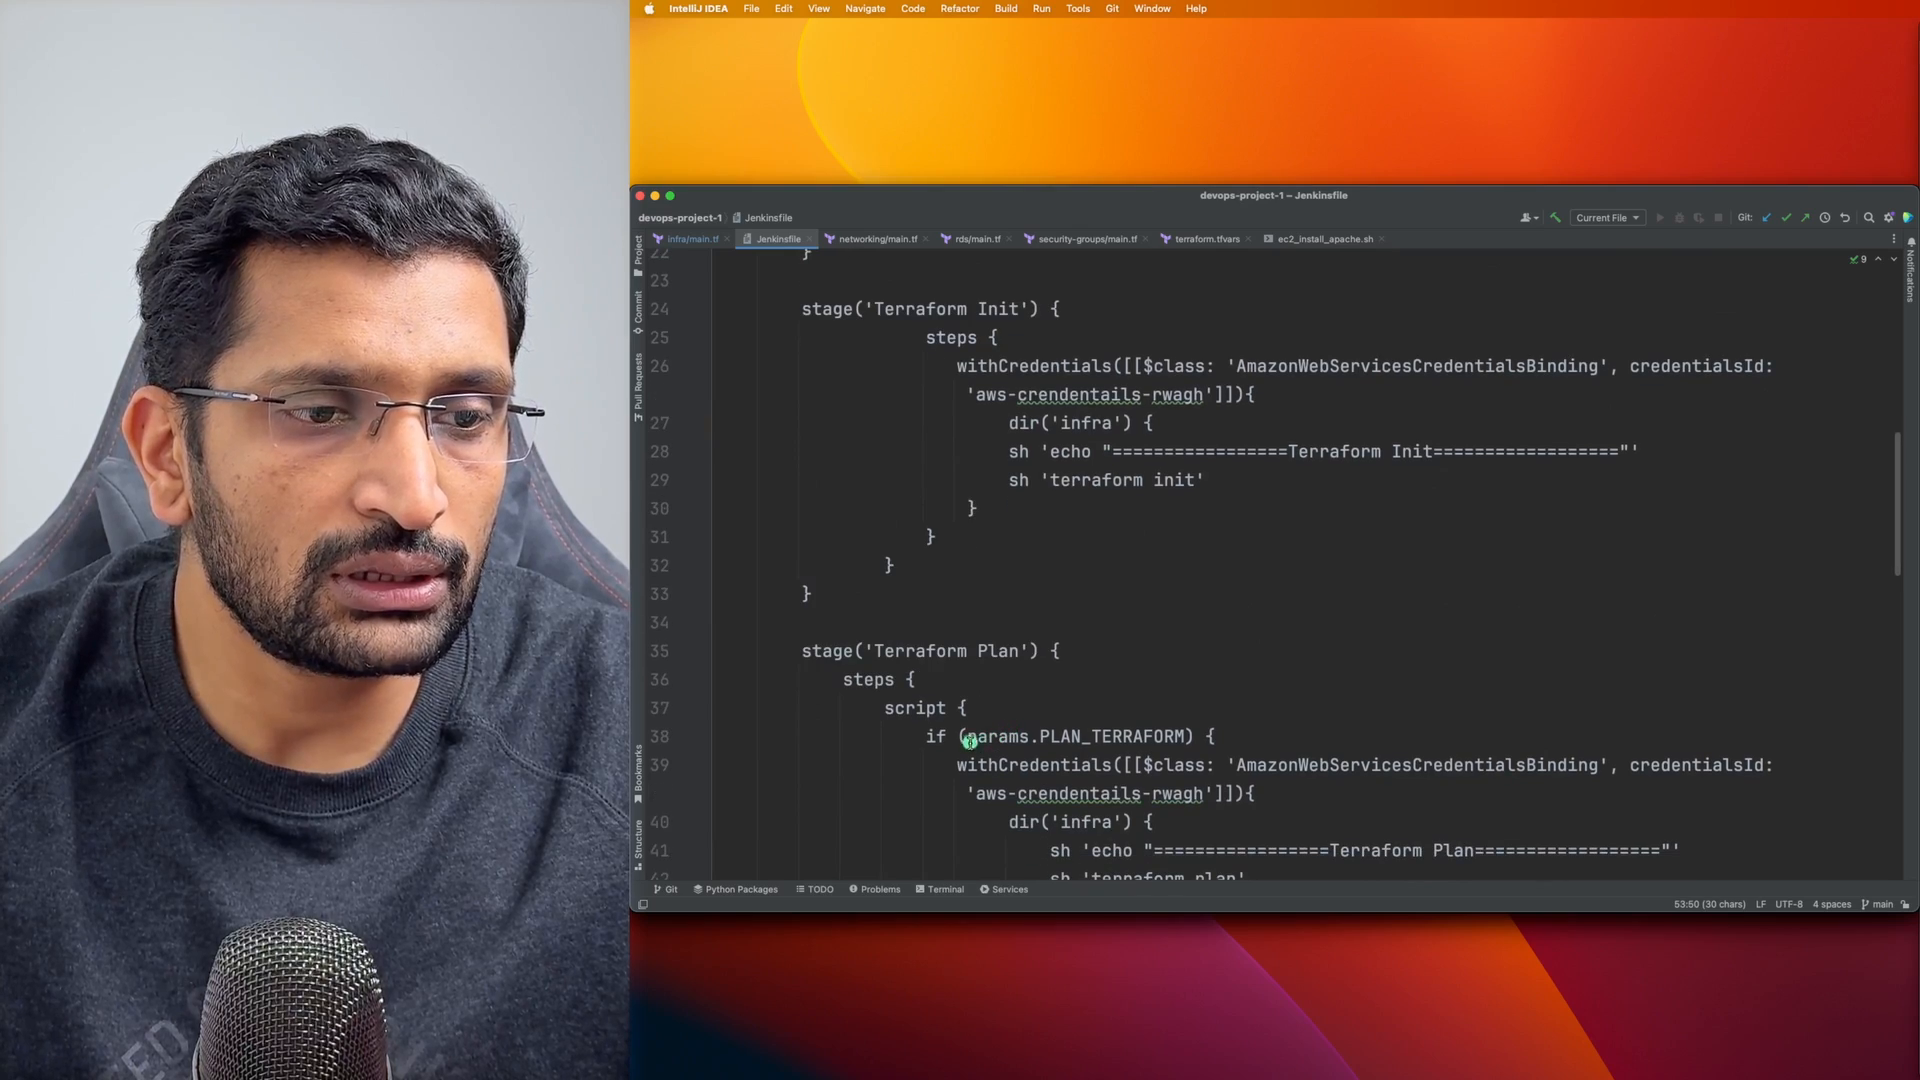
The whole pipeline is one declarative Jenkinsfile at the repository root -
 1pipeline {
 2    agent any
 3
 4    parameters {
 5        booleanParam(name: 'PLAN_TERRAFORM',    defaultValue: false, description: 'Check to plan Terraform changes')
 6        booleanParam(name: 'APPLY_TERRAFORM',   defaultValue: false, description: 'Check to apply Terraform changes')
 7        booleanParam(name: 'DESTROY_TERRAFORM', defaultValue: false, description: 'Check to apply Terraform changes')
 8    }
 9
10    stages {
11        stage('Clone Repository') {
12            steps {
13                deleteDir()                                   // clean workspace
14                git branch: 'main', url: 'https://github.com/rahulwagh/devops-project-1.git'
15                sh "ls -lart"
16            }
17        }
18
19        stage('Terraform Init') {
20            steps {
21                withCredentials([[$class: 'AmazonWebServicesCredentialsBinding', credentialsId: 'aws-crendentails-rwagh']]) {
22                    dir('infra') {
23                        sh 'echo "=================Terraform Init=================="'
24                        sh 'terraform init'
25                    }
26                }
27            }
28        }
29
30        stage('Terraform Plan') {
31            steps {
32                script {
33                    if (params.PLAN_TERRAFORM) {
34                        withCredentials([[$class: 'AmazonWebServicesCredentialsBinding', credentialsId: 'aws-crendentails-rwagh']]) {
35                            dir('infra') { sh 'terraform plan' }
36                        }
37                    }
38                }
39            }
40        }
41
42        stage('Terraform Apply') {
43            steps {
44                script {
45                    if (params.APPLY_TERRAFORM) {
46                        withCredentials([[$class: 'AmazonWebServicesCredentialsBinding', credentialsId: 'aws-crendentails-rwagh']]) {
47                            dir('infra') { sh 'terraform apply -auto-approve' }
48                        }
49                    }
50                }
51            }
52        }
53
54        stage('Terraform Destroy') {
55            steps {
56                script {
57                    if (params.DESTROY_TERRAFORM) {
58                        withCredentials([[$class: 'AmazonWebServicesCredentialsBinding', credentialsId: 'aws-crendentails-rwagh']]) {
59                            dir('infra') { sh 'terraform destroy -auto-approve' }
60                        }
61                    }
62                }
63            }
64        }
65    }
66}
How to read it -
parametersturns the job into Build with Parameters with three checkboxes. The first run of a job never shows them (Jenkins has to read the Jenkinsfile once to learn about them) - run it once with nothing ticked, then the checkboxes appear.- Init always runs; it needs the credential too, because the S3 backend is read during init.
- Each of Plan, Apply and Destroy is a stage whose body is skipped unless its parameter is true - the stage still appears in the UI, which makes the stage view honest about what happened.
withCredentials+AmazonWebServicesCredentialsBindingis the Credentials Binding step that setsAWS_ACCESS_KEY_IDandAWS_SECRET_ACCESS_KEYin the environment of theshsteps inside the block, and masks them in the console log.-auto-approveis what you want in a pipeline - the human approval happened when you ticked the box. A more mature version would run plan on every push and apply only from a protected branch; the pipeline syntax and Jenkinsfile docs have thewhenandinputdirectives for that.
Create the job - New Item → Pipeline, name dev-project-1-eu-central-1-pipeline, Pipeline → Definition Pipeline script from SCM, SCM Git, Repository URL https://github.com/rahulwagh/devops-project-1.git, Branch */main, Script Path Jenkinsfile. Save.
13. Step 9 - Run the pipeline - Build 4 and the live app
Build with Parameters → tick PLAN_TERRAFORM → Build first, read the plan in Console Output (about 30 resources), then Build with Parameters → tick APPLY_TERRAFORM → Build. The build that made it live in the recording was #4, on 6 December 2023 at 1:06 PM, from revision 826fe83128decdae10581ec38f58ccb0b5dc6981 on main - which is still the repository's HEAD today -
RDS is the slow part - a MySQL instance takes five to ten minutes to become available, and the EC2 user data needs the RDS endpoint only at request time, so the order does not matter. When the build goes green -
- Open
https://jhooq.org/health-Up & Running. - Open
https://jhooq.org/create_tableonce -Table created successfully. - Open
https://jhooq.org, type a name, Insert Record - the list below refreshes from/data-
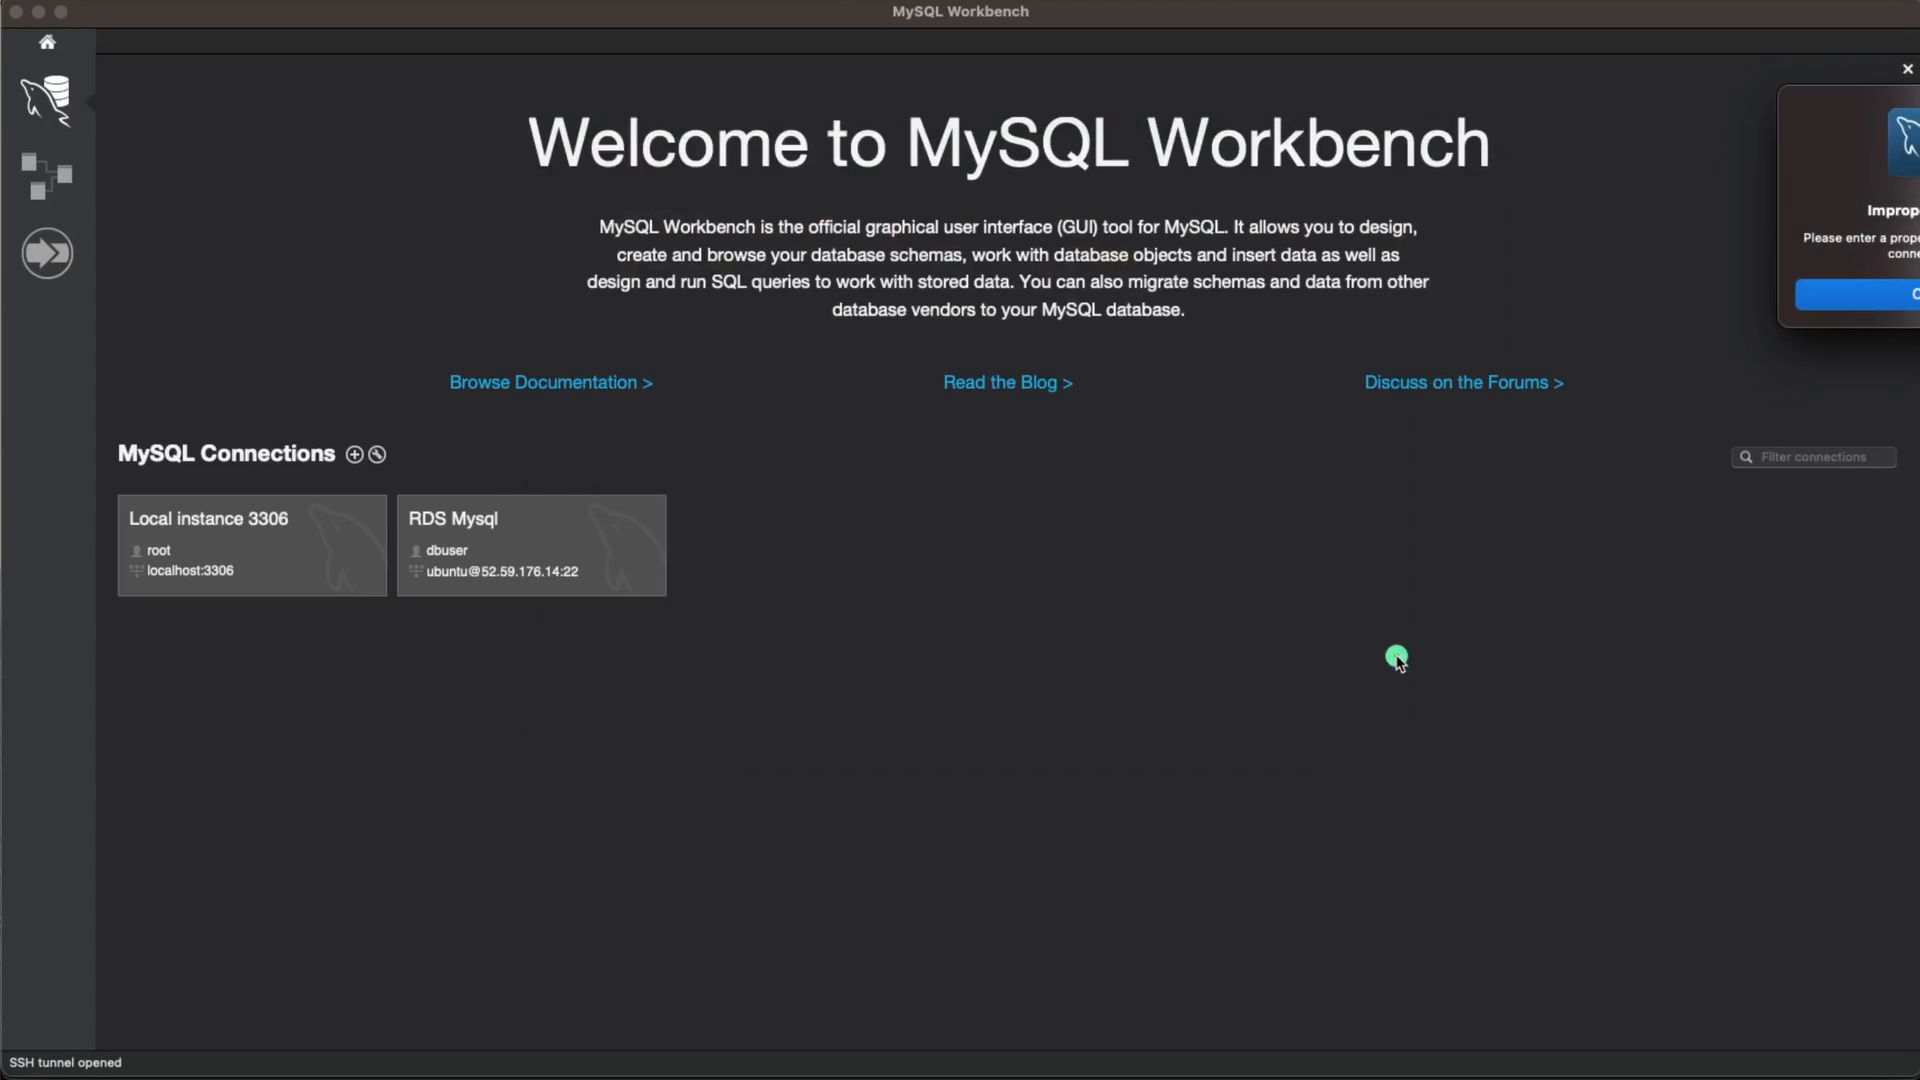
And to prove the rows are really in RDS and not in some local file, I opened MySQL Workbench with an SSH tunnel through the EC2 instance (ubuntu@52.59.176.14:22, the instance's public IP at the time) to the RDS endpoint as dbuser - because the security group only allows 3306 from inside the VPC, the tunnel is the only way in -
That is the whole project running: https://jenkins.jhooq.org in Ireland, https://jhooq.org in Frankfurt, both with valid certificates, both built by Terraform, one of them built by the other.
14. What broke when I ran this and what has changed since 2023
First the good news. I cloned both repositories today and ran terraform init -backend=false and terraform validate with Terraform v1.16.2 on Windows, 11 October 2026, using the AWS provider version pinned in the committed lock file -
 1$ terraform version
 2Terraform v1.16.2
 3on windows_amd64
 4
 5$ cd devops-project-1/infra && terraform init -backend=false -input=false
 6...
 7You may now begin working with Terraform. Try running "terraform plan" to see
 8any changes that are required for your infrastructure. All Terraform commands
 9should now work.
10
11$ terraform validate
12Success! The configuration is valid.
13
14$ cd ../../terraform-jenkins && terraform init -backend=false -input=false
15...
16$ terraform validate
17Success! The configuration is valid.
Both configurations are syntactically valid on a Terraform ten minor versions newer than the one in the video, with provider 5.26.0 from .terraform.lock.hcl. What validate cannot tell you is that AWS has retired three things the code asks for. These are the ones that will fail on apply, with the exact fix -
1. Jenkins will not start on Java 11. The installer installs openjdk-11-jdk-headless. Jenkins dropped Java 11 with LTS 2.462.3 in October 2024, and dropped Java 17 with LTS 2.541.3 in March 2026 - today's LTS needs Java 21 (or 25) per the Java support policy. The apt package installs, the service fails to start, and journalctl -u jenkins tells you why. The signing key also moved - the current Linux install docs use jenkins.io-2026.key under /etc/apt/keyrings/. Replace the first half of the installer with -
1sudo apt-get update
2sudo apt-get install -y fontconfig openjdk-21-jre-headless
3sudo mkdir -p /etc/apt/keyrings
4sudo wget -O /etc/apt/keyrings/jenkins-keyring.asc https://pkg.jenkins.io/debian-stable/jenkins.io-2026.key
5echo "deb [signed-by=/etc/apt/keyrings/jenkins-keyring.asc] https://pkg.jenkins.io/debian-stable binary/" \
6  | sudo tee /etc/apt/sources.list.d/jenkins.list > /dev/null
7sudo apt-get update
8sudo apt-get install -y jenkins
2. The Terraform download is the 32-bit build. terraform_1.6.5_linux_386.zip runs on a 64-bit Ubuntu but it is the wrong architecture and an old version. Use the amd64 build of a current release, or the HashiCorp apt repository from the install page -
1wget -O- https://apt.releases.hashicorp.com/gpg | sudo gpg --dearmor -o /usr/share/keyrings/hashicorp-archive-keyring.gpg
2echo "deb [signed-by=/usr/share/keyrings/hashicorp-archive-keyring.gpg] https://apt.releases.hashicorp.com $(lsb_release -cs) main" \
3  | sudo tee /etc/apt/sources.list.d/hashicorp.list
4sudo apt-get update && sudo apt-get install -y terraform
3. RDS rejects engine_version = "5.7" on db.t2.micro. Two separate retirements. MySQL 5.7 reached RDS end of standard support on 29 February 2024 and is only available under paid RDS Extended Support now (RDS MySQL versions); MySQL 8.0 followed on 31 July 2026, so the version to use is 8.4. And db.t2 instances cannot be created since 1 June 2024 and were unsupported from 31 December 2024 (DB instance classes) - use the Graviton db.t4g.micro, which is also the cheaper one. The two lines in infra/rds/main.tf -
1  engine_version = "8.4"
2  instance_class = "db.t4g.micro"
3  storage_type   = "gp3"           # while you are there - gp2 is the old default
4. The AMI ids are gone. ami-0694d931cee176e7d and ami-06dd92ecc74fdfb36 were the December 2023 Ubuntu images; AMIs are deregistered over time. Use a data source so that the code never goes stale again -
1data "aws_ami" "ubuntu" {
2  most_recent = true
3  owners      = ["099720109477"]   # Canonical
4  filter {
5    name   = "name"
6    values = ["ubuntu/images/hvm-ssd-gp3/ubuntu-noble-24.04-amd64-server-*"]
7  }
8}
9# then:  ami = data.aws_ami.ubuntu.id
5. Things that bit during the recording itself. The aws-crendentails-rwagh credential id has a typo that I never fixed - and the pipeline fails with "Could not find credentials entry with ID" if you spell it correctly in Jenkins. The parameters do not appear on the very first build. And the first terraform apply of the eu-central-1 stack can fail on the HTTPS listener if ACM has not finished validating the certificate - a second apply, or the aws_acm_certificate_validation resource below, fixes it.
15. What I would fix before production
The video optimises for "watch it work in 100 minutes". These are the changes between that and something you would run for real -
- Secrets.
mysql_password = "dbpassword"inmain.tfand the same password plus the RDS hostname insideapp.py. Generate the password withrandom_password, store it in Secrets Manager, let the instance read it through its instance profile, and pass the RDS endpoint to the app as an environment variable from a Terraform output. - RDS in private subnets. The subnet group uses the public subnets. The
privatesubnets already exist in the networking module - use them, and give the RDS security group the EC2 security group as its source instead of the subnet CIDRs (security group referencing). - No SSH from
0.0.0.0/0. Use Session Manager and delete port 22, or at least restrict it to your IP. The same for port 8080 on Jenkins - it only needs to be reachable from the ALB's security group. - An instance profile for Jenkins instead of an IAM user's access key in a Jenkins credential.
aws_acm_certificate_validationbetween the certificate and the listener, so that apply is deterministic.- A real app server.
setsid python3 -u app.py &in user data becomes a systemd unit runninggunicorn -b 0.0.0.0:5000 app:app, and the Flask debug flag goes. - HTTP to HTTPS redirect on the port 80 listener, and drop the port 5000 listener once DNS works.
terraform plan -outandapplyof that plan file in the pipeline, with the plan archived as a build artifact, so the thing you approved is the thing that runs.- Deletion protection and backups on RDS -
backup_retention_period = 7,deletion_protection = true- the moment there is data you care about.
16. What it costs
Everything here is billed by the hour, so destroy the stack when you stop (the DESTROY_TERRAFORM parameter exists for exactly that). The components with a price tag in eu-west-1 and eu-central-1 -
| Component | What you pay for |
|---|---|
| 2 Application Load Balancers | hourly rate plus LCUs - the ALB is the most expensive line in a tiny stack like this (ELB pricing) |
| EC2 t2.medium (Jenkins) + t2.micro (app) | hourly; the micro is free-tier eligible on accounts created before 15 July 2025 |
| RDS MySQL db.t4g.micro, 10 GB gp3 | hourly instance plus storage; 5.7 or 8.0 would add the Extended Support surcharge on top (RDS MySQL pricing) |
| 2 ACM public certificates | free |
| Route 53 hosted zone | $0.50 per month plus queries; alias queries to the ALB are free |
| S3 state buckets | cents |
Order of magnitude - a few dollars per day with everything running, dominated by the two ALBs; well under a dollar for an afternoon of testing if you destroy at the end.
17. Run it yourself
- Prerequisites - an AWS account with an IAM user and access keys (Part-1), the AWS CLI configured locally, Terraform 1.6 or newer, a domain in a Route 53 public hosted zone (replace
jhooq.organdjenkins.jhooq.orgin bothmain.tffiles), two S3 buckets for state with your own names in bothremote_backend_s3.tffiles, and an SSH key pair whose public key you paste into bothterraform.tfvars. - Apply the Phase 1 fixes from section 14 - Java 21 and the 2026 key in the installer, amd64 Terraform, the AMI data source.
git clone https://github.com/rahulwagh/terraform-jenkins && cd terraform-jenkins && terraform init && terraform plan && terraform apply- about five minutes, then wait another two for user data to finish.- Open
https://jenkins.<your-domain>, unlock withinitialAdminPassword, install suggested plugins plus AWS Credentials, add the credential with idaws-crendentails-rwagh(or fix the id in the Jenkinsfile of your fork). - Fork
devops-project-1, apply the RDS fix (8.4ondb.t4g.micro), the AMI data source, your domain and bucket, and point the pipeline'sgitstep at your fork. - Create the pipeline job from SCM, run it once with nothing ticked, then once with PLAN, then once with APPLY.
/health,/create_table, insert a record. Then DESTROY when you are done - both stacks, the Jenkins one from your laptop.
18. Conclusion
This project is still the best single exercise I know for connecting the DevOps dots - Terraform builds the CI server, the CI server runs Terraform to build the application stack, and a real application with a real database comes up behind a load balancer on a real domain with HTTPS. Keep the architecture, update the three things AWS and Jenkins retired (Java 21, MySQL 8.4 on db.t4g, amd64 Terraform), and then do the section 15 list one item at a time - that sequence is a better DevOps curriculum than most courses.
Every building block has its own deep dive on this blog - VPC and subnets, security groups, launching EC2, ALB vs NLB, ACM, Route 53, and on the Terraform side EC2 with Terraform, IAM with Terraform and the full Terraform index. The Jenkins-on-Kubernetes variant of a CI/CD pipeline is in my Kubernetes CI/CD post.
Did this save you a debugging session? Stay in the loop -
- Subscribe on YouTube - every post here has a screen-recorded companion video.
- Code on GitHub - the repositories, Terraform and scripts behind these posts.
Posts in this series
- Real-Time DevOps Project - Deploy a Python Flask REST API with MySQL RDS on AWS Using Terraform and Jenkins, Step by Step (Jenkins on EC2 in eu-west-1, App and Database in eu-central-1, ALB, ACM, Route 53, Custom Domain with HTTPS)
- Stop Building Stateless AI Chatbots - Build a Durable Kubernetes Incident Agent with Trigger.dev chat.agent, Next.js, the Vercel AI SDK and Human-in-the-Loop Approvals (OOMKilled Demo on minikube and EKS)
- AI Caught My Cloud Failure Before I Did