Azure Virtual Network Step by Step - Create a VNet, Subnets, Network Security Group and Route Table, Understand Default Outbound Access Retirement, NAT Gateway and Test with Two VMs (Azure Networking Part-1)
If you have followed my AWS VPC post, you already know the mental model - a private network, subnets inside it, a route table deciding where packets go and a firewall deciding whether they are allowed. Azure has the same four pieces, but each one behaves a little differently, and the differences are exactly where people coming from AWS get stuck.
In this Part-1 of my Azure networking series we are going to build a virtual network (VNet) with two subnets, attach a network security group (NSG) and a route table, give the network a proper way out to the internet, and prove it works with two virtual machines. Everything is done in the portal first and then repeated with the Azure CLI. I have updated the post against the current Microsoft Learn documentation, because one big thing changed since I recorded the video - default outbound access is being retired, and new VNets created in the portal are now private by default.
Table of Content
- What is an Azure virtual network
- VNet vs AWS VPC - the differences that matter
- Plan the address space and subnets
- Step 1 - Create a resource group
- Step 2 - Create the virtual network and subnets in the portal
- Step 3 - How Azure routes traffic - system routes and route tables
- Step 4 - Network security groups
- Step 5 - The way out - default outbound access retirement and NAT gateway
- Step 6 - Create two VMs and test
- The same build with the Azure CLI
- AWS to Azure translation table
- Clean up
- Conclusion
1. What is an Azure virtual network
An Azure virtual network is your private network in an Azure region. You pick one or more address spaces in CIDR notation (10.0.0.0/16), carve them into subnets, and place resources - VMs, load balancers, private endpoints, AKS nodes - into those subnets. Resources in the same VNet can talk to each other over private IPs by default, the VNet is isolated from every other customer, and the service itself is free - you pay for the things inside it and for data leaving the region.
A few properties worth memorising -
- A VNet is regional. It spans all availability zones of the region, and so does every subnet in it. You never pin a subnet to a zone.
- A VNet lives in a resource group and a subscription; the subscription is the billing boundary (close to an AWS account).
- Address space can be added after creation, and since 2023 the address range of a subnet can be modified while it has resources, within limits.
- Communication between two VNets needs VNet peering or a VPN - the equivalent of VPC peering and Transit Gateway on the AWS side. That is Part-2 of this series.
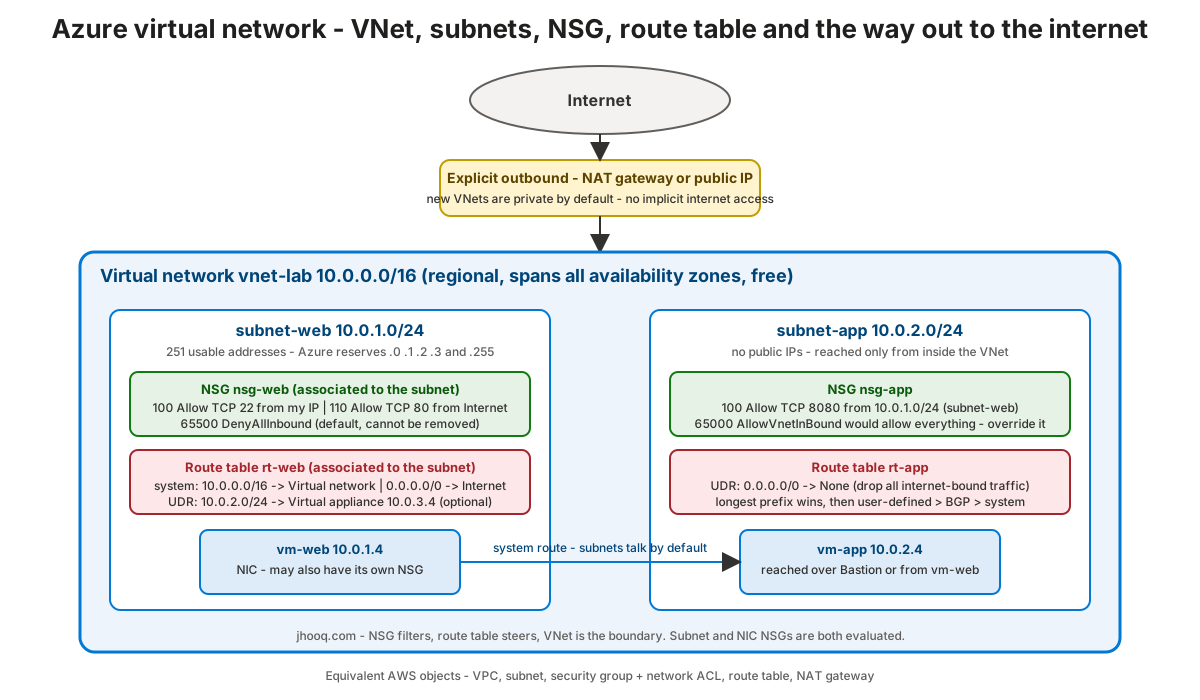
2. VNet vs AWS VPC - the differences that matter
| Topic | AWS VPC | Azure VNet |
|---|---|---|
| Scope | regional, subnets are zonal | regional, subnets span all zones |
| Reserved IPs per subnet | 5 | 5 (.0 network, .1 gateway, .2 and .3 DNS, last = broadcast) |
| Public vs private subnet | decided by the route table (route to an Internet Gateway) | no such concept - a VM is reachable because its NIC has a public IP, or through a load balancer / Bastion |
| Outbound internet | NAT Gateway or public IP, nothing implicit | historically default outbound access (implicit, Microsoft-owned IP) - being retired; new VNets are private by default and need a NAT gateway, public IP or load balancer outbound rule |
| Stateful firewall | security group (instance level, allow only) | NSG (subnet and/or NIC level, allow and deny, priorities) |
| Stateless firewall | network ACL (subnet level) | none - NSG covers both roles |
| Routing | one route table per subnet, explicit | system routes created automatically, optional user-defined routes override them |
| Internet gateway | explicit resource you attach | implicit - the 0.0.0.0/0 → Internet system route exists on day one |
| DNS | Route 53 Resolver at VPC+2 | Azure-provided DNS at 168.63.129.16 |
| Cost | free (NAT Gateway, IPv4, data transfer extra) | free (NAT gateway, public IPs, Bastion, data transfer extra) |
The two that bite - there is no public subnet, and an NSG can deny. We use both below.
3. Plan the address space and subnets
Same rules as in my CIDR post - pick a private range that does not overlap with anything you may peer with later, and leave room.
| Resource | Range | Purpose |
|---|---|---|
vnet-lab | 10.0.0.0/16 | 65,536 addresses, room for 256 /24 subnets |
subnet-web | 10.0.1.0/24 | VMs that are reachable from the internet (via public IP or load balancer) |
subnet-app | 10.0.2.0/24 | VMs with no public IP at all |
AzureBastionSubnet | 10.0.250.0/26 | only needed for the Basic or Standard Bastion SKU; the Developer SKU we use needs none |
Azure reserves five addresses in every subnet, so a /24 gives you 251 usable IPs and the smallest allowed subnet is a /29 (3 usable). Do not use the default 10.0.0.0/24 subnet name default - rename it, you will thank yourself when there are twenty subnets.
4. Step 1 - Create a resource group
Every Azure resource must live in a resource group - a logical folder with a region, used for lifecycle (delete the group, delete everything) and access control.
- Sign in to the Azure portal at
portal.azure.com. - Search Resource groups → + Create.
- Subscription - yours. Resource group -
rg-network-lab. Region - pick one close to you (I use North Europe; your region choice for the group only decides where its metadata lives). - Review + create → Create.
5. Step 2 - Create the virtual network and subnets in the portal
Following the current quickstart -
- Search Virtual networks → + Create.
- Basics tab - subscription, resource group
rg-network-lab, Namevnet-lab, Region the same as your VMs will use (this one matters - a VNet is regional). - Security tab - this is where the portal offers Azure Bastion, Azure Firewall and Azure DDoS Network Protection. Leave all three disabled for now - Firewall and DDoS Protection are expensive, and we add Bastion separately in step 6.
- IP addresses tab - the portal pre-fills IPv4 address space
10.0.0.0/16and a subnet nameddefaultat10.0.0.0/24. Click thedefaultsubnet, Edit subnet - Namesubnet-web, Starting address10.0.1.0, Subnet size/24 (256 addresses). Leave NAT gateway and Service endpoints empty for the moment and Save. - + Add a subnet -
subnet-app,10.0.2.0,/24. On this one tick Private subnet (no default outbound access) - read step 5 for why. In recent portal builds this is ticked by default for every new subnet. - Review + create → Create. A VNet is created in seconds.
Open the VNet → Subnets and you will see both ranges, each with Available IPs 251.
6. Step 3 - How Azure routes traffic - system routes and route tables
This is the biggest conceptual difference from AWS, so let's be exact. From the traffic routing documentation - Azure automatically creates a route table for every subnet with these system routes, which you cannot edit or delete -
| Address prefix | Next hop type | Meaning |
|---|---|---|
the VNet's address space (10.0.0.0/16) | Virtual network | all subnets in the VNet reach each other, no configuration needed |
0.0.0.0/0 | Internet | everything else goes to the internet (traffic to Azure public services stays on the Microsoft backbone) |
10.0.0.0/8, 172.16.0.0/12, 192.168.0.0/16, 100.64.0.0/10 | None | private ranges that are not yours are dropped, not sent to the internet |
Optional system routes appear when you enable features - Virtual network peering routes for each peered VNet's range, Virtual network gateway routes for VPN or ExpressRoute prefixes, and VirtualNetworkServiceEndpoint routes for service endpoints.
To change behaviour you create a route table resource with user-defined routes (UDRs) and associate it with a subnet - one route table per subnet, one table can serve many subnets, up to 400 UDRs per table. A UDR can point to one of five next hop types - Virtual appliance (a firewall VM, you give its private IP), Virtual network gateway, Virtual network, Internet, or None (drop).
Route selection - longest prefix match first; if prefixes are equal, user-defined beats BGP beats system.
Let's create one and use it to make subnet-app unable to reach the internet at all -
- Search Route tables → + Create - resource group
rg-network-lab, region same as the VNet, Namert-app, Propagate gateway routes Yes (only matters with a VPN gateway). - Open
rt-app→ Routes → + Add - Route namedrop-internet, Destination type IP Addresses, Destination IP addresses/CIDR ranges0.0.0.0/0, Next hop type None. Add. - Subnets → + Associate →
vnet-lab/subnet-app.
From now on a VM in subnet-app can reach 10.0.0.0/16 (longer prefix, Virtual network route still wins) but nothing outside. Later, when you add a firewall appliance, you change this one route to Virtual appliance and every VM in the subnet is inspected - that is the classic hub-and-spoke pattern.
Two warnings from the docs - never associate a route table with a 0.0.0.0/0 route to the GatewaySubnet of a VPN gateway, and remember a 0.0.0.0/0 UDR to an appliance also captures traffic to Azure public services unless you add service endpoints or private endpoints.
7. Step 4 - Network security groups
A network security group is a stateful firewall made of rules. Each rule has a name, a priority (100 to 4096 - lower number wins, processing stops at the first match), source and destination (Any, an IP or CIDR, a service tag like Internet, VirtualNetwork, AzureLoadBalancer, Storage, or an application security group), protocol (TCP, UDP, ICMP, ESP, AH, Any), port range, direction and an action - Allow or Deny. Being able to deny is what an AWS security group cannot do.
Every NSG is born with six default rules you cannot delete, only override with a lower-numbered rule -
| Direction | Priority | Name | Effect |
|---|---|---|---|
| Inbound | 65000 | AllowVNetInBound | anything from the VirtualNetwork tag (the whole VNet and peered VNets) is allowed |
| Inbound | 65001 | AllowAzureLoadBalancerInBound | health probes from the load balancer |
| Inbound | 65500 | DenyAllInbound | everything else is dropped |
| Outbound | 65000 | AllowVnetOutBound | to the VNet |
| Outbound | 65001 | AllowInternetOutBound | to the internet |
| Outbound | 65500 | DenyAllOutBound | everything else |
Note the implication of AllowVNetInBound - inside a VNet everything is open by default, even between subnets. If you want subnet-app to accept only port 8080 from subnet-web, you must add a Deny rule for the rest.
An NSG can be associated with a subnet, a NIC, or both. For inbound traffic the subnet NSG is evaluated first, then the NIC NSG; for outbound it is NIC first, then subnet. Both must allow. My rule of thumb - one NSG per subnet, NIC-level NSGs only for exceptions, otherwise you will debug two rule sets for every connection.
Let's create the two NSGs from the diagram -
- Search Network security groups → + Create -
nsg-web, region as the VNet. Create a second one,nsg-app. nsg-web→ Inbound security rules → + Add - Source IP Addresses, your public IP with/32, Destination port ranges22, Protocol TCP, Action Allow, Priority100, Nameallow-ssh-from-me. Add another - Source Service TagInternet, port80, Allow, priority110,allow-http.nsg-app→ inbound - Source IP Addresses10.0.1.0/24, port8080, Allow, priority100,allow-app-from-web. Then Source Service TagVirtualNetwork, port*, Deny, priority200,deny-rest-of-vnet. The deny at 200 overrides the default allow at 65000.- Associate -
nsg-web→ Subnets → + Associate →vnet-lab/subnet-web;nsg-app→subnet-app.
Rules apply immediately to new connections; existing flows keep running until they end (NSGs track flows, that is what makes them stateful - no need for a return rule).
Two more facts you will need - NSGs cannot block the Azure platform addresses 168.63.129.16 and 169.254.169.254 (DNS, DHCP, metadata, health) unless you target the AzurePlatformDNS / AzurePlatformIMDS service tags explicitly, and outbound port 25 is blocked on pay-as-you-go and free subscriptions no matter what your NSG says.
8. Step 5 - The way out - default outbound access retirement and NAT gateway
Here is the part that changed since the video. Historically a VM with no public IP, no NAT gateway and no load balancer could still reach the internet, because Azure silently gave it a Microsoft-owned default outbound IP that could change at any time. Microsoft is retiring default outbound access -
- The portal already creates subnets as private by default (the Private subnet checkbox we ticked).
- For the API version released after 31 March 2026, subnets in new VNets have
defaultOutboundAccess = false- ARM, Bicep, CLI, PowerShell and Terraform using that API version all get private subnets unless you say otherwise. - Existing VNets are not changed. VMs in them keep getting default outbound IPs until you flip the subnet to private - and flipping requires a stop/deallocate of the VMs for the NIC to update.
- Microsoft's reasons - security (Zero Trust), clarity (explicit over implicit) and stability (the implicit IP is not yours and does not support fragmented packets or ICMP).
So a VM in a private subnet has exactly four ways to reach the internet, and the docs recommend the first -
- Azure NAT gateway associated with the subnet - the equivalent of the AWS NAT Gateway. Regional, zonal or zone-redundant, scales to 50 Gbps and 64,000 SNAT ports per public IP, up to 16 public IPs. Priced per hour plus per GB processed - see the NAT gateway overview.
- A Standard public IP on the VM's NIC.
- A Standard load balancer with outbound rules and the VM in its backend pool.
- A firewall or network virtual appliance reached through a
0.0.0.0/0UDR.
Add a NAT gateway for subnet-web -
- Search NAT gateways → + Create -
rg-network-lab, Namenatgw-lab, region as the VNet, Availability zone No zone or a zone, Idle timeout 4 minutes. - Outbound IP tab → Create a new public IP address
pip-natgw(Standard SKU is forced). - Subnet tab →
vnet-lab→ ticksubnet-web. - Review + create → Create.
Every VM in subnet-web now egresses through pip-natgw - one fixed IP you can give to vendors for allow-listing, exactly like the Elastic IP of an AWS NAT Gateway. subnet-app deliberately gets no path out at all in this lab (its route table drops 0.0.0.0/0); in a real deployment you would attach the same NAT gateway to it and keep the UDR for the firewall case only.
9. Step 6 - Create two VMs and test
We need something inside the subnets to prove the rules. Instead of public IPs on the VMs I use Azure Bastion in the Developer SKU - it is free, needs no dedicated subnet and no public IP, and gives you browser SSH over port 443 (the Basic and Standard SKUs need an AzureBastionSubnet of at least /26 and a Standard public IP, and they are billed hourly).
- Search Bastions → + Create -
rg-network-lab, Namebastion-lab, region as the VNet, Tier Developer, Virtual networkvnet-lab. Create. - Search Virtual machines → + Create → Azure virtual machine - Name
vm-web, region as the VNet, Image Ubuntu Server 24.04 LTS, SizeStandard_B1s(cheap), Authentication SSH public key, Usernameazureuser, let Azure generate the key pair and download it. Networking tab - Virtual networkvnet-lab, Subnetsubnet-web (10.0.1.0/24), Public IP None, NIC network security group None (we filter at the subnet). Review + create → Create. - Repeat for
vm-appinsubnet-app, same settings. - Open
vm-web→ Connect → Bastion → usernameazureuser, upload the private key → Connect. You get a shell in the browser.
Now the tests, from vm-web -
 1# private IP of this VM - 10.0.1.4 (the first usable address, .0-.3 are reserved)
 2ip -4 addr show eth0
 3
 4# subnet-to-subnet over the system route - works (nsg-app allows nothing but 8080 from 10.0.1.0/24, ICMP is denied by our rule 200)
 5ping -c 2 10.0.2.4      # fails - expected, the deny rule at priority 200 catches ICMP
 6nc -zv 10.0.2.4 8080    # connects once something listens on 8080 on vm-app
 7
 8# internet through the NAT gateway - note the public IP equals pip-natgw
 9curl -s ifconfig.me
10sudo apt-get update
And from vm-app (connect with Bastion the same way) -
1# start something on 8080 so the test above succeeds
2python3 -m http.server 8080 &
3
4# no route out - the UDR drops 0.0.0.0/0, this hangs and times out
5curl -m 5 -s ifconfig.me || echo "no internet from subnet-app - as designed"
If curl from vm-web hangs, check three things in order - the NAT gateway is associated with subnet-web (NAT gateway → Subnets), the subnet is not carrying a route table that overrides 0.0.0.0/0, and nsg-web's outbound rules still include the default AllowInternetOutBound. Network Watcher → Connection troubleshoot and NSG diagnostics show you exactly which rule or route made the decision - it is the equivalent of the Reachability Analyzer on AWS and worth learning early.
10. The same build with the Azure CLI
Install the Azure CLI, az login, and run -
 1RG=rg-network-lab
 2LOC=northeurope
 3
 4# resource group
 5az group create --name $RG --location $LOC
 6
 7# VNet with the web subnet; --default-outbound false makes it a private subnet
 8az network vnet create --resource-group $RG --name vnet-lab --location $LOC \
 9  --address-prefix 10.0.0.0/16 \
10  --subnet-name subnet-web --subnet-prefixes 10.0.1.0/24
11
12az network vnet subnet create --resource-group $RG --vnet-name vnet-lab \
13  --name subnet-app --address-prefixes 10.0.2.0/24 --default-outbound false
14
15# NSGs and rules
16az network nsg create --resource-group $RG --name nsg-web --location $LOC
17az network nsg rule create --resource-group $RG --nsg-name nsg-web --name allow-ssh-from-me \
18  --priority 100 --direction Inbound --access Allow --protocol Tcp \
19  --source-address-prefixes "$(curl -s ifconfig.me)/32" --destination-port-ranges 22
20az network nsg rule create --resource-group $RG --nsg-name nsg-web --name allow-http \
21  --priority 110 --direction Inbound --access Allow --protocol Tcp \
22  --source-address-prefixes Internet --destination-port-ranges 80
23
24az network nsg create --resource-group $RG --name nsg-app --location $LOC
25az network nsg rule create --resource-group $RG --nsg-name nsg-app --name allow-app-from-web \
26  --priority 100 --direction Inbound --access Allow --protocol Tcp \
27  --source-address-prefixes 10.0.1.0/24 --destination-port-ranges 8080
28az network nsg rule create --resource-group $RG --nsg-name nsg-app --name deny-rest-of-vnet \
29  --priority 200 --direction Inbound --access Deny --protocol "*" \
30  --source-address-prefixes VirtualNetwork --destination-port-ranges "*"
31
32# route table for subnet-app - drop everything that is not in the VNet
33az network route-table create --resource-group $RG --name rt-app --location $LOC
34az network route-table route create --resource-group $RG --route-table-name rt-app \
35  --name drop-internet --address-prefix 0.0.0.0/0 --next-hop-type None
36
37# associate NSGs and the route table
38az network vnet subnet update --resource-group $RG --vnet-name vnet-lab --name subnet-web \
39  --network-security-group nsg-web
40az network vnet subnet update --resource-group $RG --vnet-name vnet-lab --name subnet-app \
41  --network-security-group nsg-app --route-table rt-app
42
43# NAT gateway for subnet-web
44az network public-ip create --resource-group $RG --name pip-natgw --sku Standard --location $LOC
45az network nat gateway create --resource-group $RG --name natgw-lab --location $LOC \
46  --public-ip-addresses pip-natgw --idle-timeout 4
47az network vnet subnet update --resource-group $RG --vnet-name vnet-lab --name subnet-web \
48  --nat-gateway natgw-lab
49
50# two VMs without public IPs
51az vm create --resource-group $RG --name vm-web --image Ubuntu2404 --size Standard_B1s \
52  --vnet-name vnet-lab --subnet subnet-web --public-ip-address "" --nsg "" \
53  --admin-username azureuser --generate-ssh-keys
54az vm create --resource-group $RG --name vm-app --image Ubuntu2404 --size Standard_B1s \
55  --vnet-name vnet-lab --subnet subnet-app --public-ip-address "" --nsg "" \
56  --admin-username azureuser --generate-ssh-keys
57
58# see the effective routes and NSG rules the way Azure evaluates them
59NIC=$(az vm show -g $RG -n vm-app --query "networkProfile.networkInterfaces[0].id" -o tsv)
60az network nic show-effective-route-table --ids $NIC -o table
61az network nic list-effective-nsg --ids $NIC
The show-effective-route-table output is the single most useful troubleshooting command in Azure networking - it lists the system routes, the peering routes and your UDRs with their State (Active or Invalid), so you can see exactly which route was overridden by which.
11. AWS to Azure translation table
| You know this on AWS | On Azure it is |
|---|---|
| VPC | Virtual network |
| Subnet (zonal) | Subnet (regional, spans zones) |
| Route table + Internet Gateway | System routes (0.0.0.0/0 → Internet built in) |
| Custom route table entry | User-defined route in a route table |
| Security group | NSG (but NSG can deny and has priorities) |
| Network ACL | NSG on the subnet |
| NAT Gateway | NAT gateway |
| Elastic IP | Standard public IP |
| Bastion host you build yourself | Azure Bastion service |
| VPC peering | VNet peering |
| Transit Gateway | Virtual WAN hub (or hub-and-spoke peering) |
| VPC Flow Logs | Virtual network flow logs (Network Watcher) |
| Reachability Analyzer | Network Watcher connection troubleshoot |
| Prefix list | Service tag / application security group |
12. Clean up
Everything is in one resource group, so one command removes the VMs, disks, NICs, Bastion, NAT gateway and public IP -
1az group delete --name rg-network-lab --yes --no-wait
The NAT gateway, the Standard public IP and the two VMs are the only things in this lab that cost money by the hour; Bastion Developer SKU and the VNet itself are free.
More videos on this topic - Part-2 and Part-3 of my Azure networking series - public and private subnets in a demo, and the Azure Bastion setup for public and private subnets -
13. Conclusion
An Azure virtual network gives you the same four building blocks as a VPC - network, subnets, routes and a firewall - but with three twists you must internalise - subnets span zones and there is no public subnet, system routes exist from day one and user-defined routes override them, and NSGs can deny and have priorities, with everything inside the VNet open by default. Add to that the retirement of default outbound access - every new design needs an explicit NAT gateway, public IP or load balancer outbound rule - and you have the full Part-1 picture.
In Part-2 we connect two VNets with peering and look at the hub-and-spoke pattern. If you are building VMs with Terraform, the Azure Virtual Machine course has the azurerm_virtual_network, azurerm_subnet and azurerm_network_security_group resources for exactly this layout, and the AWS versions of this post are the VPC, NAT Gateway and security groups parts of my AWS series.