AWS Organizations Step by Step - Multi-Account Setup, Organizational Units, Service Control Policies (SCPs), Consolidated Billing and Identity Center (AWS Part-2)
In Part-1 we created IAM users inside one AWS account. Sooner or later - usually the first time a developer deletes something in production while "just testing" - you realise that one account is the wrong unit. The AWS answer is AWS Organizations - many accounts (dev, test, prod, security, sandbox) under one management account, with one bill, a tree of organizational units and service control policies as guardrails that even the account administrators cannot get around.
This is Part-2 of the series. We are going to create an organization, create and invite accounts, build the OU structure, write our first SCP, log in to a member account, and look at how IAM Identity Center turns all those accounts into a single login. Everything is checked against the current Organizations documentation - a few things, like resource control policies, did not exist when I recorded the video in 2023.
Table of Content
- Why multiple AWS accounts?
- The vocabulary - management account, root, OUs, member accounts, policies
- Create the organization
- Create a new member account (and the email plus-alias trick)
- Invite an existing account
- Organise accounts into organizational units
- Service control policies - guardrails that admins cannot bypass
- Access a member account - OrganizationAccountAccessRole
- Consolidated billing and delegated administrators
- IAM Identity Center - one login for every account
- Where AWS Control Tower fits
- Common AWS Organizations errors and how to fix them
- Conclusion
1. Why multiple AWS accounts?
An AWS account is the hardest boundary AWS has. Resources, IAM, service quotas, and the blast radius of a mistake all stop at the account edge. Teams split into accounts for -
- Isolation - a bug or a leaked key in
devcannot touchprod. - Blast radius of permissions - "admin in the sandbox account" is a safe thing to give a junior engineer; "admin in the only account" is not.
- Quotas - every account gets its own limits (VPCs, EIPs, Lambda concurrency).
- Billing - cost per account is free and exact; cost per tag is a project.
- Compliance - a
log-archiveaccount nobody can write to, asecurityaccount that reads everything.
AWS Organizations is what makes many accounts manageable instead of chaotic - and it is free.
2. The vocabulary - management account, root, OUs, member accounts, policies
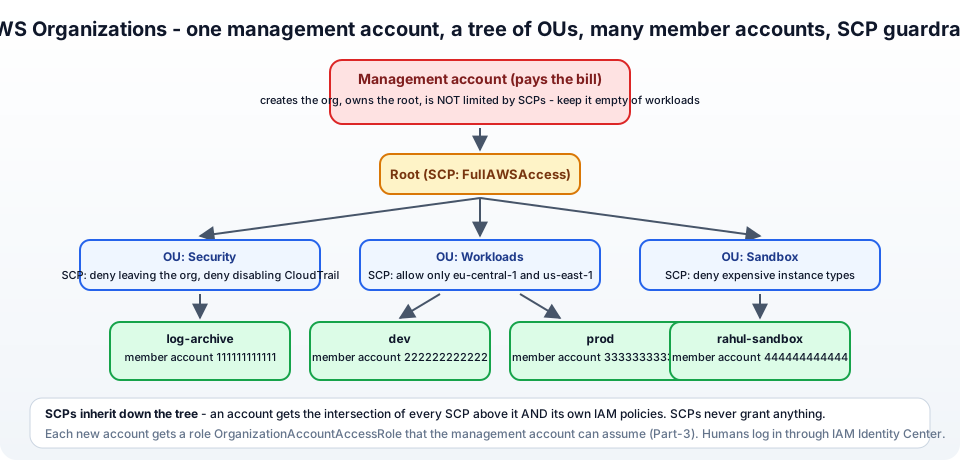
From the concepts page -
- Organization - the whole thing. One per management account.
- Management account - the account that created the organization. It pays the consolidated bill, creates and invites accounts, and attaches policies. SCPs do not apply to it, which is exactly why you should run no workloads in it - the best practices for the management account say so in bold.
- Member account - every other account in the organization.
- Root - the top of the tree (not the root user - an unfortunate name clash). Policies attached here apply to every account.
- Organizational unit (OU) - a folder in the tree, up to five levels deep. Accounts and OUs sit inside OUs; policies attached to an OU apply to everything below it.
- Policies - service control policies (SCPs) cap what identities in member accounts can do; resource control policies (RCPs) cap what can be done to resources in member accounts; plus tag, backup, AI-services-opt-out and declarative policies.
- Features - an organization runs in all features mode (the default now, needed for SCPs) or the legacy consolidated billing only mode.
3. Create the organization
Log in to the account that will become the management account - ideally a fresh account created only for this purpose, with nothing in it, root MFA on - and follow the create an organization steps -
- Search for AWS Organizations and open it.
- Click Create an organization. That is it - the organization is created with all features enabled and your account becomes the management account.
- AWS sends a verification email to the root email address of the management account. Verify it - until you do, you cannot invite other accounts.
On the AWS accounts page you now see the Root with your single account under it. From here on, log in to this account only to manage the organization and the bill.
With the CLI (from the management account) -
1aws organizations create-organization --feature-set ALL
2aws organizations describe-organization
4. Create a new member account (and the email plus-alias trick)
Every AWS account needs a unique root email address. You do not want twenty mailboxes, so use plus-addressing - most mail providers (Gmail, Google Workspace, Outlook) deliver rahul+aws-dev@jhooq.com to rahul@jhooq.com while AWS sees a different address. Better still, use a group alias like aws-prod@jhooq.com that several admins receive.
- AWS accounts → Add an AWS account → Create an AWS account.
- AWS account name -
dev. - Email address of the account's owner -
rahul+aws-dev@jhooq.com. - IAM role name - leave
OrganizationAccountAccessRole. This role is created inside the new account withAdministratorAccessand a trust policy that lets the management account assume it - it is how you get into the account at all (see section 8). - Create AWS account. It takes a minute; the status shows
In progressthen the account ID appears.
1aws organizations create-account --email rahul+aws-dev@jhooq.com --account-name dev
2aws organizations describe-create-account-status --create-account-request-id car-xxxxxxxx
Things to know about created accounts -
- There is no root password set. If you ever need the root user, use "Forgot password" at the sign-in page with the account email. You rarely should - in fact Organizations can now centrally manage root access and remove root credentials from member accounts entirely.
- The account inherits consolidated billing - it has no payment method of its own.
- The default quota is 10 accounts per organization; a quota increase takes a form, not money.
- Closing an account from Organizations (Actions → Close) is allowed for up to 10% of your accounts per 30 days, and the account stays recoverable for 90 days.
Repeat for prod, log-archive, rahul-sandbox - or let Control Tower's Account Factory do it (section 11).
5. Invite an existing account
Already have accounts? Add an AWS account → Invite an existing AWS account, enter the account ID or email, add a note, Send invitation. The invited account's admin opens Organizations → Invitations and accepts. Invited accounts keep their own payment method until they join, then move to the consolidated bill.
The difference from created accounts - an invited account does not get OrganizationAccountAccessRole automatically. Create it yourself in that account (IAM → Roles → Create role → AWS account → the management account ID → AdministratorAccess) if you want the same access path.
Invitations expire after 15 days, and you can have 20 open at a time.
6. Organise accounts into organizational units
Accounts dropped under the root all get the same policies. OUs let you group them by how they should be governed - not by team or by cost centre (tags do that). The structure AWS recommends, and that Control Tower creates, looks like this -
1Root
2├── Security          (log-archive, audit)        <- SCP: nobody may turn off CloudTrail/Config
3├── Infrastructure    (network, shared-services)
4├── Workloads
5│   ├── Prod          (prod-web, prod-data)       <- SCP: approved regions only
6│   └── NonProd       (dev, test)
7├── Sandbox           (rahul-sandbox, ...)        <- SCP: cheap instance types, no IAM users
8└── Suspended         (accounts being closed)     <- SCP: deny *
- AWS accounts → Root → Actions → Create new (under Organizational unit). Name
Workloads, create. - Select
Workloads→ Actions → Create new again forProdandNonProd. - Tick an account → Actions → Move → pick the OU.
1ROOT_ID=$(aws organizations list-roots --query 'Roots[0].Id' --output text)
2aws organizations create-organizational-unit --parent-id "$ROOT_ID" --name Workloads
3aws organizations move-account --account-id 222222222222 --source-parent-id "$ROOT_ID" --destination-parent-id ou-xxxx-yyyyyyyy
An account can be in exactly one OU, and an OU can be up to five levels deep.
7. Service control policies - guardrails that admins cannot bypass
This is the feature that makes Organizations worth it. A service control policy looks like an IAM policy, but it never grants anything - it defines the maximum permissions available in the accounts it is attached to. The docs put it precisely: the effective permissions are the logical intersection between what is allowed by the SCP and what is allowed by the identity-based and resource-based policies.
What that means in practice -
- Every entity starts with the default SCP
FullAWSAccess(allow*). Do not detach it unless you replace it with your own allow-list - otherwise every API call in the member accounts fails. - An SCP attached to an OU applies to every account below it, including nested OUs. An account gets only what every level above it allows.
- SCPs affect all identities in member accounts, including their root user - but not the management account, and not service-linked roles.
- Giving a user
AdministratorAccessin the account does not override an SCP deny. This is the whole point. - SCPs need all features mode and have to be enabled once - Policies → Service control policies → Enable.
- Limits - 5 SCPs attached per root, OU or account, 5,120 characters per SCP, 1,000 policies per organization.
Two classic SCPs. The first stops a member account from leaving the organization (which would escape all the guardrails) -
1{
2  "Version": "2012-10-17",
3  "Statement": [{
4    "Sid": "DenyLeavingTheOrganization",
5    "Effect": "Deny",
6    "Action": "organizations:LeaveOrganization",
7    "Resource": "*"
8  }]
9}
The second restricts workloads to two regions while leaving the global services alone (IAM, STS, Organizations, CloudFront, Route 53, Support, Health are global and must be exempted - the SCP examples page maintains the full list) -
 1{
 2  "Version": "2012-10-17",
 3  "Statement": [{
 4    "Sid": "DenyAllOutsideEUAndUSEast1",
 5    "Effect": "Deny",
 6    "NotAction": [
 7      "iam:*", "sts:*", "organizations:*", "account:*", "budgets:*", "cloudfront:*",
 8      "route53:*", "route53domains:*", "support:*", "health:*", "trustedadvisor:*",
 9      "waf:*", "shield:*", "access-analyzer:*", "ce:*", "cur:*", "pricing:*"
10    ],
11    "Resource": "*",
12    "Condition": {
13      "StringNotEquals": { "aws:RequestedRegion": ["eu-central-1", "us-east-1"] }
14    }
15  }]
16}
Create them under Policies → Service control policies → Create policy (paste JSON or use the visual editor), then Actions → Attach to the OU. And the one rule AWS writes in capital letters - do not attach a new SCP to the root without testing it. Attach it to a Test OU, move one account in, verify the account still works, then move it up the tree.
Since late 2024 there is a sibling - resource control policies (RCPs) - which cap what principals (including ones from outside the organization) can do to your resources, e.g. "no S3 bucket in any account may be shared with an account outside the org". SCPs restrict your identities; RCPs restrict your resources. Both are deny-only guardrails.
8. Access a member account - OrganizationAccountAccessRole
You created the dev account; now how do you log in? Not with a root password - with the role that was created for you. From the management account -
Console - account menu (top right) → Switch role → Account 222222222222, Role OrganizationAccountAccessRole, a display name and colour → Switch Role. You are now an administrator in dev; the account menu shows the role, and the entry is saved for next time.
CLI - a named profile that assumes the role -
1# ~/.aws/config
2[profile mgmt]
3region = eu-central-1
4
5[profile dev]
6role_arn       = arn:aws:iam::222222222222:role/OrganizationAccountAccessRole
7source_profile = mgmt
8region         = eu-central-1
1aws sts get-caller-identity --profile dev
2# "Arn": "arn:aws:sts::222222222222:assumed-role/OrganizationAccountAccessRole/botocore-session-..."
The identity you switch from needs sts:AssumeRole on that role ARN (the management account admins have it through AdministratorAccess). All of this - trust policies, session duration, MFA conditions - is the subject of Part-3, AWS assume IAM role, and the Terraform version of a multi-account provider setup is in Terraform and AWS multi-account setup.
Lock it down afterwards - in real organizations the day-to-day path into accounts is Identity Center (section 10), and OrganizationAccountAccessRole is reserved for automation and break-glass, with a trust policy that requires MFA.
9. Consolidated billing and delegated administrators
Consolidated billing is automatic - one invoice to the management account, with the cost of every member account broken out in Cost Explorer. Two bonuses - volume tiered pricing (S3, data transfer) is calculated across all accounts together, and Reserved Instances / Savings Plans are shared across accounts by default. Set AWS Budgets alerts in the management account per linked account; a sandbox account with a $50 budget alarm is a cheap insurance policy.
Delegated administrator - the management account should do as little as possible, so Organizations lets you hand the administration of specific services to a member account - GuardDuty, Security Hub, Config, CloudTrail, IAM Access Analyzer, Identity Center and more. Settings → Delegated administrator for AWS Organizations / per service → register the security account. Humans then work in security, not in the management account.
10. IAM Identity Center - one login for every account
With five accounts, nobody wants five sets of IAM users. IAM Identity Center sits on top of the organization -
- Enable it in the management account (or a delegated admin) - it needs Organizations.
- Choose the identity source - the built-in directory (create users and groups right there), or connect Google Workspace, Microsoft Entra ID, Okta via SAML/SCIM so your company logins work.
- Create permission sets - these are IAM roles by another name:
AdministratorAccess,PowerUserAccess,ViewOnlyAccess, or custom. - Assign a user or group to accounts with a permission set - "the
developersgroup getsPowerUserAccessindevandViewOnlyAccessinprod". - Users open the access portal
https://d-xxxxxxxxxx.awsapps.com/start(give it an alias), log in once with MFA, and see tiles for every account and role they may use.
For the CLI -
1aws configure sso          # paste the portal URL, pick account + role
2aws sso login --profile dev-admin
3aws s3 ls --profile dev-admin
Short-lived credentials, central MFA, one place to remove a leaver. This is the setup the IAM best practices mean when they say "use federation with temporary credentials", and once it is in place the IAM users from Part-1 shrink to CI and break-glass.
11. Where AWS Control Tower fits
Everything above is manual. AWS Control Tower automates the opinionated version of it - a landing zone with the Security OU (log-archive and audit accounts), CloudTrail and Config organization-wide, controls (the guardrails, a mix of SCPs, Config rules and hooks - 500+ of them), Identity Center enabled, and Account Factory to vend new accounts that land in the right OU with the right baseline. If you are starting fresh with more than a handful of accounts, start with Control Tower; if you already have an organization, it can be enrolled. I walk through it in the Part-24 video on Control Tower, and the dedicated post is on the way.
12. Common AWS Organizations errors and how to fix them
1. You must verify your email address before you can invite accounts / EMAIL_VERIFICATION_REQUIRED - Click the link AWS sent to the management account's root email (resend from the Organizations settings page).
2. ConstraintViolationException: ACCOUNT_NUMBER_LIMIT_EXCEEDED - You hit the default of 10 accounts. Request an increase in Service Quotas → AWS Organizations → Default maximum number of accounts.
3. The email address is already associated with an AWS account - Every account needs a unique root email. Use a plus-alias or a new distribution list.
4. AccessDenied ... with an explicit deny in a service control policy in a member account - Working as designed. Find the SCP with Policies → the OU → Service control policies, and remember the management account is exempt - test SCPs from a member account.
5. All API calls in member accounts suddenly fail with AccessDenied - Someone detached FullAWSAccess or attached an allow-list SCP that forgot a service. Re-attach FullAWSAccess at the root first, then fix the custom SCP.
6. Switch role fails with Invalid information in one or more fields - Wrong account ID or role name, or you are trying from an account the role does not trust. Invited accounts have no OrganizationAccountAccessRole until you create it.
7. You cannot create a policy of this type because the policy type is not enabled - Enable SCPs under Policies → Service control policies → Enable (needs all-features mode).
8. HandshakeConstraintViolationException: ... all features ... must be enabled when inviting -** The invited account is already in another organization, or your organization is in consolidated-billing-only mode. Leave the other org first / enable all features.
9. Cannot remove account: the account must have a payment method when removing a member account -** A leaving account must stand on its own - add a credit card and complete the sign-up steps in that account first.
10. Identity Center shows No access on the portal - The user has no assignment for any account. Assign a permission set under Multi-account permissions → AWS accounts.
13. Conclusion
To summarise Part-2 -
- Use multiple accounts - the account is the strongest isolation boundary AWS has - and manage them with AWS Organizations from an empty management account.
- Create accounts with plus-addressed emails (
OrganizationAccountAccessRolegets created for you) or invite existing ones. - Group accounts into OUs by how they should be governed, and attach SCPs as guardrails - deny-only, inherited, tested on one account first, and binding even on account admins.
- Consolidated billing is automatic; delegated administrators keep humans out of the management account.
- Put IAM Identity Center on top for one login, short-lived credentials and permission sets across all accounts - and consider Control Tower to automate the whole landing zone.
The official references are the Organizations User Guide, the SCP documentation and the Identity Center getting started guide. Next up is the mechanism behind "switch role" - Part-3, AWS assume IAM role.
More videos on this topic - AWS Organizations and organizational units from my 2024 Solutions Architect series, and the AWS Resource Access Manager demo for sharing resources across the accounts -
AWS step by step series -
- Part-1 : AWS IAM user - create a user, group, policy, access keys and MFA
- Part-2 : AWS Organizations - multi-account setup, OUs and SCPs
- Part-3 : AWS assume IAM role - trust policy, switch role in console and CLI
- Part-4 : How to launch an EC2 instance - key pair, security group, SSH
- Part-5 : AWS VPC - public and private subnets, Internet Gateway, NAT Gateway, route tables
- Part-8 : EC2 launch template - versions, default version, source template, SSM parameter AMI
- Part-10 : EC2 Auto Scaling - launch template, Auto Scaling group, target tracking, ALB
- Part-11 : AWS WAF - web ACL, managed rules, rate limiting, geo blocking
- Part-12 : AWS VPC Peering - connect two VPCs, routes, security groups, DNS
- Part-13 : AWS Transit Gateway - hub-and-spoke for many VPCs and on-premises
- Part-14 : AWS NAT Gateway deep dive - public vs private, limits, cost, troubleshooting
- Part-15 : Amazon Route 53 - hosted zones, records, alias, routing policies, health checks
- Part-16 : AWS security groups - inbound and outbound rules, stateful, referencing, quotas
- Part-16 : AWS Certificate Manager - free TLS certificates for ALB, CloudFront and API Gateway
- Part-17 : AWS Lambda - function URLs, environment variables and layers
- Part-18 : Network Load Balancer - setup, and ALB vs NLB
- Part-19 : VPC endpoints - gateway and interface endpoints (PrivateLink) instead of NAT
- Part-20 : AWS PrivateLink - publish your own service with an endpoint service and NLB
- Part-20 : Amazon EBS volumes - types, attach, mount, resize, snapshots, encryption
- Part-21 : VPC Flow Logs - CloudWatch Logs, S3, record format, Logs Insights, Athena
- Part-21 : EC2 Spot Instances - pricing, interruptions, mixed instances groups
- Part-24 : AWS Control Tower - landing zone, controls, Account Factory, Identity Center
Networking fundamentals -
- What is a VPC and a subnet? AWS networking in five minutes
- What is CIDR? Calculate IP ranges for VPCs and subnets
- What is NAT? Static NAT, dynamic NAT and PAT explained
More AWS guides -
- What is AWS CloudFormation? Templates, stacks, change sets, drift, StackSets
- Learn AWS S3 - the complete course
- AWS API Gateway - REST API with Lambda, authorizers, Terraform
- AWS Advanced Networking Specialty (ANS-C01) - course companion
- AWS ECS and Fargate - how to deploy a Docker container
- AWS S3 - how to host a static website
- Terraform create EC2 instance on AWS
- Terraform AWS IAM - users, roles and policies
- Terraform and AWS multi-account setup
- Terraform - setting up an ALB and SSL
Posts in this series
- Amazon EBS Volumes Step by Step - Volume Types Compared (gp3, gp2, io2 Block Express, st1, sc1), Create, Attach, Format and Mount a Volume, Resize Without Downtime, Snapshots, Encryption, Multi-Attach, Pricing and Troubleshooting (AWS Part-20)
- Amazon Route 53 Step by Step - Hosted Zones, Record Types, Alias Records, Point a Domain at an ALB, Routing Policies (Weighted, Latency, Failover, Geolocation), Health Checks, Private Zones and Pricing (AWS Part-15)
- AWS Advanced Networking - Free 8-Hour Full Course Companion (VPC, NAT Gateway, Bastion, ALB, NLB, WAF, VPC Peering, Transit Gateway, VPC Endpoints and PrivateLink, Route 53, ACM) with Timestamps and the ANS-C01 Exam Facts
- AWS Assume IAM Role Step by Step - Trust Policy vs Permissions Policy, Switch Role in the Console, aws sts assume-role, CLI Profiles, Cross-Account Access, MFA and External ID (AWS Part-3)
- AWS Certificate Manager (ACM) Step by Step - Request a Free TLS Certificate, DNS Validation with Route 53, Attach It to an ALB HTTPS Listener, Redirect HTTP to HTTPS, CloudFront and API Gateway, Auto-Renewal, Exportable Certificates and ACME (AWS Part-16)
- AWS Control Tower Step by Step - Set Up a Landing Zone, Security OU with Log Archive and Audit Accounts, Controls (Guardrails), Region Deny, IAM Identity Center, Account Factory and Enrolling Existing Accounts (AWS Part-24)
- AWS EC2 Auto Scaling Step by Step - Launch Template, Auto Scaling Group Across Two AZs, Target Tracking Policy, Application Load Balancer, Health Checks and Instance Refresh (AWS Part-10)
- AWS EC2 Launch Template Step by Step - Create a Template, Versions and the Default Version, Source Template, Create From a Running Instance, Systems Manager Parameter Instead of an AMI ID, Launch Templates vs Launch Configurations, IAM Guardrails, CLI and Terraform (AWS Part-8 and Part-17)
- AWS EC2 Spot Instances Step by Step - How Spot Pricing Works, Launch a Spot Instance, Interruptions and the Two-Minute Notice, Rebalance Recommendations, Stop vs Hibernate vs Terminate, Spot in Auto Scaling Mixed Instances Groups, Billing Rules, Best Practices, CLI and Terraform (AWS Part-21)
- AWS IAM User Step by Step - Create a User, User Group, Attach Policies, Access Keys, MFA and Sign-in URL (AWS Part-1)
- AWS Lambda Step by Step - Create a Function, Function URL (HTTPS Endpoint Without API Gateway), Environment Variables, Lambda Layers for Python Dependencies, Versions and Aliases, Limits, Pricing and Errors (AWS Part-17)
- AWS NAT Gateway Deep Dive - How It Works, Public vs Private NAT Gateway, Setup Step by Step, Limits (55,000 Connections, 100 Gbps), CloudWatch Metrics, Cost Optimisation, NAT Instance Comparison and Troubleshooting (AWS Part-14)
- AWS Network Load Balancer Step by Step - Create an NLB with Static IPs, Target Groups, TCP and TLS Listeners, Security Groups, Client IP Preservation, Cross-Zone Load Balancing, and ALB vs NLB Explained (AWS Part-18)
- AWS Organizations Step by Step - Multi-Account Setup, Organizational Units, Service Control Policies (SCPs), Consolidated Billing and Identity Center (AWS Part-2)
- AWS PrivateLink Step by Step - Publish Your Own Service with a VPC Endpoint Service and Network Load Balancer, Allow Consumers, Accept Connections, Private DNS Name, Cross-Account and Cross-Region, Pricing and Troubleshooting (AWS Part-20)
- AWS Security Groups Step by Step - Inbound and Outbound Rules, Stateful Behaviour, Referencing Security Groups, the Three-Tier ALB-Web-DB Pattern, Quotas, Security Group vs Network ACL, CLI and Terraform (AWS Part-16)
- AWS Transit Gateway Step by Step - Connect Many VPCs and On-Premises Through One Hub, VPC Attachments, Transit Gateway Route Tables, Associations and Propagations, Isolation, Peering, Pricing (AWS Part-13)
- AWS VPC Endpoints Step by Step - Gateway Endpoints for S3 and DynamoDB, Interface Endpoints (PrivateLink) for SSM, ECR and Other Services, Private DNS, Endpoint Policies, Security Groups, Cost vs NAT Gateway, and Troubleshooting (AWS Part-19)
- AWS VPC Flow Logs Step by Step - Enable Flow Logs for a VPC, Subnet or Network Interface, Publish to CloudWatch Logs or S3, Read a Flow Log Record Field by Field, Custom Formats, Query with Logs Insights and Athena, Find Rejected Traffic, Pricing and Limitations (AWS Part-21)
- AWS VPC Peering Step by Step - Connect Two VPCs (Same or Different Account and Region), Accept the Request, Add Routes, Security Groups, DNS Resolution, Test with EC2, and the Limits (AWS Part-12)
- AWS VPC Step by Step - Create a VPC with Public and Private Subnets, Internet Gateway, NAT Gateway and Route Tables (and Test It with EC2) (AWS Part-5)
- AWS WAF Step by Step - Create a Web ACL, Attach It to an ALB or API Gateway, AWS Managed Rules, Rate-Based Rules, Geo Blocking, IP Sets, Count Mode and Logging (AWS Part-11)
- How to Launch an EC2 Instance on AWS Step by Step - AMI, Instance Type, Key Pair, Security Group, Connect with SSH or EC2 Instance Connect, Stop vs Terminate (AWS Part-4)
- What is an AWS VPC and a Subnet? Virtual Private Cloud Explained in Five Minutes (Region, Availability Zones, Public vs Private Subnets, Gateways, Route Tables)
- What is AWS CloudFormation? Templates, Stacks and Change Sets Explained, Template Anatomy Section by Section, Create Your First Stack Step by Step, Update With a Change Set, Drift Detection, Nested Stacks and StackSets, Quotas, Pricing, CLI, and CloudFormation vs Terraform
- What is CIDR (Classless Inter-Domain Routing)? How to Calculate IP Ranges for VPCs and Subnets, with Examples (/8, /16, /24, /28, /32)
- What is NAT (Network Address Translation)? How It Works, Static NAT vs Dynamic NAT vs PAT, the Translation Table, and Where NAT Shows Up in AWS
- AWS API Gateway Tutorial - REST API with Lambda Proxy and Non-Proxy Integration, Request Validation, HTTP API vs REST API, Resource Policies, Lambda Authorizers and Terraform
- Learn AWS S3 - The Complete Course (Buckets, Objects, Storage Classes, Lifecycle, Versioning, Security Defaults, Bucket Policies, Static Hosting, CLI and Terraform)
- How to release(delete) Elastic IP from AWS?
- Fix docker login 'error saving credentials: error storing credentials - err: exit status 1' (AWS ECR on macOS, Windows, Linux and WSL)